Come creare il tuo server VPN con OpenVPN e Debian, come montare la tua VPN su un server – Numerama
Come montare la tua VPN su un server
Contents
- 1 Come montare la tua VPN su un server
- 1.1 Debian 11 e OpenVPN: come creare il tuo server VPN ?
- 1.2 Ii. Installazione del server OpenVPN su Debian 11
- 1.3 Iii. Testare la connessione VPN
- 1.4 Iv. Conclusione
- 1.5 Come montare la tua VPN su un server
- 1.6 Installa una VPN fatta in casa su un Raspberry Pi
- 1.7 Installa una VPN su una macchina virtuale installando Algo VPN
- 1.8 Passa attraverso le soluzioni chiavi in mano degli ospiti
- 1.9 Facile, ma limitato
- 1.10 Un buon fornitore VPN è più semplice
Per impostare un server VPN in base a OpenVPN, ci sono diverse soluzioni: appoggiarsi a un firewall come PfSense, utilizzare una macchina Linux, utilizzare una macchina Windows, ecc. Oggi siamo interessati all’implementazione su una macchina Linux, in questo caso sotto Debian 11.
Debian 11 e OpenVPN: come creare il tuo server VPN ?

In questo tutorial, impareremo a configurare un server VPN in Debian 11 con OpenVPN, con l’obiettivo di creare un server VPN su cui faremo affidamento su Internet. Questo tutorial è ideale se si desidera impostare il tuo server VPN, su un server VPS nel cloud a Ovhcloud o altro. Pertanto, una macchina client remota può connettersi al server OpenVPN per accedere a Internet sfruttando la connessione del server OpenVPN, ma anche all’infrastruttura remota, sia che si tratti del server VPN stesso o di un altro server della stessa rete. In effetti, questo principio si basa sull’implementazione di una VPN “client-to-site”.
Come promemoria, VPN significa VIrtual PRivate NONEbork E l’obiettivo di una VPN è semplice: La VPN creerà un collegamento virtuale tra due punti, Ad esempio tra due reti aziendali (sito VPN a sito) o tra un PC cliente e una rete aziendale (cliente VPN sul sito). All’interno di questo link, che si chiama un tunnel, I dati saranno quantificato E isolato dal resto del traffico, questo è tutto l’interesse di VPN e questa nozione di “privato”. Al giorno d’oggi, le VPN per uso personale sono molto popolari per aggirare la censura, nascondere la tua navigazione su Internet, ecc.
Per impostare un server VPN in base a OpenVPN, ci sono diverse soluzioni: appoggiarsi a un firewall come PfSense, utilizzare una macchina Linux, utilizzare una macchina Windows, ecc. Oggi siamo interessati all’implementazione su una macchina Linux, in questo caso sotto Debian 11.
Ecco alcune informazioni sull’infrastruttura del giorno:
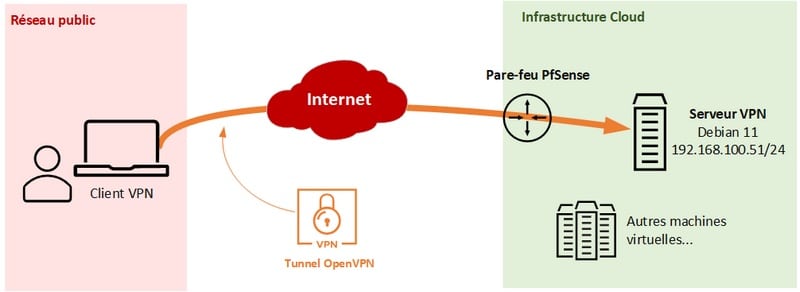
Esistono diverse possibili architetture, tra cui:
- Il server OpenVPN ha un indirizzo IP pubblico (caso di un VPS), quindi ci connettiamo direttamente al suo indirizzo IP pubblico
- Il server OpenVPN è mascherato dietro un router / firewall, e quindi dietro un NAT. Risultato, ci connettiamo all’indirizzo IP pubblico dell’apparecchiatura (router/firewall) e grazie a una regola di reindirizzamento della porta, ci colleghiamo alla nostra VPN – Sono in questo caso, come parte di questa demo
Una volta connesso a VPN dal client VPN, tutto il traffico passa attraverso VPN e lascia attraverso la connessione Internet del server OpenVPN.
Ii. Installazione del server OpenVPN su Debian 11
Potremmo configurare manualmente il server OpenVPN e passo dopo passo sul nostro server Debian 11. Tuttavia, useremo uno script di installazione che consentirà di distribuire un server VPN molto facilmente e rapidamente. Questa sceneggiatura, Debian compatibile, Rocky Linux, Fedora, Ubuntu, ecc. è disponibile su GitHub: puoi rivedere il suo codice a volontà.
Cos’è questa installazione ? Questa sceneggiatura è molto pratica, ma cosa farà sulla macchina ?
- Su una macchina Debian, installerà i seguenti pacchetti: OpenVPN, iptables, OpenSSL, WGET, CA-QUERIFICATI, CURL, INCONOUND
- Configura OpenVPN tramite il file di configurazione:/etc/openvpn/server.confuso
- Configurare iptables sul server per consentire i flussi
- Attiva il routing sul server VPN (“SySctl Net.IPv4.ip_forward = 1 “in /etc /systeml.D/ 99 -openvpn.confuso )
Oltre a installare OpenVPN Server, lo script si baserà su un PKI locale per generare un certificato essenziale per il corretto funzionamento di VPN.
Prima di iniziare, assicurarsi che il tuo server VPN sia ben connesso a Internet e abbia un indirizzo IP fisso.
HA. Scarica lo script di installazione
Connettiti al tuo futuro server VPN e inizia aggiornando la cache del pacchetto. Ne cogliemo anche l’occasione per installare Curl.
Sudo apt-get aggiornamento sudo apt-get installa curl
Quindi scarica lo script di installazione con Curl:
Curl -o https: // raw.githubusent.com/Angristan/OpenVPN-Install/Master/OpenVPN-Install.sh
Non appena lo script viene scaricato, è necessario aggiungere i diritti di esecuzione per poterlo eseguirlo in seguito:
Chmod +x openvpn-install.sh
Quindi eseguire lo script per avviare la configurazione passo dopo passo del server OpenVPN:
sudo ./OpenVPN-Install.sh
B. Configurare la VPN
Il messaggio “Benvenuto tonnellata L’installazione OpenVPN!”Gli effetti e le fasi di configurazione saranno collegati. Prima di tutto, è necessario Indicare l’indirizzo IPv4 del server VPN, Ma la buona notizia è che torna automaticamente. Se è l’indirizzo IP locale, significa che esiste un NAT e in questo caso, è logico. Altrimenti, l’indirizzo IP pubblico del tuo server, ad esempio del server VPS, verrà visualizzato qui. Qui, la sceneggiatura torna bene “192.168.100.51 “Convalida.

Oltretutto, Lo script rileva la presenza di NAT e indica l’indirizzo IP pubblico. Basta convalidare, a meno che tu non voglia specificare un nome di dominio specifico o correggere le informazioni sollevate dallo script (che si basa su Curl per recuperare il proprio IP pubblico).

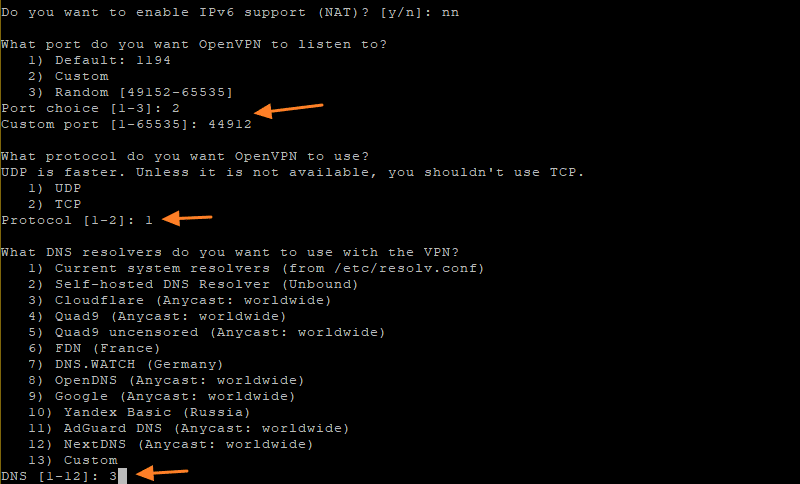
È richiesto se si desidera attivare il supporto IPv6, è possibile indicare “N” per rifiutare.
- Quale porta vuoi che OpenVPN elenca?
Quindi devi scegliere la porta su cui ascolterà il server VPN. Per impostazione predefinita, questa è la porta 1194, ma ti consiglio di utilizzare una porta personalizzata per nascondere la tua VPN (È possibile utilizzare una porta utilizzata da un altro protocollo (esempio: 443/https) per passare più facilmente attraverso determinati firewall).
Per definire una porta personalizzata, indicare “2”, quindi indicare il numero di porta. Ad esempio “44912” nel mio esempio.
- Che protocollo vuoi che OpenVPN usi ?
OpenVPN è più veloce con il protocollo di trasporto UDP e inoltre è la sua modalità operativa predefinita. Ti incoraggio a rimanere su UDP, a meno che tu non provi a passare attraverso un firewall: se usi la porta 443, è più coerente usare TCP per fare come HTTPS !
- Cosa vuoi usare con la VPN ?
Una volta connesso a VPN, quale server VPN si desidera utilizzare per la risoluzione dei nomi. Puoi scegliere un server personalizzato con scelta 13 o sceglierne uno dall’elenco che indica il tuo numero.
Così tanto per la prima serie di domande. Andiamo dopo.
- Vuoi usare la compressione ?
Lo script consiglia di non usare la compressione, perché viene utilizzato dagli attacchi Voracle. Indicare “n” e convalidare.
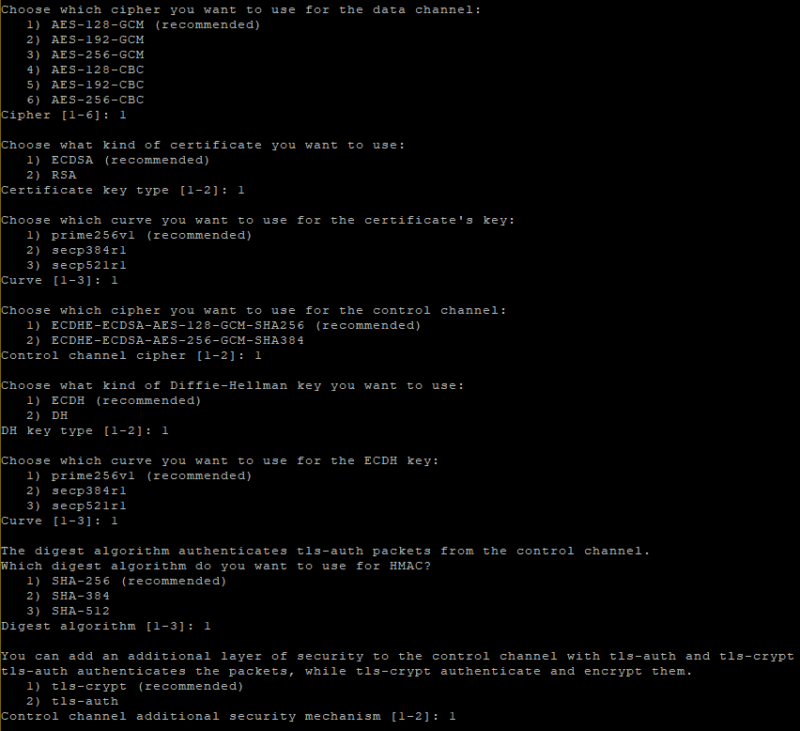
- Personalizza le impostazioni di crittografia ?
Lo script è già preconfigurato per utilizzare alcuni parametri per la crittografia del tunnel VPN e la sua sicurezza nel suo insieme. Hai la possibilità di definire i tuoi parametri indicando “y”, altrimenti fai solo “n”.

Di seguito, ecco le diverse opzioni offerte (nonché le scelte consigliate e corrispondenti alla configurazione automatica) per coloro che decidono di personalizzare le opzioni di crittografia.
La prima parte dell’interrogatorio è finita ! Finora, la sceneggiatura non ha ancora cambiato la macchina locale. D’altra parte, in questo momento preciso se si preme il tasto “Invio” (o un altro tocco), l’installazione del server OpenVPN avrà inizio.
![]()
Vs. Creazione di un primo cliente
Seguendo la configurazione del server VPN, l’installazione tramite lo script continua con la creazione di un primo cliente VPN. Indica il nome del PC che utilizzerà la VPN (solo per trovare la tua strada), per esempio “PC-FLO“”. Quindi la domanda “Vuoi proteggere il file di configurazione con una password?“Visualizzato, indica” 2 “per sì per Definire una password che sarà necessaria per stabilire la connessione VPN.

Ciò genererà un file di configurazione OVPN nel profilo utente in uso. Qui, sono connesso come root in modo che la configurazione sia generata in “/root/”. Da un punto di vista del server VPN, l’aggiunta di questo cliente genererà due file:
- Il certificato del cliente in /etc/openvpn/easy-rsa/pki/emesso/.Crt
- La chiave privata per il cliente in /etc/openvpn/easy-psa/pki/private/.Chiave
Nota : In qualsiasi momento, è possibile modificare la configurazione del server OpenVPN modificando il file di configurazione: /etc/openvpn/server.confuso
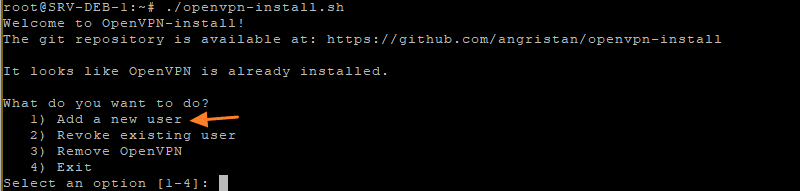
D. Aggiungi un nuovo cliente OpenVPN
In qualsiasi momento, puoi aggiungere un nuovo cliente puro che ogni macchina che si collega ha il proprio certificato. Sia per Aggiungi o elimina un nuovo cliente, basta eseguire eseguire lo script e fare la scelta “1”.
sudo ./OpenVPN-Install.sh
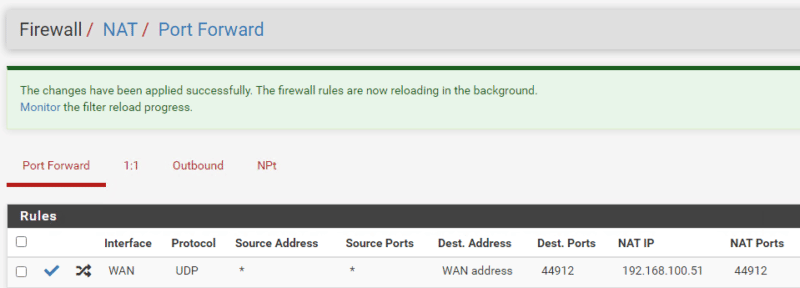
E. In modalità NAT: la regola del reindirizzamento della porta
In modalità NAT, vale a dire con un server VPN collegato dietro un router/firewall in cui è attivato il NAT, dovrai Crea una regola di reindirizzamento della porta. Altrimenti, i flussi per l’indirizzo IP pubblico sulla porta 44912 non verranno reindirizzati al server VPN.
- Se questi concetti sono sfocati per te: Nat e Pat per i principianti
Pertanto, sul mio firewall, creo una regola per reindirizzare i flussi UDP/44912 per il mio indirizzo IP pubblico per il server VPN (192.168.100.51).
Iii. Testare la connessione VPN
Il file di configurazione generato in precedenza (/Root/pc-flo.Ovpn) nel profilo utente deve essere trasferito al computer che deve connettersi a VPN. Se sei su Windows, puoi usare WinSCP o SCP e sotto Linux puoi usare SCP.
HA. Su Windows
Su Windows, dovrai installare OpenVPN GUI o OpenVPN Connect. Personalmente, uso OpenVPN GUI Quindi devo copiare e incollare il file OVPN nella seguente directory:
C: \ Programmi \ OpenVpn \ config
Quindi, nel mio client VPN, posso vedere apparire la mia nuova connessione VPN che prende il nome di quello del file OVPN:
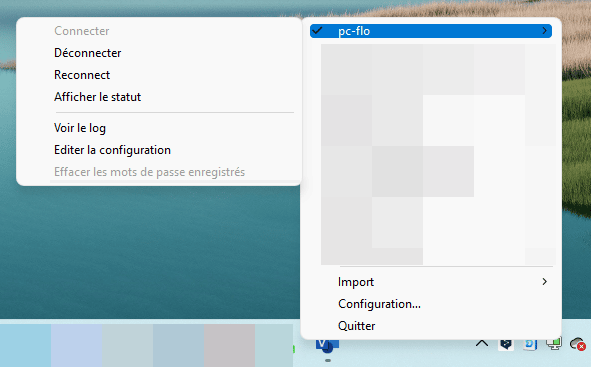
Clicking on “Collegare“, Devo Immettere la password associata al cliente “PC-FLO” Per autenticarmi con il mio certificato.
Una volta connesso, posso Accedi al mio server Debian 11 in SSH grazie al suo indirizzo IP locale, sapere “192.168.100.51“”. Posso anche accedere agli altri server nella mia infrastruttura remota. Se accedo a Internet, passo attraverso la mia VPN e quindi uso la mia connessione Internet VPN !
Sul lato di Windows, guardando la configurazione IP della mia macchina, vedo che il tunnel VPN funziona sulla rete “10.8.0.0/24“Da quando ho l’indirizzo IP”10.8.0.2/24“”. Questa sottorete è definita nel file “/etc/openvpn/server.Conf “dal server VPN tramite la riga” Server 10.8.0.0 255.255.255.0 “. In termini di server DNS, quelli di CloudFlare sono definiti (1.0.0.1 e 1.1.1.1) e che avevo scelto durante la configurazione iniziale.

B. Su Linux
Se il post del tuo cliente, che dovrebbe utilizzare la VPN, è sotto Linux, è possibile installare OpenVPN tramite questo comando:
Sudo apt-get installa openvpn
Quindi il file di configurazione OVPN deve essere depositato in questa posizione:
/etc/openvpn/cliente/
Per attivare una connessione in base a questo file di configurazione, sarà sufficiente per fare:
OpenVPN-Client-Config/etc/OpenVPN/Customer/PC-Flo.Ovpn
Vs. Giornali sul server VPN
La connessione della posizione del cliente è visibile sui giornali del server VPN, eseguendo l’ordine seguente.
JournalCtl-Identificazione OVPN-Server
Ad esempio, quando si collegano dal mio post sul cliente di Windows, sono visibili i seguenti giornali:
SRV-DEB-1 OVPN-Server [436393]: multi_init chiamato, r = 256 V = 256 SRV-DEB-1 OVPN-Server [436393]: Pool ifconfig IPv4: base = 10.8.0.2 dimensioni = 252 SRV-DEB-1 OVPN-Server [436393]: elenco del pool ifConfig SRV-DEB-1 OVPN-Server [436393]: sequenza di inizializzazione completata SRV-DEB-1 OVPN-Server [436393] ::: 53471 Canale in uscita: ' AES-256-CTR 'inizializzato con tasto da 256 bit srv-deb-1 ovpn-server [436393] :: 53471 Crittico del canale di controllo in uscita: utilizzando un messaggio da 256 bit hash' sha256 'per hmac autenticazione srv-deb-1 ovpn-server- Server [436393] :: 53471 Crittico del canale di controllo in entrata: cifera "AES-256-CTR" inizializzato con 256 bit Key SRV-DEB-1 OVPN-Server [436393] ::: 53471 Canale di controllo in arrivo in arrivo: Utilizzo di 256 bit hash ' Sha256 'per autenticazione HMAC SRV-DEB-1 OVPN-Server [436393] :: 53471 TLS: pacchetto iniziale da [Af_inet] 89.87.49.50: 53471, SID = EB971C1D A6A6884B SRV-DEB-1 OVPN-Server [436393] :: 53471 Verificare OK: Profondità = 1, CN = CN_UIEY50OEG1ZHZHNLA8 SRV-DEB-1 OVPN-toer [436393]:, Cn = pc-flo SRV-DEB-1 OVPN-Server [436393] :: 53471 INFO peer: iv_ver = 2.5.6 SRV-DEB-1 OVPN-Server [436393] :: 53471 Informazioni peer: Iv_plat = win SRV-DEB-1 OVPN-Server [436393] :: 53471 INFO peer: IV_Proto = 6 SRV-DEB-1 OVPN-Server [436393] ::: 53471 INFO peer: IV_NCP = 2 SRV-DEB-1 OVPN-Server [ 436393] :: 53471 INFO peer: IV_ciphers = AES-256-GCM: AES-128-GCM SRV-DEB-1 OVPN-Server [436393] ::: 53471 Informazioni peer: IV_LZ4 = 1 SRV-DEB-1 OVPN-Server [436393] :: 53471 INFO peer: iv_lz4v2 = 1 srv-deb-1 ovpn-server [436393] :: 53471 peer info: iv_lzo = 1 srv-deb-1 ovpn-server [436393] :: 53471 = 1 SRV-DEB-1 OVPN-Server [436393] :: 53471 INFO peer: IV_COMP_SBV2 = 1 SRV-DEB-1 OVPN-SERVER [436393] ::: 53471 Informazioni peer: iv_tcpnl = 1 srv-deb-1 ovpn- Server [436393] :: 53471 Informazioni peer: iv_gui_ver =OpenVPN_GUI_11 SRV-DEB-1 OVPN-Server [436393] :: 53471 INFO peer: IV_SSO = OpenUrl, Crtext SRV-DEB-1 OVPN-Server [436393] :: 53471 Canale di controllo: TLSV1.3, Cipher TLSV1.3 TLS_AES_256_GCM_SHA384, 256 bit EC, Curva: Prime256v1 SRV-DEB-1 OVPN-Server [436393] :: 53471 [PC-FLO] Connessione peer avviata con [AF_INET] : 53471
Inoltre, puoi visualizzare le regole iptable con il comando seguente:
iptables -t nat -l -n -v
Questo comando dovrebbe consentirti di vedere che la catena post -ft contiene questa riga:
2200 971k Masquerade All - * Ens192 10.8.0.0/24 0.0.0.0/0
Una linea essenziale per i flussi VPN da trasportare e trasportare correttamente.
Iv. Conclusione
Questo tutorial sta per finire: abbiamo appena visto un modo semplice per Imposta un server OpenVPN in Debian 11 Utilizzando questo superbo script di installazione. Mi sono preso il tempo di spiegarti cosa stava facendo la sceneggiatura in modo da poter capire cosa stai facendo, allo stesso tempo. Sappi che ci sono molte possibili configurazioni per l’implementazione di una VPN con OpenVPN.
Per impostare una VPN per connettersi a un’infrastruttura completa, ti consiglio di impostare sul tuo firewall per poter gestire i flussi direttamente a questo livello. Sarà più facile autorizzare solo determinati protocolli nel tunnel VPN o consentire i flussi solo a determinati host. D’altra parte, per una VPN che usi per uso personale, per bypassare la censura, ad esempio, questa soluzione è l’ideale.
Condividi questo articolo 


- ← Text4Shell precedente: un difetto di sicurezza critico nella libreria di testo Apache Commons
- Più di 20 milioni di download accumulati per questi malware e le prossime applicazioni Android →
Florian Burnel
Ingegnere di sistema e rete, co-fondatore di IT-Connect e Microsoft MVP “Cloud and Datacenter Management”. Voglio condividere la mia esperienza e le mie scoperte attraverso i miei articoli. Generalista con una particolare attrazione per Microsoft Solutions and Scripting. Buona lettura.
Florian ha 4966 posti e conteggio.Guarda tutti i post di Florian
Come montare la tua VPN su un server
Poiché il funzionamento di una VPN si basa su server, protocolli di rete e tecnologie di sicurezza complesse, il montaggio della propria VPN può sembrare fuori portata del semplice mortale. È davvero il caso ? Abbiamo provato a impostare la nostra VPN su un server noi stessi.
È così difficile che imposti il tuo servizio VPN ? Ed è l’operazione redditizia rispetto a un servizio VPN “pronto per l’uso”, come ExpressVPN ? Per rispondere, ci mettiamo nei panni di un potenziale utente e abbiamo iniziato esplorando il web. La letteratura sull’argomento non si arrende, ma ciò che è certo è che ci sono dozzine di modi per realizzare una VPN fatta in casa, a gradi di difficoltà molto diverse.
Per questo articolo, ne abbiamo mantenuti tre e spiegheremo in dettaglio il metodo più “semplice”. Allevare la tua VPN da soli non richiede necessariamente una grande conoscenza del computer. D’altra parte, devi avere tempo davanti a te stesso e non aver paura di mettere le mani nel citch.
Installa una VPN fatta in casa su un Raspberry Pi
Piratelab ha pubblicato un lungo tutorial molto dettagliato in francese per installare una VPN su un Raspberry Pi. Questo è il metodo che richiede il maggior numero di prerequisiti: Configurazione di Raspberry Pi, la casella Internet quindi applicazioni. Il principio è trasformare il piccolo computer che è il Raspberry Pi in un server VPN che ti configureremo. Collegandosi ad esso, passerai quindi attraverso l’indirizzo IP del tuo Raspberry Pi e beneficerai della connessione Internet (e dell’IP associato) a cui è connesso (per esempio quello della tua casa). Se si tratta di una connessione in fibra, il flusso sarà eccellente, ma se è una connessione ADSL, sarai meccanicamente limitato.

Installa una VPN su una macchina virtuale installando Algo VPN
Se non hai davvero paura delle righe di comando su una macchina virtuale, allora la soluzione Algo VPN è per te. Questa è una soluzione VPN molto facile da installare (ma molto meno da configurare), open source, che consente di installare una VPN (con wireguard o protocolli IPSEC) su molte macchine virtuali. Lo sviluppatore americano Lenny Zeltser ha scritto un tutorial molto completo in inglese su questo argomento sul suo blog.
Passa attraverso le soluzioni chiavi in mano degli ospiti
Ma la soluzione più semplice, per il grande pubblico, creare la propria VPN è passare attraverso le soluzioni “chiavi in mano” degli host. Questa è la soluzione che stiamo per i dettagli di seguito. Per usarlo faremo l’esempio della Scaleway host (altri host offrono soluzioni identiche, su OVH o DigitalOcean). Offre davvero le sue opzioni di istanza per utilizzare “Instantapps”.
Concretamente, in due clic e pochi minuti, è possibile avere un server con una distribuzione (Ubuntu ML) e un’applicazione preinstallata. L’utente deve quindi pagare il noleggio del server e configurare la propria applicazione di comando online.
Noleggia il tuo server
Per iniziare, apri un account su Scalatway. La registrazione è gratuita ma richiede di inserire un numero di carte bancarie e effettuare una pre-autorizzazione del pagamento di 2 euro. Questo è normale, stai per affittare un server e questi hanno un prezzo al mese o al minuto.
Nell’interfaccia, fare clic sull’istanza, nella barra laterale sinistra, quindi sul pulsante verde ” Crea un’istanza »». Congratulazioni, stai per impostare il tuo primo server. Viene quindi visualizzato un menu di personalizzazione del server. Al passaggio 1 (” Scegli un’immagine »), Fai clic su Instantapps, quindi scegli OpenVPN.

Qui è dove configurerai il tuo server. Abbiamo scelto di individuare il nostro server ad Amsterdam, nei Paesi Bassi. È lì che il nostro futuro indirizzo IP sarà trasferito.
Ora arriva la scelta del tipo di server. Abbiamo bisogno di un piccolo server che si occuperà di trasferire il nostro indirizzo IP e di navigare su Internet per noi. Non abbiamo bisogno di un potente server qui, il più economico farà il trucco per le esigenze di questo tutorial.
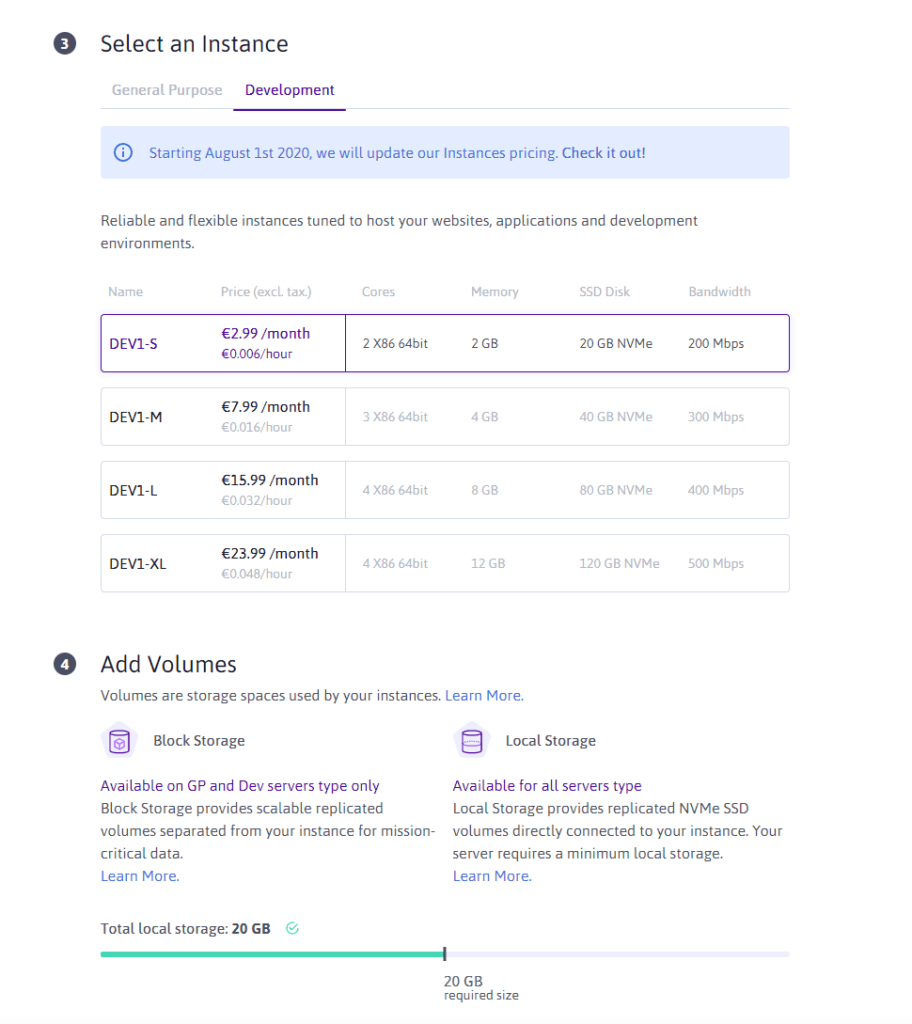
Vai alla scheda di sviluppo e prendi l’opzione più economica, che con un flusso massimo di 200 mb/s.
Devi solo dare un piccolo nome al tuo corpo e soprattutto per associarlo a una chiave SSH. Non spiegheremo come generare una chiave SSH e associarla a istanza, scaleway o OVH spiegarlo perfettamente nella loro documentazione. Per il resto di questo tutorial, passeremo attraverso il software di stucco per inserire le righe di comando.
Configurare OpenVPN
Se tutti questi passaggi vengono eseguiti, ora sei in possesso di un server su cui è installato OpenVPN. Ora dobbiamo configurare OpenVPN direttamente sul server.
Connettiti al server, tramite il terminale (su Mac e Linux) o tramite PUTTY (Windows). Quando il server ti chiede di identificarti, inserisci root. Ora configureremo OpenVPN in modo che possa identificarci sul server quando ci connettiamo con un’applicazione VPN. Più specificamente, creeremo un profilo utente.
Per iniziare, immettere il comando “root”. Il server indica che è stato installato OpenVPN e che è pronto per l’uso.
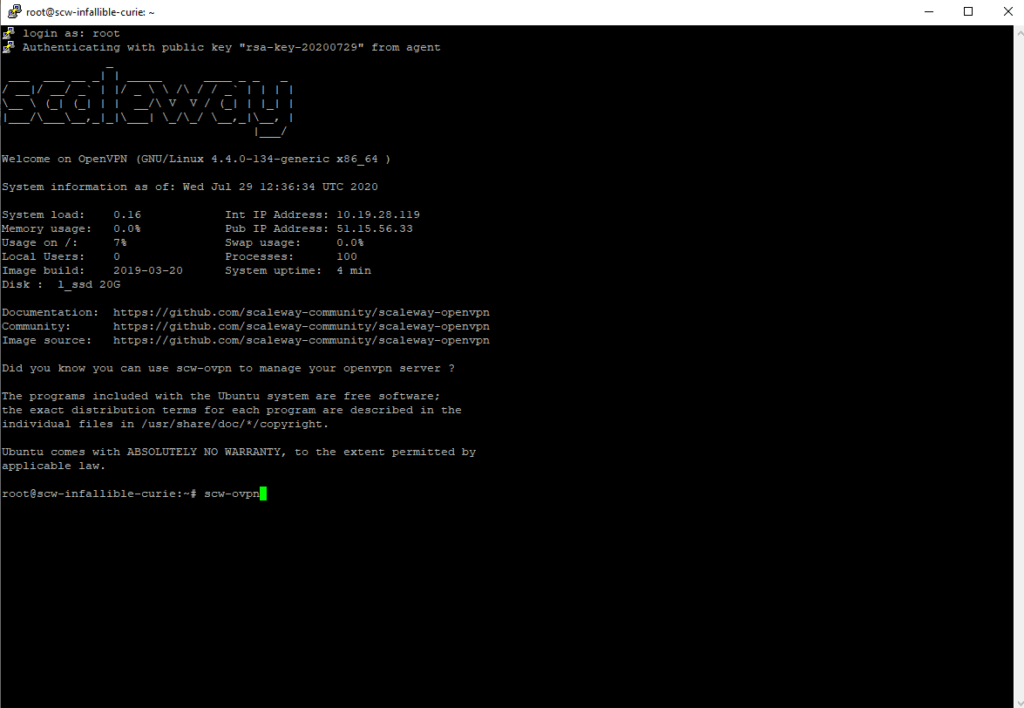
Quindi immettere il comando “SCW-OVPN”, che creerà un nuovo utente.
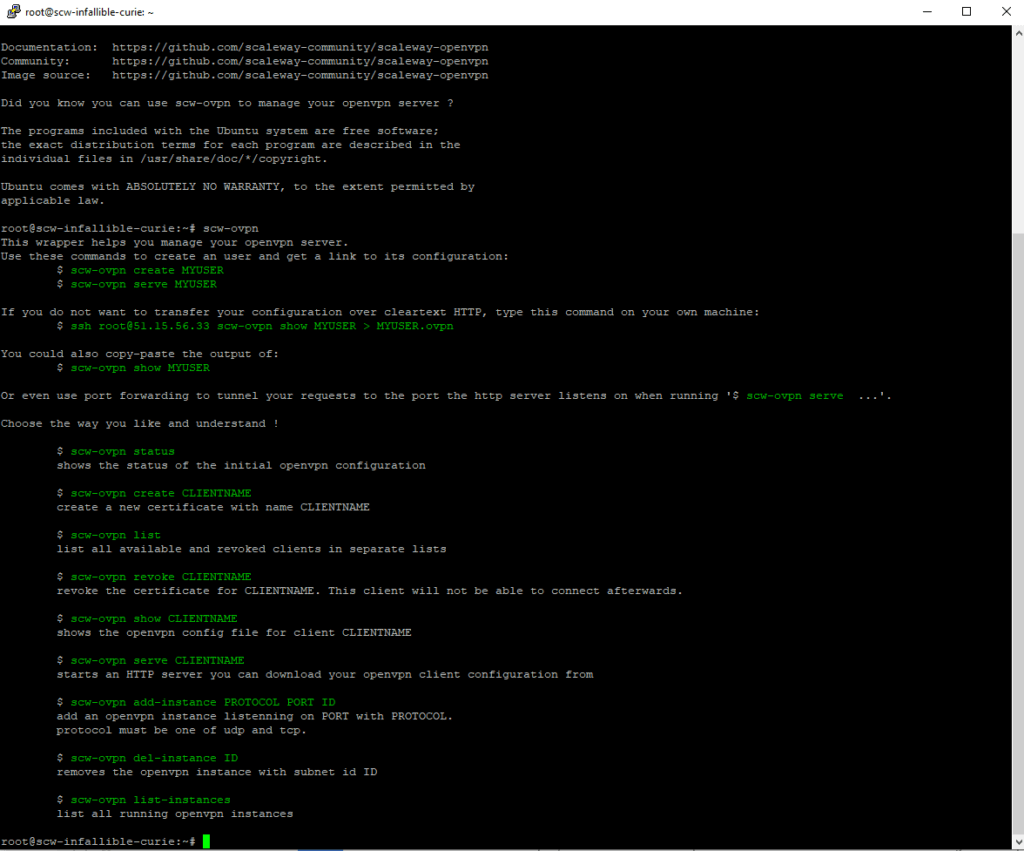
Per creare un nuovo utente, immettere il comando “SCW-OVPN Crea Nome”, o il nominilizzatore è, come suggerisce il nome, il nome dell’utente che stai per prendere. Qui abbiamo messo “Monpremiervpn”.
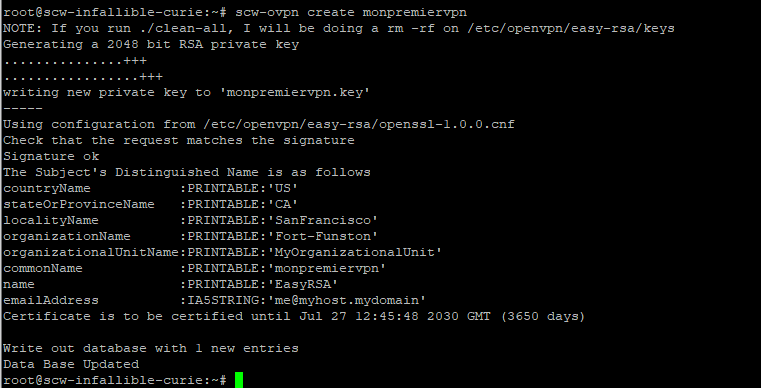
Ora che è stato creato, hai bisogno del file .OVPN che ti permetterà di identificarti sul server quando usi il cliente VPN per connetterti.
Per generare il file .OVPN Immettere il comando “SCW-OVPN SERVILIZZAZIONE”. Il server genererà quindi un collegamento che consente di scaricare il file .Ovpn.
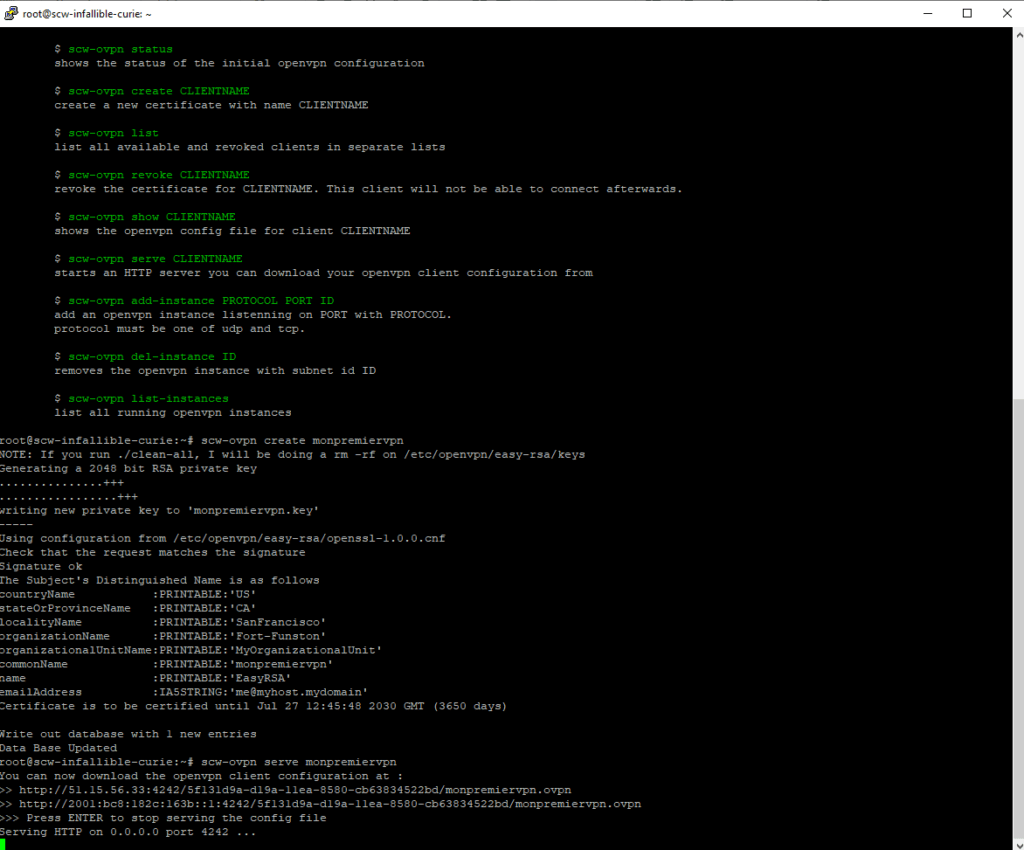
Copia il collegamento generato automaticamente da OpenVPN sul browser (o scaricalo con un comando ssh se si è una riga di comando) per scaricare il file. Si prega di notare, il collegamento è disponibile solo durante il periodo di questo ordine: non appena si preme la voce, il collegamento scadrà.
Usa un cliente VPN
Dopo aver recuperato il file .Ovpn, il più difficile è fatto. Tutto quello che devi fare è scaricare un cliente VPN. Quello di OpenVPN fa molto bene il caso. Scaricalo, quindi installalo. Quindi basta importare il file .OVPN nel cliente per connettersi al server tramite un tunnel.

Congratulazioni, hai appena messo la tua prima VPN !
Facile, ma limitato
Per rispondere alla domanda che ci interessa: no, non è molto complicato creare la tua VPN. Ma i vincoli sono numerosi e il servizio offerto al pubblico non è davvero vantaggioso rispetto a una soluzione come ExpressVPN.
Una lunga installazione
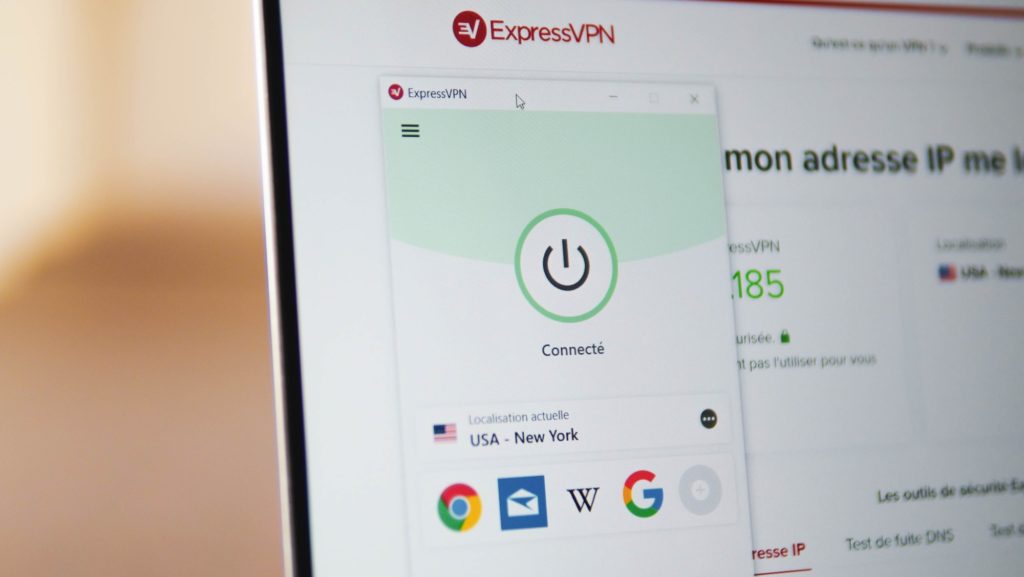
Devi effettivamente prenderti il tempo per installare diversi software (OpenVPN, PUTTY), imparare e capire come funziona una chiave SSH e aprire un account con un host. Expressvpn ha un’applicazione disponibile su un gran numero di dispositivi (computer, cellulare, ecc.), Che richiede solo tre clic per accontentarsi e che è interamente tradotto in francese.
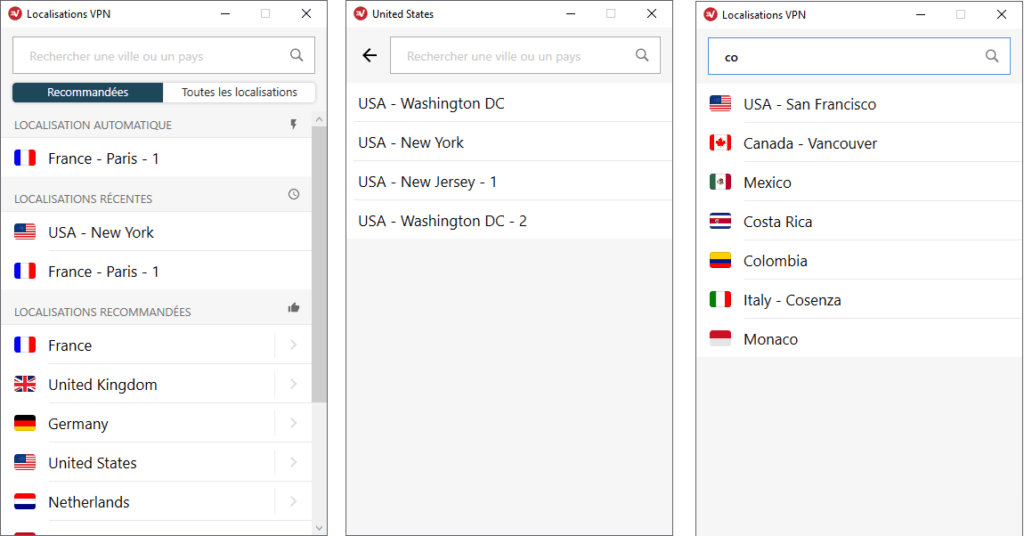
È possibile scegliere il paese in cui vogliamo connetterci e in alcuni casi, la città precisa in cui vogliamo connetterci. È anche presente un motore di ricerca.
Un prezzo poco attraente
Nel nostro esempio, Scaleway offre il suo servizio Instantapp OpenVPN al prezzo di 4,99 euro (esterni) al mese. Expressvpn offre attualmente il suo abbonamento di un anno per meno di 6 euro al mese. È quasi equivalente per una qualità del servizio molto diversa.
Caratteristiche limitate
La buona domanda da porre non è tanto sapere se è complicato creare la tua VPN quanto sapere cosa vuoi fare con la tua VPN. Nel nostro esempio, la nostra VPN si trova nei Paesi Bassi e lavora con un’applicazione di base, OpenVPN.
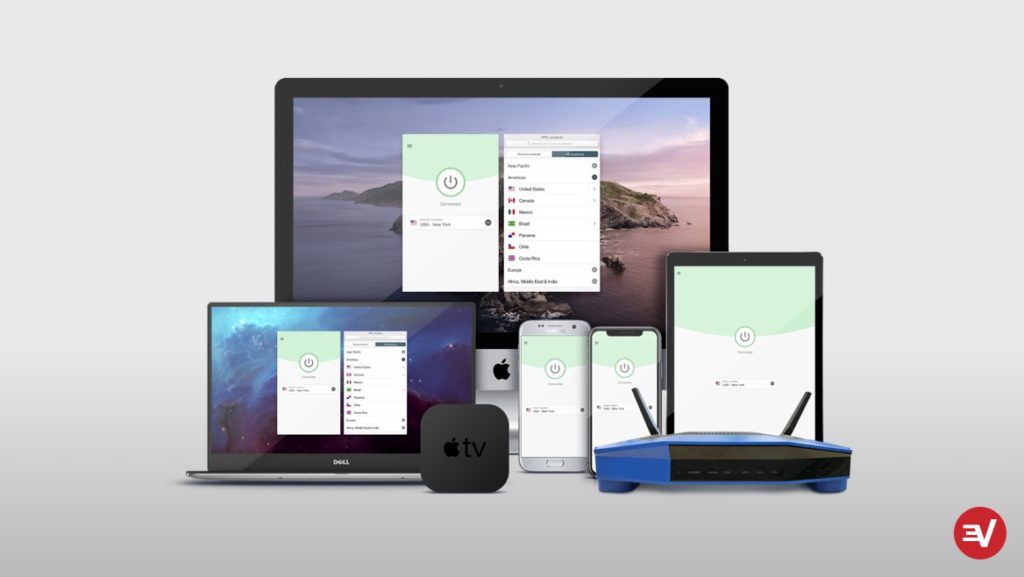
In altre parole, hai un solo server in cui ExpressVPN offre più di 3.000 in 160 posizioni diverse. Non avrai accesso a funzioni di tunneling diviso o una grande scelta di protocollo. Il flusso della nostra casa VPN è anche inferiore a quello offerto dai server Expressvpn. Infine, questo server unico situato in Europa non consentirà di accedere ai cataloghi stranieri di piattaforme SVOD.
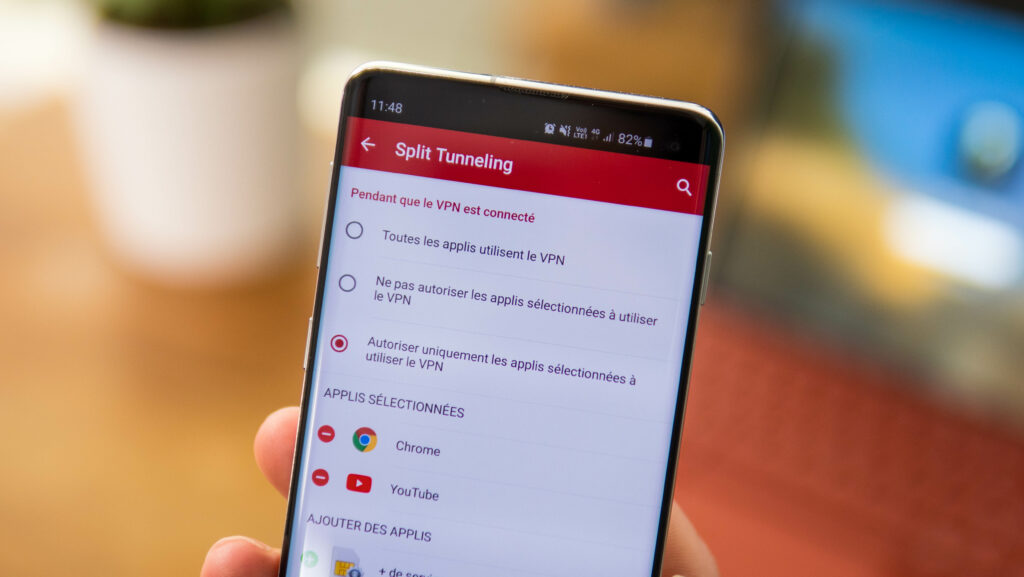
Il tunneling diviso consente di circoscrivere la connessione VPN a applicazioni specifiche.
Attualmente, pochissimi host offrono server situati negli Stati Uniti. E anche se lo facessero, l’accesso al catalogo americano di Netflix non è garantito. Con una soluzione come ExpressVPN, la domanda non sorge: basta connettersi a un server americano o canadese per accedere al catalogo straniero su cui
Un buon fornitore VPN è più semplice
In breve, se hai bisogno di una VPN con un singolo server, funzionalità limitate e non hai paura di mettere le mani nelle linee di controllo, puoi divertirti a montare la tua VPN. Se hai bisogno di una soluzione che funzioni in due clic, con migliaia di server e una forte politica sulla privacy, ExpressVPN è una delle migliori scelte del momento.
Expressvpn offre attualmente un’offerta speciale sul suo abbonamento di un anno. Questo ha tre mesi liberi. Questo abbonamento equivale quindi a meno di 6 euro al mese. Per avere un’idea della qualità del servizio, hai anche 30 giorni di test “soddisfatti o rimborsati” durante i quali puoi fermarti e far rimborsare l’abbonamento in qualsiasi momento contattando il servizio post-vendita, senza di essa non domande.

Ti chiedi qual è la migliore VPN ? La nostra selezione delle migliori VPN la risposta è nel nostro comparatore
Questo articolo è stato effettuato in collaborazione con ExpressVPN
Questo è il contenuto creato da redattori indipendenti all’interno dell’entità umanoide XP. Il team editoriale di Numerama non ha partecipato alla sua creazione. Siamo impegnati con i nostri lettori in modo che questi contenuti siano interessanti, qualitativi e corrispondono ai loro interessi.


 Ilyass Badry – 26 giugno 2023
  Condivido con te la mia brutta esperienza B la nuova Astra . Auto acquistata in mesi 10/22 Sono stato costretto a muovermi circa 9 volte il servizio dopo le scale per regolare i problemi della fotocamera 360 e aria condizionata e ora sono di fronte a un problema NV: cabina di pilotaggio e lo schermo che si spegne da solo . Hadchi Kamel e la Yalah Waslah W 5900 km sono davvero deluso .
 WAFA HH – 22 febbraio 2022
  Lei Ram – 23 febbraio 2022