Come creare una suoneria per iPhone, senza Mac o computer?, Come creare una suoneria su iPhone (senza Mac)
Come creare una suoneria su iPhone (senza Mac)
Contents
- 1 Come creare una suoneria su iPhone (senza Mac)
- 1.1 Come creare una suoneria per iPhone, senza Mac o computer ?
- 1.2 Crea la suoneria sul tuo iPhone tramite un’applicazione
- 1.3 Definiscilo come suoneria del tuo iPhone
- 1.4 Come creare una suoneria su iPhone (senza Mac)
- 1.5 Prezzo e disponibilità di iPhone 13 Mini e iPhone 13
- 1.6 Primo passo: comporre la suoneria
- 1.7 Secondo passaggio: definire la canzone come una suoneria
La prima cosa da fare sarà comporre la nostra suoneria. E quindi preparare la traccia su cui faremo affidamento per crearla.
Come creare una suoneria per iPhone, senza Mac o computer ?
Vuoi creare una suoneria personalizzata per iPhone, senza Mac o computer ? C’è una soluzione facile a mano.

Se hai un iPhone, probabilmente sai che purtroppo non è possibile configurare una suoneria personalizzata lì. Puoi scaricare questo suono, questo stesso audio, questa musica che ti fa desiderare così tanto: iOS non ti consente di fare quello che vuoi. Stai tranquillo, esiste una soluzione piuttosto semplice che è di più. Sorpresa: non è necessario utilizzare il minimo computer o Mac per questo, tutto accade direttamente dal touch screen per iPhone !
Crea la suoneria sul tuo iPhone tramite un’applicazione
Per il momento, Apple non offre alcuna applicazione ufficiale per creare le proprie suonerie. Se questo tipo di funzionalità era legione in un momento ormai lontano, una pletora di suonerie è già offerta negli smartphone e tramite applicazioni dedicate. Di conseguenza, gli sviluppatori devono senza dubbio dire che la creazione della propria suoneria non era più necessariamente utile ?
Che Nenni, molti di noi vogliono mantenere questo tocco di personalità quando riceviamo una chiamata o un messaggio. Per essere in grado di farlo, devi soprattutto scaricare un’applicazione che consente di creare una suoneria, abbiamo scelto qui il produttore di suonerie. State tranquilli, è disponibile gratuitamente sull’App Store; Dovrai solo avere un iPhone in funzione sotto iOS 9.0 almeno 0. Basti dire che se questo non è il tuo caso, hai tra le mani una reliquia di un tempo andato.
Una volta che l’applicazione è stata scaricata sul tuo iPhone, la procedura è piuttosto semplice. Fai clic sul “+” nella parte inferiore dello schermo per avviare la creazione di una suoneria, quindi diverse scelte si permetteranno:
- Importa una traccia audio da un video;
- Importazione da un computer;
- Scarica una traccia audio dalla libreria delle applicazioni;
- Sintetizzare una voce scrivendo il testo desiderato;
- Salva la tua voce;
- Importazione da Apple Music;
- Importazione da un file;
- Importazione da un’altra applicazione.
Inoltre, hai molte possibilità qui. Entro i limiti della legalità, puoi quindi usare musica (senza diritti) e tagliarla come desideri. Dopo aver selezionato la traccia audio tramite una delle molte possibilità offerte dall’applicazione, è quindi possibile scegliere un gioco da isolare tramite l’interfaccia del produttore di suoneria.
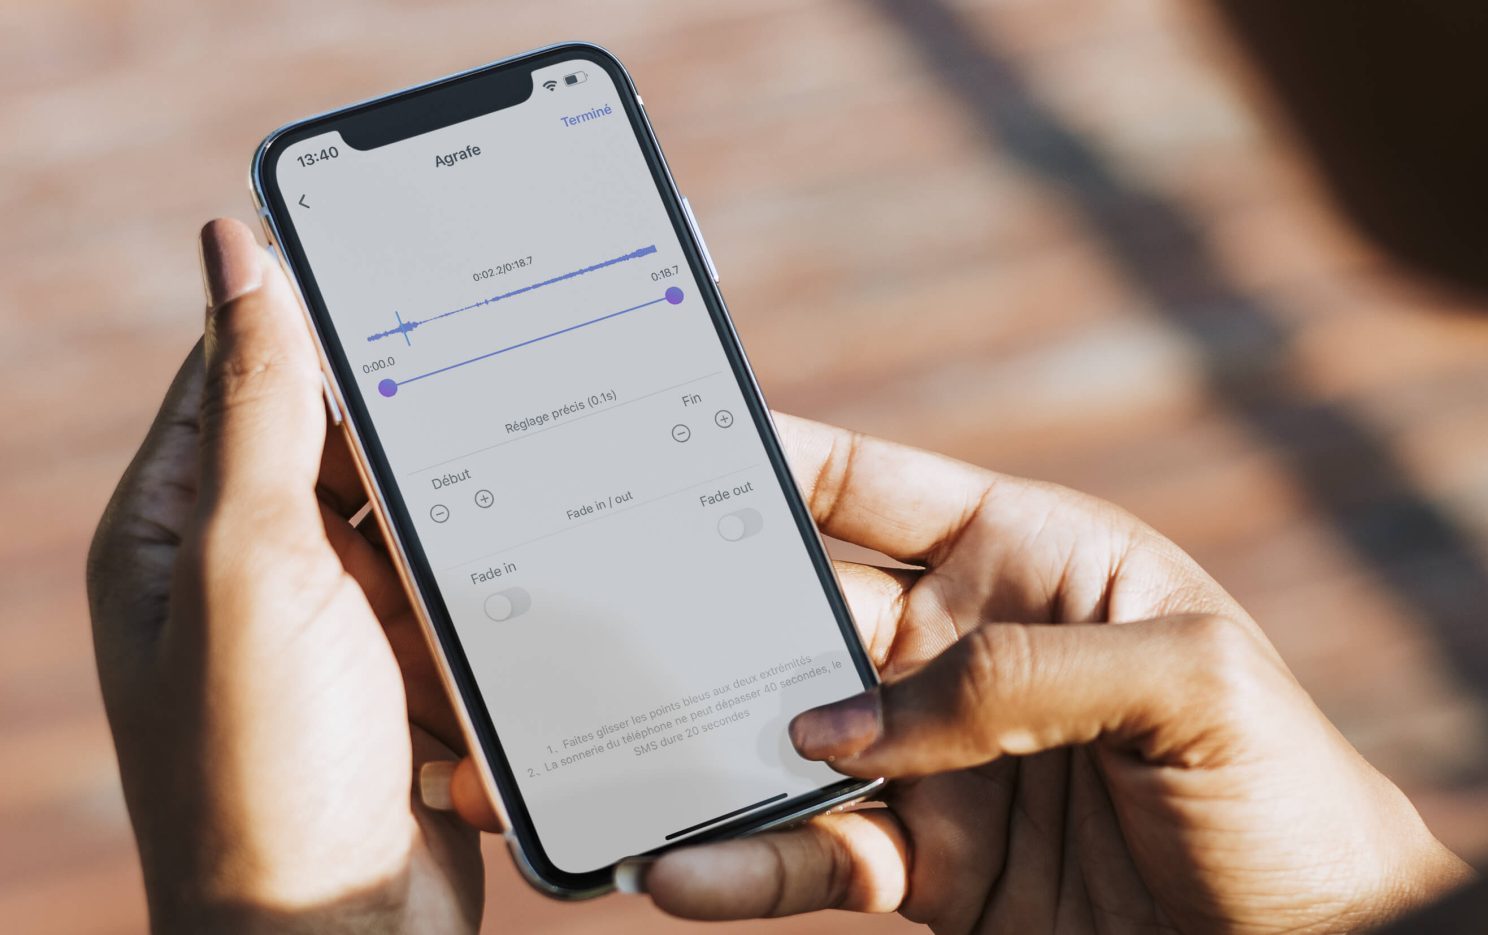
Devi solo premere il suono che hai appena importato, quindi sull’icona di forbice sottotitolata “Staple”; Quindi selezionare 30 secondi al massimo sulla traccia. È necessario rispettare questo tempo definito, poiché uno squillo non può durare più di 30 secondi su iOS. Una volta fatto questo, fai clic su “Finito” in alto a destra dello schermo.
Definiscilo come suoneria del tuo iPhone
Lo squillo è pronto, ma attenzione: iOS non lo consente (per il momento ?) per definire qualsiasi file audio in squillo. Per fare ciò, siamo obbligati a passare attraverso un’altra domanda, chiamata Garage Band. Se quante persone non volevano tenere la banda del garage quando si passa per la prima volta sul tuo iPhone, è tempo di andare a rinunciare all’app gratuitamente sull’App Store.
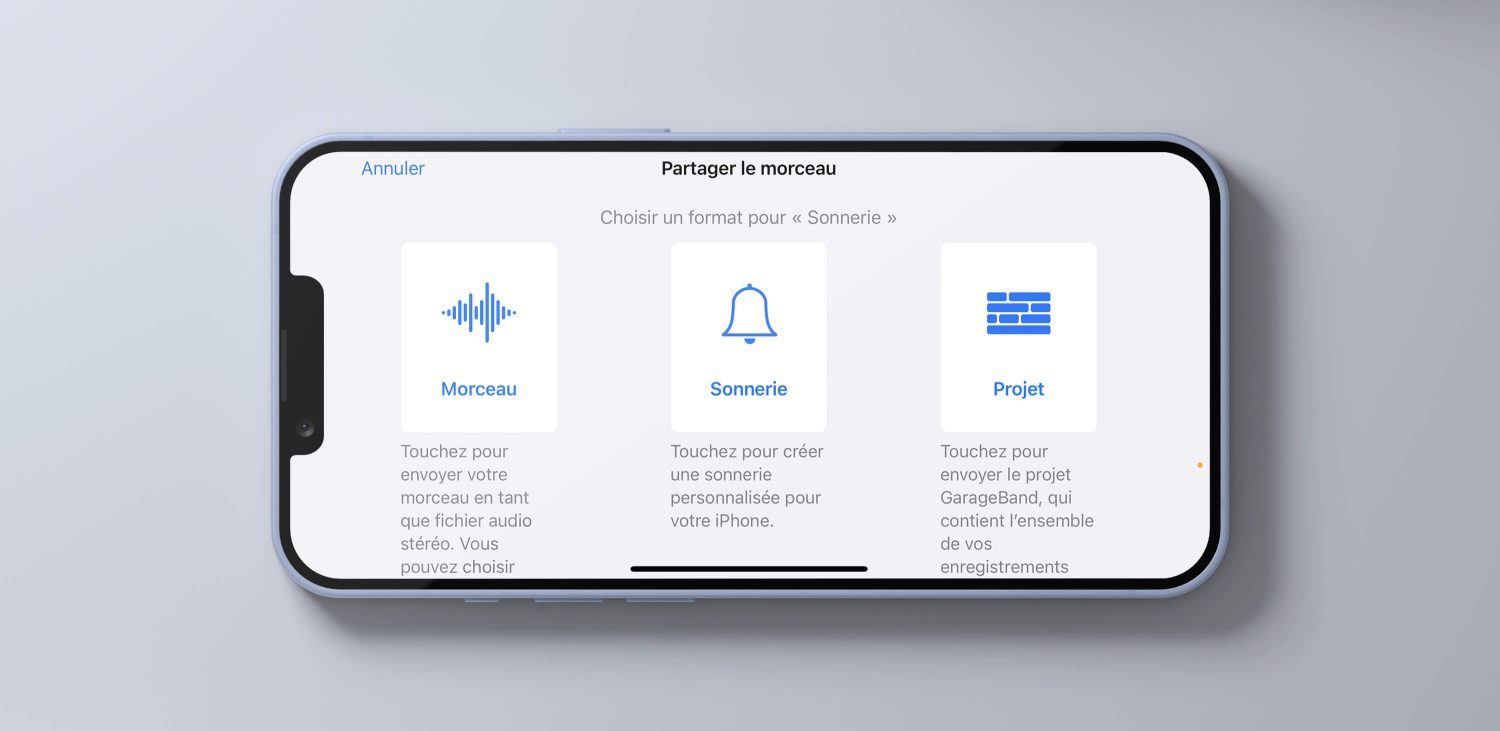
Una volta che l’applicazione è disponibile sul tuo iOS, ritorna al produttore di suonerie. Trova la suoneria che hai appena creato nel passaggio anteriore, quindi fai clic sul pulsante “Do”. Ti apre la finestra di condivisione. Nell’elenco delle applicazioni, scegli Garage Band. Il file che hai appena creato sarà disponibile in “File recenti” di Garage Band. Premerelo per molto tempo, quindi fare clic su “Condividi” nel menu. Quindi premere “Sonorie”. Scegli la durata di esso, quindi premi “Continua”.
L’ultimo passaggio ti invita a modificare il nome della suoneria, se lo desideri. Una volta fatto questo, fai clic su “Esporta” nella parte superiore dello schermo, quindi vai alle impostazioni della suoneria del tuo iPhone. Nell’elenco, puoi selezionare quello che hai appena generato. Scegli e basta ! La tua suoneria personalizzata è stata appena configurata come suoneria del tuo iPhone.
Come creare una suoneria su iPhone (senza Mac)
Stufo con suonerie di base per iPhone ? Nessun problema, ecco come creare la tua suoneria, senza Mac.
Pubblicato il 1 maggio 2022 alle 18:00

Se sei interessato alla questione delle suonerie per iPhone, allora dovresti sicuramente sapere che ci sono molti metodi per crearle. Alcuni sono relativamente complicati.
Questo non è il caso di quello che ti presenteremo. Per creare la tua nuova suoneria, avrai bisogno di due applicazioni che installerai sul tuo iPhone: Suonerie del creatore E Fascia da garage.
Due strumenti che hanno un vantaggio notevole: i loro gratuiti. Non pagherai nulla per trarre vantaggio dai loro servizi. D’altra parte, dovrai assicurarti di avere musica memorizzata localmente sul tuo telefono.

Prezzo e disponibilità di iPhone 13 Mini e iPhone 13
L’iPhone 13 Mini e iPhone 13 sono disponibili da settembre 2021. Possono essere ordinati in Apple Store o tramite rivenditori approvati.
iPhone 13 Mini 128 GB al prezzo di base del miglior prezzo: € 809
iPhone 13 128 GB al prezzo di base del miglior prezzo: € 909
Primo passo: comporre la suoneria

La prima cosa da fare sarà comporre la nostra suoneria. E quindi preparare la traccia su cui faremo affidamento per crearla.
Per farlo, passeremo attraverso le suonerie. Che è disponibile sull’App Store. Una volta installato, lo lancerai.
Lo strumento visualizzerà la sua home page. Con un pulsante ” +” in basso per consentirti di creare la tua prima suoneria. Tocca. Quindi dovrai scegliere l’origine della tua musica, con quattro pulsanti tra cui scegliere: “Importa video”, “Carica da PC”, “Download” e “Plus”. Digiterai il pulsante “Plus” e selezionerà l’opzione “Importa da un file”.
L’applicazione visualizzerà una nuova finestra, con due schede: “recente” ed “esplora”. Fai clic sul secondo. Quindi vai a prendere la musica che hai scaricato. Se l’hai recuperato con Chrome, ad esempio, dovrai andare nella cartella Chrome situata sul tuo iPhone.
Per quanto mi riguarda, ho optato per una canzone recuperata da Epidemic Sound, una piattaforma a pagamento che consente ai videografi di trovare e scaricare musica e effetti sonori per le loro creazioni.
Lo strumento importerà quindi musica e apparirà sullo schermo. Digita il suo nome. Apparirà una serie di pulsanti. Digita su “clip”.
Questo passaggio è essenziale. Ci permetterà davvero di tagliare la nostra canzone e selezionare i 30 secondi che verranno utilizzati per il nostro squillo.
E insisto sulla durata. Su iOS, una suoneria non deve superare i 30 secondi.
Per selezionare l’estratto, sarà sufficiente spostare i punti di riferimento situati nella sequenza temporale, nella parte superiore. Di seguito, troverai pulsanti che ti aiuteranno a perfezionare la tua selezione. Una volta che tutto è in ordine, digita il pulsante “finito” in alto a destra.
Hai appena creato la tua suoneria. Tranne il fatto che iOS non lo riconosce ancora come tale. Quindi dovremo essere difficili.
Secondo passaggio: definire la canzone come una suoneria

Il che ci porta alla seconda fase di questo piccolo tutorial. Passaggio che chiamerà la seconda applicazione menzionata in precedenza: Garageband.
Resta su Ringtones Maker. Tocca la tua suoneria. Non sbagliare. I pulsanti prima compaiono di nuovo. Digita il pulsante “Do” per generare la suoneria. iOS ti offrirà quindi di aprirlo con diverse applicazioni. Seleziona Garageband nell’elenco.
Garageband si aprirà. La tua suoneria apparirà nell’elenco dei file recenti. Premere a lungo. Viene visualizzato un nuovo menu. Digita “Condividi” quindi su “Sonnerie”. Garageband ti offrirà di regolare la durata della suoneria. Accetta toccando “Continua”.
Si aprirà un nuovo schermo. Ti consente di cambiare il nome della tua suoneria. Fallo se ritieni che sia necessario e digita il pulsante “Esporta” in alto a destra.
Congratulazioni, la tua suoneria è creata. Tutto quello che devi fare è andare alle impostazioni del telefono e ai suoni dedicati ai suoni per trovarlo e definirlo come suoneria. Nota che puoi anche usarlo per il tuo SMS.


 Ilyass Badry – 26 giugno 2023
  Condivido con te la mia brutta esperienza B la nuova Astra . Auto acquistata in mesi 10/22 Sono stato costretto a muovermi circa 9 volte il servizio dopo le scale per regolare i problemi della fotocamera 360 e aria condizionata e ora sono di fronte a un problema NV: cabina di pilotaggio e lo schermo che si spegne da solo . Hadchi Kamel e la Yalah Waslah W 5900 km sono davvero deluso .
 WAFA HH – 22 febbraio 2022
  Lei Ram – 23 febbraio 2022