Ripristina il decodificatore più SFR, installa e configura il mio decodificatore più rosso di SFR – rosso di SFR
Installa e configura di più il mio decodificatore
Contents
- 1x Broadcom Chipsets 43602
- Solo cliente (nessun AP o ripetitore)
- Attivazione solo della banda di frequenza a 5 GHz
- Wifi 5ghz mimo 3×3
- Standard supportati: 802.11n/ac
- Flusso massimo di 1300 Mbps (teorico)
Come ripristinare il mio decodificatore più SFR per ripristinare i parametri di & nbspdaut e nbsp?
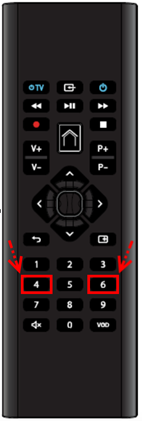
Premere i tasti 4 E 6 Dal tuo telecomando al flash chiave Casa : Il tuo telecomando viene ora ripristinato in modalità Factory.
Ho ripristinato il decodificatore
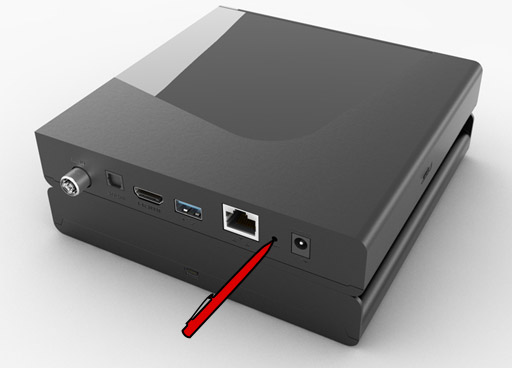
Con una penna o un trombone, premere il pulsante Ripristina Situato sul retro del decoder.
Il tuo decoder è ora ripristinato in modalità Factory.
Resincronizzare il telecomando
Il ripristino del decodificatore porta alla desincronizzazione del telecomando.
Inoltre, dopo il ripristino, è necessario rifare l’associazione del telecomando con il decodificatore.
Reattivo il mio canale per i diritti+ / Canalsat
Il ripristino del decodificatore più SFR porta alla perdita dei tuoi diritti relativi all’abbonamento ai canali Canal+ o/e Canalsat.
Inoltre, dopo il ripristino, è necessario riattivare i tuoi doveri Canal+/Canalsat.
Per ulteriori
Se nessuna delle manipolazioni di cui sopra ha funzionato, non esitare a contattare il servizio clienti SFR.
Installa e configura di più il mio decodificatore
Grazie al WiFi, non è mai stato più facile connettersi a Internet. A condizione che tu configuri bene il tuo modem. I nostri consigli.
- ADSL
- Fibra / velocità molto alta
Evo
Evo
Decodificatore+
![]()
Mini
- Controlla il mio pacchetto
- Imposta il mio decodificatore
- Configura il mio decodificatore
- Collega il mio decodificatore in modalità WiFi
- Familiarizzare con il telecomando
Controlla il mio pacchetto
Il tuo pacchetto Decoder Plus è composto da diversi elementi.
- Il decodificatore Plus
- Un alimentatore 12V/2.5A
- Un telecomando (fornito con 2 batterie)
- Un cavo ad alta velocità HDMI® (flusso video 4K compatibile)
- Un cavo Ethernet RJ45
- Un disco rigido impilabile (opzionale)
- Un cavo micro USB-USB (fornito nel pacchetto con il disco rigido)
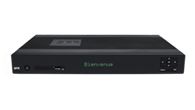
Visto da vicino, il tuo decodificatore è molto simile a questo:
- HA. LED di potenza rossa/verde
- B. Pulsante WPS
- Vs. Porta micro SD
Ecco le sue caratteristiche tecniche
- 1x Live Flow 2160p + Quick’zap + PIP (1080p) + 2x PVR 2160p
- Compatibilità video:
- SD / HD / UHD / 3D
- MPEG-2
- MPEG-4 BC / H.264
- Hevc / h.265
- 1x Broadcom Chipsets 43602
- Solo cliente (nessun AP o ripetitore)
- Attivazione solo della banda di frequenza a 5 GHz
- Wifi 5ghz mimo 3×3
- Standard supportati: 802.11n/ac
- Flusso massimo di 1300 Mbps (teorico)
- 1 Gigabit Port Ethernet RJ45
- 1 output HDMI 2.0 / HDCP2.2
- 1 ingresso dell’antenna DVB-T/T2 (RF in femmina)
- 1 output audio digitale ottico
- 1 porta USB 3.0
- 1 lettore di schede micro-SD
- Bluetooth 4.1 (audio AD2P)
- Bluetooth
- Funzione di controllo remoto universale intelligente
- Tastiera azera
- Puntatore del mouse
Imposta il mio decodificatore
- Scegli di più la posizione del decoder
- Questa posizione dovrebbe consentire una buona dissipazione del calore (fornire almeno 5 centimetri di spazio libero su ciascun lato).
- Non coprire il decoder e assicurarsi di non ostruire le prese d’aria che sono sui lati.
- Collega il tuo decodificatore Plus alla tua scatola rossa utilizzando il cavo Ethernet fornito.
- Collega la tua TV con un decoder più utilizzando il cavo HDMI fornito, per ottenere la migliore qualità dell’immagine, in particolare per il ritorno di flussi di video Full HD e Ultra HD (4K).
Se la tua televisione non ha la presa HDMI, usa un adattatore HDMI/Sidel (non fornito). In questo caso, non sarai in grado di godere di una qualità video ottimale. - Collega il tuo decodificatore più alla spina dell’antenna . Questa connessione opzionale consente di ricevere canali TNT direttamente dall’antenna del tuo alloggio. Si consiglia di migliorare la velocità del tuo accesso a Internet.
- Collega il tuo disco rigido al tuo decodificatore Plus
- Puoi collegare un disco rigido a tua scelta alla porta USB del decodificatore Plus. Si prega di notare, in questo caso, il disco rigido deve essere formattato prima di essere collegato al decodificatore.
- Collega l’alimentazione al tuo decodificatore Plus. Il tuo decoder si accende automaticamente. Puoi fare il passo successivo.
- Assicurati che il tuo modem di Red Box Plus sia installato, acceso e connesso a Internet. Altrimenti, sarà lo schermo nero !
- Verificare che la sorgente HDMI selezionata sulla TV corrisponda alla presa su cui è collegato il decodificatore. In questo caso, la home page del tuo decodificatore Plus deve apparire sullo schermo.
- Installa le batterie (fornite) nel telecomando incluso nel pacchetto Decoder Plus.
- Benvenuto . Quando viene visualizzata la schermata Home, premere il pulsante “OK” sul telecomando.
- Connessione di rete locale . Preferisci la modalità di connessione tramite “cavo Ethernet”.
- connessione wifi . Premere il tasto WPS sulla tua casella per attivare WiFi e connessione Internet.
- Aggiornamento . Attendi qualche minuto fino a quando lo schermo ti chiede di riavviare il decodificatore. Premere il tasto “OK”.
- Sincronizza il tuo telecomando . Premere contemporaneamente i tasti 7 e 9 fino a quando non lampeggiano il pulsante “House” o l’aspetto di un punto fisso leggero nella parte superiore per il telecomando vocale.
- Tnt . Se hai collegato di più il tuo decodificatore alla presa dell’antenna, seleziona “Cerca i canali disponibili in TNT”. Altrimenti, fai questo passo selezionando “Non usare TNT”.
- Codici . Scegli un codice personale (protezione dei minori) e un codice personale (protezione dell’accesso a determinate funzioni).
- Premere il pulsante “Home” sul telecomando per accedere alla schermata di benvenuto (o home page).
- Utilizzando i tasti direzionali, selezionare “Impostazioni” e convalidare con il tasto “OK”.
- Seleziona “Installazione”.
- Seleziona “Connessioni”.
- Seleziona “Wi-Fi Wireless”.
- Premi il pulsante WPS sulla tua casella per collegare il decodificatore TV. La connessione viene effettuata automaticamente.
- Inserire le 2 batterie (fornite) nel telecomando,
- Se il controllo remoto è inattivo, premere contemporaneamente i tasti 1 e 3 al lampeggiamento della “casa” o del punto leggero del telecomando vocale,
- Dalla home page televisiva, vai su “Impostazioni” e premi il tasto “OK” (al centro delle chiavi direzionali),
- Seleziona “Telector” e premi il pulsante “OK”,
- Seleziona “Associa un telecomando” e premi il tasto “OK”. Un messaggio ti avverte della radio che disinstalla altri controlli remoti. Ciò significa che se hai altri telecomando per il decodificatore, continueranno a funzionare solo se li punta al tuo decodificatore. Premere il tasto “OK” per convalidare il messaggio.
- Quando il messaggio “Premere le chiavi 7 e 9 del telecomando” viene visualizzato sul televisore, premere contemporaneamente i tasti 7 e 9. Per favore aspetta 4 secondi … “appare.
- Un messaggio che ti informa che il tuo telecomando è associato viene visualizzato sulla TV. Premere il tasto “OK”. Il tuo telecomando è ora associato al tuo decodificatore e pienamente operativo !
- Un telecomando può essere accoppiato solo un decodificatore.
- Un decoder può essere accoppiato con diversi telecomandi.
- L’accoppiamento viene memorizzato nel telecomando: anche se le batterie vengono rimosse, le informazioni vengono mantenute.
- 1 + 3 tasti per lampeggiare la chiave “casa”: dondolare il controllo remoto dalla trasmissione a infrarossi alla trasmissione della radiofrequenza. Un nuovo supporto su 1+3 ti consente di cambiare di nuovo la moda.
- 4 + 6 tasti per lampeggiare il tasto “House”: reimpostare il telecomando in modalità di fabbrica (a infrarossi) e cancella gli accoppiamenti di controllo / decodificatore remoto.
- 0 + 2 tasti per 3 secondi: cancella la configurazione del telecomando universale.
- I tasti P+/P sono utilizzati per la navigazione rapida (spostamento da pagina a pagina) in interfacce a mosaico, mini-guida, guida completa.
- Il tasto “Play” ti consente di avviare direttamente la visualizzazione di un contenuto selezionato dalla home page e le parti “My Video” e “My Recordings”.
- Durante una sessione VOD, il supporto sulle chiavi direzionali sinistra / destra consente di saltare nel video del 10 % del tempo totale del contenuto (circa 10 minuti per un film).
Configura il mio decodificatore
Prima che inizi
Imposta il decodificatore
Per installare il decodificatore, seguire i passaggi indicati nella schermata TV. Per una prima configurazione, si consiglia una connessione via cavo Ethernet a una connessione da parte di WiFi, facile da fare in seguito.
Collega il mio decodificatore in modalità WiFi
Per cambiare il tuo decodificatore Plus dalla modalità Ethernet (cavo) alla modalità WiFi:
Familiarizzare con il telecomando
Combina il telecomando con il decoder
Per rendere il tuo telecomando riconosciuto dal tuo decodificatore, è necessario associare l’attrezzatura 2.
Se non è stato ancora fatto, procedi come segue:
Primi passi
Indispensabile per pilotare il tuo decodificatore Plus, il tuo nuovo controllo remoto intelligente nasconde molti vantaggi. Funziona in particolare in radiofrequenza, in modo che non sia necessario puntarlo al decoder per cambiare il suo canale.
Dettaglio del mio telecomando:
Dettaglio del mio telecomando vocale:
Scopri le scorciatoie


 Ilyass Badry – 26 giugno 2023
  Condivido con te la mia brutta esperienza B la nuova Astra . Auto acquistata in mesi 10/22 Sono stato costretto a muovermi circa 9 volte il servizio dopo le scale per regolare i problemi della fotocamera 360 e aria condizionata e ora sono di fronte a un problema NV: cabina di pilotaggio e lo schermo che si spegne da solo . Hadchi Kamel e la Yalah Waslah W 5900 km sono davvero deluso .
 WAFA HH – 22 febbraio 2022
  Lei Ram – 23 febbraio 2022