कंप्यूट इंजन पर विंडोज के लिए क्रोम रिमोट डेस्कटॉप सेवा कॉन्फ़िगर करें | क्लाउड आर्किटेक्चर सेंटर | Google क्लाउड, Favicons SERP डेस्कटॉप पर लौटते हैं Google – बहुतायत
Favicons SERP डेस्कटॉप Google पर लौटते हैं
Contents
- 1 Favicons SERP डेस्कटॉप Google पर लौटते हैं
- 1.1 कंप्यूट इंजन पर विंडोज के लिए क्रोम रिमोट डेस्कटॉप सेवा कॉन्फ़िगर करें
- 1.2 लक्ष्य
- 1.3 लागत
- 1.4 आपके शुरू करने से पहले
- 1.5 आरडीपी के साथ इंटरैक्टिव स्थापना
- 1.6 नॉन -इंटेरेक्टिव इंस्टॉलेशन
- 1.7 Chrome रिमोट डेस्कटॉप के साथ VM इंस्टेंस से कनेक्ट करें
- 1.8 दूरस्थ डेस्कटॉप में उपयोगकर्ता अनुभव में सुधार करें
- 1.9 को साफ
- 1.10 पीछे पीछे जाना
- 1.11 Favicons SERP डेस्कटॉप Google पर लौटते हैं
- 1.12 एक विफल पहले प्रयास के लगभग 3 साल बाद, Google SERP डेस्कटॉप में Favicons को पुष्ट करता है ताकि उन्हें मोबाइल परिणामों के अपने पृष्ठों को जितना संभव हो उतना एकजुट किया जा सके.
रिमोट ऑफिस डिफ़ॉल्ट रिज़ॉल्यूशन को आपके स्थानीय कंप्यूटरों के कार्यालय के संकल्प के लिए बेहतर मेल खाने के लिए संशोधित किया जा सकता है.
कंप्यूट इंजन पर विंडोज के लिए क्रोम रिमोट डेस्कटॉप सेवा कॉन्फ़िगर करें
यह ट्यूटोरियल बताता है कि CHROME रिमोट डेस्कटॉप सेवा को वर्चुअल मशीन इंस्टेंस (VM) Microsoft Windows के लिए कंप्यूट इंजन पर कॉन्फ़िगर करें. वीएम लिनक्स के लिए अलग -अलग निर्देश प्राप्त करने के लिए, लिनक्स वर्चुअल मशीन पेज देखें. यह सेवा आपको स्थानीय कंप्यूटर या मोबाइल डिवाइस से ग्राफिक यूजर इंटरफेस के साथ दूरस्थ रूप से एप्लिकेशन तक पहुंचने की अनुमति देती है.
जब आप इस ट्यूटोरियल का अनुसरण करते हैं, तो डिफ़ॉल्ट फ़ायरवॉल नियम एक दूरी क्रोम पर ब्यूरो कनेक्शन की अनुमति देते हैं. आपको अतिरिक्त फ़ायरवॉल नियमों को कॉन्फ़िगर करने की आवश्यकता नहीं है.
VM को इंटरनेट तक पहुंच की आवश्यकता है (बाहरी IP पते के साथ या NAT गेटवे के माध्यम से), और आप प्रमाणीकरण और प्राधिकरण के लिए अपने Google खाते का उपयोग करते हैं.
दो क्रोम रिमोट डेस्कटॉप कॉन्फ़िगरेशन विधियों का वर्णन किया गया है:
- Windows RDP (रिमोट डेस्कटॉप प्रोटोकॉल) प्रोटोकॉल का उपयोग करके इंटरैक्टिव विधि. इस विधि के लिए आवश्यक है कि VM RDP ग्राहक का उपयोग करके आपके स्थानीय कंप्यूटर से सीधे सुलभ हो, जो सभी स्थितियों में संभव नहीं हो सकता है.
- VM के निर्माण के दौरान क्रोम रिमोट डेस्कटॉप को स्थापित करने और कॉन्फ़िगर करने के लिए एक स्टार्ट -अप स्क्रिप्ट का उपयोग करके नॉन -इंटेरिएक्टिव विधि. इस विधि का उपयोग किया जाना चाहिए यदि फ़ायरवॉल वीएम तक सीधी पहुंच को रोकते हैं या यदि आपके पास आरडीपी ग्राहक तक पहुंच नहीं है, तो उदाहरण के लिए क्रोम ओएस पर.
इस ट्यूटोरियल में, हम उस सिद्धांत से शुरू करते हैं जिसे आप Microsoft Windows और PowerShell कमांड लाइन जानते हैं.
वर्चुअल वर्कस्टेशन बनाने के लिए अन्य समाधानों के बारे में अधिक जानने के लिए, वर्चुअल वर्कस्टेशन पेज देखें.
लक्ष्य
- विंडोज के नीचे वीएम कंप्यूट इंजन का एक उदाहरण बनाएं, जिस पर क्रोम रिमोट डेस्कटॉप सेवा निष्पादित की जा सकती है
- VM इंस्टेंस पर क्रोम डिस्टेंस ऑफिस सर्विस को इंस्टॉल और कॉन्फ़िगर करें
- VM उदाहरण पर अपने स्थानीय कंप्यूटर से डेस्कटॉप वातावरण से कनेक्ट करें
लागत
यह ट्यूटोरियल Google क्लाउड के बिल योग्य घटकों का उपयोग करता है, जिसमें शामिल हैं:
अपने नियोजित उपयोग के अनुसार लागत अनुमान उत्पन्न करने के लिए लागत सिम्युलेटर का उपयोग करें.
आपके शुरू करने से पहले
- अपने Google क्लाउड खाते से कनेक्ट करें. यदि आप Google क्लाउड पर शुरू करते हैं, तो वास्तविक परिस्थितियों में हमारे उत्पादों के प्रदर्शन का आकलन करने के लिए एक खाता बनाएं. नए ग्राहकों को वर्कलोड को निष्पादित करने, परीक्षण करने और तैनात करने के लिए $ 300 मुफ्त क्रेडिट से लाभ होता है.
- Google क्लाउड कंसोल में, प्रोजेक्ट चयन पृष्ठ पर, Google क्लाउड प्रोजेक्ट का चयन करें या बनाएं. ध्यान दिया : यदि आप इस प्रक्रिया में बनाए गए संसाधनों को रखने की योजना नहीं बनाते हैं, तो किसी मौजूदा प्रोजेक्ट का चयन करने के बजाय एक प्रोजेक्ट बनाएं. इन चरणों का पालन करने के बाद, आप परियोजना को हटा सकते हैं. यह इसके साथ जुड़े सभी संसाधनों के उन्मूलन की ओर जाता है. प्रोजेक्ट चयनकर्ता तक पहुँचें
- जाँच करें कि बिलिंग आपके Google क्लाउड प्रोजेक्ट के लिए सक्रिय है.
- कंप्यूट इंजन एपीआई सक्रिय करें एपीआई को सक्रिय करें
- Google क्लाउड कंसोल में, प्रोजेक्ट चयन पृष्ठ पर, Google क्लाउड प्रोजेक्ट का चयन करें या बनाएँ. ध्यान दिया : यदि आप इस प्रक्रिया में बनाए गए संसाधनों को रखने की योजना नहीं बनाते हैं, तो किसी मौजूदा प्रोजेक्ट का चयन करने के बजाय एक प्रोजेक्ट बनाएं. इन चरणों का पालन करने के बाद, आप परियोजना को हटा सकते हैं. यह इसके साथ जुड़े सभी संसाधनों के उन्मूलन की ओर जाता है. प्रोजेक्ट चयनकर्ता तक पहुँचें
- जाँच करें कि बिलिंग आपके Google क्लाउड प्रोजेक्ट के लिए सक्रिय है.
- कंप्यूट इंजन एपीआई सक्रिय करें एपीआई को सक्रिय करें
एक बार जब आप इस दस्तावेज़ में वर्णित कार्यों को समाप्त कर लेते हैं, तो आप अपने द्वारा बनाए गए संसाधनों को हटाकर लागत का भुगतान जारी रखने से बच सकते हैं. अधिक जानकारी के लिए, सफाई अनुभाग देखें.
भूमिकाओं की जाँच करें
- Google क्लाउड कंसोल में, पेज को एक्सेस करें मैं हूँ. एक्सेस Iam
- प्रोजेक्ट का चयन करें.
- स्तंभ में मुख्य खाता, उस लाइन की तलाश करें जिसमें आपका ईमेल पता हो. यदि आपका ईमेल पता इस कॉलम में दिखाई नहीं देता है, तो इसका मतलब है कि आपकी कोई भूमिका नहीं है.
- स्तंभ में भूमिका अपने ईमेल पते वाली लाइन में से, जांचें कि क्या भूमिकाओं की सूची में आवश्यक भूमिकाएँ शामिल हैं.
सौंपना
- Google क्लाउड कंसोल में, पेज को एक्सेस करें मैं हूँ. एक्सेस Iam
- प्रोजेक्ट का चयन करें.
- Person_add पर क्लिक करें अनुदान.
- क्षेत्र में नया मुख्य लेखा, अपना ईमेल पता दर्ज करें.
- सूची में एक भूमिका का चयन करें, एक भूमिका का चयन करें.
- अतिरिक्त भूमिकाएं आवंटित करने के लिए, जोड़ें पर क्लिक करें एक और भूमिका जोड़ें और प्रत्येक अतिरिक्त भूमिका जोड़ें.
- पर क्लिक करें बचाना.
आरडीपी के साथ इंटरैक्टिव स्थापना
क्रोम रिमोट डेस्कटॉप को इंटरैक्टिवली इंस्टॉल करने के लिए, आपको आरडीपी ग्राहक का उपयोग करके रिमोट वीएम से कनेक्ट करने में सक्षम होना चाहिए. इस ट्यूटोरियल में, आप इंटरनेट पर RDP 3339 पोर्ट को प्रदर्शित करने के लिए डिफ़ॉल्ट फ़ायरवॉल नियमों के साथ डिफ़ॉल्ट VPC में VM बनाएंगे.
यदि यह आपके वातावरण में संभव नहीं है, तो इस दस्तावेज़ में बाद में वर्णित गैर -सक्रिय विधि का उपयोग करें.
एक कंप्यूट इंजन इंस्टेंस बनाएं
इस ट्यूटोरियल के प्रयोजनों के लिए, डिफ़ॉल्ट मशीन के प्रकार का उपयोग किया जाता है. यदि आप इसे अपने स्वयं के वातावरण के लिए उपयोग करते हैं, तो आप मशीन के प्रकार, नाम, क्षेत्र, स्टार्टर डिस्क या अन्य सेटिंग्स के आकार को समायोजित कर सकते हैं.
सांत्वना देना
- Google क्लाउड कंसोल में, पेज को एक्सेस करें वीएम इंस्टेंस ::
- पर क्लिक करें बनाएं.
- Crdhost पर उदाहरण के नाम को परिभाषित करें .
- बॉक्स को चेक करें डिस्प्ले डिवाइस को सक्रिय करें, क्योंकि क्रोम रिमोट डेस्कटॉप को विंडोज वीएम पर एक डिस्प्ले डिवाइस की आवश्यकता होती है.
- नीचे स्टार्टर डिस्क, पर क्लिक करें संशोधित करना पैनल खोलने के लिए स्टार्टर डिस्क.
- सूची में ऑपरेटिंग सिस्टम, चुनना विंडोज सर्वर.
- सूची में संस्करण, चुनना विंडोज सर्वर 2022 डेटासेंटर.
- पर क्लिक करें चुनना पैनल को बंद करने के लिए.
- पर क्लिक करें बनाएं.
क्लाउड शेल
- ओपन क्लाउड शेल. ओपन क्लाउड शेल
- अपनी पसंद के क्षेत्र को परिभाषित करें:
ZONE = US-Central1-B क्षेत्र = US-Central1 GCloud Config सेट कंप्यूट/ज़ोन "$" Gcloud कंप्यूट इंस्टेंसेस CRDHOST \-मशीन-टाइप = E2-Meedium \-स्कोप्स = क्लाउड-प्लेटफ़ॉर्म \-सक्षम-डिस्प्ले-डिवाइस \ -image- परिवार = Windows-2022 \ -image-project = Windows- क्लाउड \ _ -Boot-Disk- आकार = 50GB \ -Boot-Disk-Device-name = crdhost आरडीपी के साथ वीएम इंस्टेंस से कनेक्ट करें
- Google क्लाउड कंसोल में, पेज को एक्सेस करें वीएम इंस्टेंस. “वीएम इंस्टेंसेस” पेज तक पहुँचें
- एक हरे रंग की जाँच सुनिश्चित करें जाँच करना आपके Crdhost बॉडी के नाम के बगल में प्रदर्शित किया जाता है, यह दर्शाता है कि उदाहरण तैयार है.
- पृष्ठ खोलने के लिए Crdhost उदाहरण के नाम पर क्लिक करें वीएम इंस्टेंस जानकारी.
- नीचे दूरदराज का उपयोग, पर क्लिक करें एक विंडोज पासवर्ड को परिभाषित करें, तब से परिभाषित करना दूरस्थ मशीन पर अपना खाता बनाने के लिए. यह चरण स्वचालित रूप से आपका पासवर्ड उत्पन्न करता है. पासवर्ड नोट करें या इसे सुरक्षित अस्थायी फ़ाइल में कॉपी करें.
- दूरस्थ उदाहरण से कनेक्ट करने के लिए, तीर पर क्लिक करें ARROW_DROP_DOWN बटन के आगे आरडीपी, फिर चुनें RDP फ़ाइल डाउनलोड करें. आप अपनी पसंद के RDP ग्राहक का उपयोग करके RDP फ़ाइल खोल सकते हैं.
- जब आपका RDP क्लाइंट आपको पासवर्ड दर्ज करने के लिए आमंत्रित करता है, तो वह दर्ज करें जिसे आपने पहले उत्पन्न किया है.
- जब आपको यह इंगित करने के लिए आमंत्रित किया जाता है कि क्या आपके कंप्यूटर को अन्य पीसी और नेटवर्क उपकरणों द्वारा पता लगाया जा सकता है, तो क्लिक करें नहीं.
- इसे बंद करें सर्वर प्रबंधक डैशबोर्ड अगर यह खुला है.
Chrome दूरस्थ डेस्कटॉप सेवा स्थापित करें
अगला कदम Google Chrome और Chrome दूरस्थ डेस्कटॉप सेवा को VM उदाहरण पर स्थापित करना है.
- अपने RDP सत्र में, बटन पर क्लिक करें शुरू करना विंडोज टास्कबार में, PowerShell दर्ज करें, फिर Windows PowerShell एप्लिकेशन का चयन करें.
- जब PowerShell प्रॉम्प्ट प्रदर्शित किया जाता है, तो क्रोम रिमोट डेस्कटॉप इंस्टॉलेशन प्रोग्राम को डाउनलोड करें और चलाएं.
$ इंस्टॉल = "$ लगभग: temp \ chromeremotesktophost.Msi "$ uri = 'https: // dl.गूगल.COM/EDGEDL/CHROME-REMOTE-DESKTOP/CHROMEMEMOTESKTOPHOST.MSI '(नया ऑब्जेक्ट नेट.Webclient).DownloadFile ($ uri, "$ इंस्टॉल") && `START-BREAK $ Install -wait &&` निकालें- $ इंस्टॉल
Chrome दूरस्थ डेस्कटॉप सेवा कॉन्फ़िगर करें
अब आप एक Windows कमांड उत्पन्न करेंगे जो Chrome से डेस्कटॉप सेवा शुरू करता है और इसे अपने Google खाते के साथ जोड़ता है.
- अपने स्थानीय कंप्यूटर पर, क्रोम ब्राउज़र का उपयोग करके क्रोम रिमोट ऑफिस कमांड लाइन कॉन्फ़िगरेशन पृष्ठ पर जाएं.
- यदि आप पहले से ही नहीं कर चुके हैं तो Google खाते से कनेक्ट करें. यह वह खाता है जिसका उपयोग रिमोट एक्सेस की अनुमति देने के लिए किया जाएगा.
- पेज पर एक और कंप्यूटर सेट करें (एक और कंप्यूटर कॉन्फ़िगर करें), क्लिक करें शुरू (प्रारंभ), फिर पर अगला (अगले).
- पर क्लिक करें अनुमति देने के लिए. आपको अपने खाते तक पहुंचने के लिए ऑफिस रिमोट क्रोम को अधिकृत करना होगा. यदि आप स्वीकार करते हैं, तो पृष्ठ कई कमांड लाइनें प्रदर्शित करता है, जिसमें एक भी शामिल है विंडोज (पॉवरशेल) निम्नलिखित के समान:
& "$ \ Google \ Chrome दूरस्थ डेस्कटॉप \ currentversion \ Remoting_start_host.पूर्व "` -कोड नहीं "> एन्कोडेड_एथेंटिकेशन_टोकन"` -Redirect-url = "https: // remotesktop.गूगल.com/_/oauthredirect "` -name = $ भेजें: Computerume
नॉन -इंटेरेक्टिव इंस्टॉलेशन
इस दृष्टिकोण में, आप VM उदाहरण को कॉन्फ़िगर करते हैं ताकि इसमें एक स्टार्ट -अप स्क्रिप्ट हो जो VM के निर्माण के दौरान चलती है.
इस दृष्टिकोण के साथ, वीएम को सीधे सुलभ होने की आवश्यकता नहीं है से इंटरनेट, हालांकि उसे एक्सेस करने की आवश्यकता है है इंटरनेट.
क्रोम रिमोट ऑफिस सेवा को अधिकृत करें
अब आप एक Windows कमांड उत्पन्न करेंगे जिसका उपयोग आप बाद में विशेषज्ञता स्क्रिप्ट में करेंगे. इस प्रक्रिया के हिस्से के रूप में, आप ऑर्डर में शामिल प्राधिकरण जानकारी प्रदान करते हैं.
- अपने स्थानीय कंप्यूटर पर, क्रोम ब्राउज़र का उपयोग करके क्रोम रिमोट ऑफिस कमांड लाइन कॉन्फ़िगरेशन पृष्ठ पर जाएं.
- यदि आप पहले से ही नहीं कर चुके हैं तो Google खाते से कनेक्ट करें. यह वह खाता है जिसका उपयोग रिमोट एक्सेस की अनुमति देने के लिए किया जाएगा.
- पर क्लिक करें आरंभ करना, तब से अगले.
- पर क्लिक करें अनुमति देने के लिए.
- अपने खाते तक पहुंचने के लिए ऑफिस रिमोट क्रोम को अधिकृत करें. पृष्ठ में अब कई कमांड लाइनें हैं, जिनमें से एक के लिए विंडोज (सीएमडी) निम्नलिखित के समान:
"%Programfiles (x86)%\ Google \ Chrome दूरस्थ डेस्कटॉप \ currentversion \ Remotting_start_host.Exe "-कोड नहीं"> encoded_authentication_token"-Redirect-url =" https: // remotesktop.गूगल.com/_/oauthredirect "-name =%Computerame%
क्लाउड शेल में स्टार्टर कमांड कॉपी करें
अगला चरण अपने क्लाउड शेल इंस्टेंस में एक फ़ाइल बनाना है जिसमें आपके द्वारा अभी -अभी उत्पन्न होने वाली स्टार्ट -अप कमांड है.
- ओपन क्लाउड शेल. ओपन क्लाउड शेल
- स्टार्टर कमांड के लिए एक फ़ाइल बनाएं:
बिल्ली> crd-auth-command.TXT स्टार्ट -अप स्क्रिप्ट बनाएं
- निम्न कोड ब्लॉक कॉपी करें और इसे क्लाउड शेल से चिपका दें.
कैट सीआरडी-सिस्प्रेप-स्क्रिप्ट.PS1 $ ERRORACATIONPREFERENT = 'स्टॉप' फ़ंक्शन गेट-मेटाडाटा ([स्ट्रिंग] $ मेटाडाटैम) < try < $value = (Invoke-RestMethod ` -Headers @` -Uri "http://metadata.google.internal/computeMetadata/v1/instance/attributes/$metadataName") > कुश्ती < # Report but ignore REST errors. Write-Host $_ >If ($ मूल्य -eq $ null -or $ मूल्य.लंबाई -EQ 0) < throw "Metadata value for ""$metadataName"" not specified. Skipping Chrome Remote Desktop service installation." >$ मूल्य लौटें> # मेटाडेटा से कॉन्फ़िगरेशन प्राप्त करें # $ CRDCOMMAN = GET-MetaData ('CRD-Command') $ CRDPIN = GET-MetaData ('CRD-PIN') $ CRDNAME = GET-METADATA ('CRD-NAME') यदि ($ crdpin -isnot [int32] -or $ crdpin -gt 999999 -or $ crdpin -lt 0) < throw "Metadata ""crd-pin""=""$crdPin"" is not a 6 digit number. Skipping Chrome Remote Desktop service installation." >यदि आवश्यक हो तो शून्य के साथ $ crdpin. $ Crdpin = $ crdpin.Tostring ("000000"); # प्रमाणीकरण कोड निकालें और # रिमोट डेकस्टॉप स्टार्टअप कमांड लाइन से URL तर्कों को पुनर्निर्देशित करें. # $ Crdcommandargs = $ crdcomman.स्प्लिट ('') $ codearg = $ crdcommandargs | Select-String -pattern '-code = "[^"]+"$ redirectarg = $ crdcommandargs | Select-string -pattern' -redirect-url =" [^"]+" if (-not $ codearg)) < throw 'Cannot get --code= parameter from crd-command. Skipping Chrome Remote Desktop service installation.' >If (-not $ redirectarg) < throw 'Cannot get --redirect-url= parameter from crd-command. Skipping Chrome Remote Desktop service installation.' >राइट-होस्ट 'डाउनलोडिंग क्रोम रिमोट डेस्कटॉप.'$ इंस्टॉल = "$ लगभग: temp \ chromeremotesktophost.Msi "$ uri = 'https: // dl.गूगल.COM/EDGEDL/CHROME-REMOTE-DESKTOP/CHROMEMEMOTESKTOPHOST.MSI '(नया ऑब्जेक्ट नेट.Webclient).DownloadFile ($ uri, "$ इंस्टॉल") राइट-होस्ट 'इंस्टालिंग क्रोम रिमोट डेस्कटॉप.'और msiexec.EX /I $ स्थापित /शांत | आउट-डिफॉल्ट निकालें-आइटम $ इंस्टॉल राइट-होस्ट 'शुरुआती क्रोम रिमोट डेस्कटॉप सेवा.'& "$ \ Google \ Chrome दूरस्थ डेस्कटॉप \ currentversion \ Remoting_start_host.पूर्व "` $ codearg $ redirectarg-name = "$ crdname" -pin = "$ crdpin" | out-default राइट-होस्ट 'डाउनलोड क्रोम.'$ इंस्टॉल = "$ लगभग: temp \ chrome_installer.पूर्व "$ uri = 'https: // dl.गूगल.com/chrome/स्थापित/नवीनतम/chrome_installer.पूर्व '(नया ऑब्जेक्ट नेट.Webclient).DownloadFile ($ uri, "$ इंस्टॉल") राइट-होस्ट 'इंस्टालिंग क्रोम.'और $ इंस्टॉल /साइलेंट /इंस्टॉल | Out-Default remove-ém $ स्थापित eof - कार्यालय होस्ट रिमोट क्रोम डाउनलोड और इंस्टॉल करें.
- निम्नलिखित मेटाडेटा सेटिंग्स पुनर्प्राप्त करें:
- CRD-Command: Windows प्रमाणीकरण और स्टार्ट-अप कमांड
- CRD-PIN: अतिरिक्त प्रमाणीकरण के लिए उपयोग किए गए छह-अंकीय कोड
- CRD-NAME: उदाहरण का नाम
एक विंडोज वर्चुअल मशीन बनाएं
अब आप डेस्कटॉप क्रोम को कॉन्फ़िगर करने के लिए पहले बनाई गई फ़ाइलों का उपयोग करके एक विंडोज वीएम बनाएंगे.
इस ट्यूटोरियल की जरूरतों के लिए, E2-Medium मशीन के प्रकार का उपयोग किया जाता है. यदि आप इसे अपने स्वयं के वातावरण के लिए उपयोग करते हैं, तो आप मशीन के प्रकार, नाम, क्षेत्र, स्टार्टर डिस्क या अन्य सेटिंग्स के आकार को समायोजित कर सकते हैं.
-
क्लाउड शेल में, अपनी पसंद के क्षेत्र को परिभाषित करें:
ZONE = US-Central1-B क्षेत्र = US-Central1 GCloud Config सेट कंप्यूट/ज़ोन "$"Crd_pin =योर-पिनउदाहरण_नाम = crdhostGcloud कंप्यूट इंस्टेंस $ \ _-मशीन-प्रकार = E2-Meedium \-Scopes = Cloud-platform \-सक्षम-डिस्प्ले-डिवाइस \ -image- परिवार = Windows-2022 \ -image-project = Windows- क्लाउड \ _ -Boot-Disk- आकार = 50GB \ -Boot-Disk-Device-name = $ \ -metadata = crd-pin = $, crd-name = $ \ -metadata-flom-file = crd- कमांड = crd-auth- आज्ञा.Txt, sysprep-specialize-scrct-ps1 = crd-sysprep-script.PS1वीएम की शुरुआत की निगरानी करें
आप यह देख सकते हैं कि स्टार्टर स्क्रिप्ट वीएम सीरियल पोर्ट पर सहेजे गए संदेशों की जांच करके काम करती है जब इसे बनाया गया था.
-
क्लाउड शेल में, वीएम शुरू करते समय सहेजे गए संदेशों को प्रदर्शित करें:
Gcloud की गणना टेल-सेरियल-पोर्ट-आउटपुट $ इंस्टेंसेस
यदि Chrome दूरस्थ डेस्कटॉप का कॉन्फ़िगरेशन सफल है, तो निम्नलिखित अखबार लाइनें प्रदर्शित की जाती हैं:
मेटाडेटा में sysprep-specialize-scrct-ps1 मिला. Sysprep-specialize-scrct-ps1: क्रोम रिमोट डेस्कटॉप डाउनलोड करना. Sysprep-Specialize-SCRCT-PS1: क्रोम रिमोट डेस्कटॉप इंस्टालिंग. Sysprep-specialize-scrct-ps1: chrome डाउनलोड करना. Sysprep-specialize-scrct-ps1: इंस्टालिंग क्रोम. Sysprep-specialize-scrct-ps1: क्रोम रिमोट डेस्कटॉप सेवा शुरू करना. Sysprep-specialize-scrct-ps1 एक्जिट स्थिति 0 फाइनल रनिंग स्पीस्टाईलाइज़ स्क्रिप्ट.
डेस्कटॉप कॉन्फ़िगरेशन क्रोम की विफलता के मामले में दूरस्थ रूप से, एक त्रुटि संदेश प्रदर्शित होता है. उदाहरण :
Sysprep-specialize-scrct-ps1: होस्ट शुरू नहीं कर सका: Oauth त्रुटि.
यह त्रुटि इंगित करती है कि ऑफिस रिमोट क्रोम के प्रमाणीकरण पृष्ठ पर OAuth टोकन अब मान्य नहीं है, या तो या तो इसका उपयोग पहले से ही किया जा चुका है, या क्योंकि यह समाप्त हो गया है. इस त्रुटि को ठीक करने के लिए, आरडीपी के माध्यम से कनेक्ट करें और पहले वर्णित के रूप में एक इंटरैक्टिव कॉन्फ़िगरेशन विकसित करें, या वीएम को हटा दें और कॉन्फ़िगरेशन प्रक्रिया को फिर से तैयार करें. जब निम्न संदेश सीरियल पोर्ट पर प्रदर्शित होता है, तो वीएम तैयार होता है.
Gceinstancesup: ------------------------------------------------------------------ -------------------------------------------------------------- - gceinstancesup: सेटअप समाप्त शरीर. Crdhost उपयोग करने के लिए तैयार है. Gceinstancesup: ------------------------------------------------------------
एक Windows उपयोगकर्ता खाता बनाएँ
- Google क्लाउड कंसोल में, पेज को एक्सेस करें वीएम इंस्टेंस. “वीएम इंस्टेंसेस” पेज तक पहुँचें
- पृष्ठ खोलने के लिए Crdhost उदाहरण के नाम पर क्लिक करें वीएम इंस्टेंस जानकारी.
- नीचे दूरदराज का उपयोग, पर क्लिक करें एक विंडोज पासवर्ड को परिभाषित करें, तब से परिभाषित करना दूरस्थ मशीन पर अपना खाता बनाने के लिए. यह चरण स्वचालित रूप से आपका पासवर्ड उत्पन्न करता है. उपयोगकर्ता नाम और पासवर्ड नोट करें, या उन्हें एक सुरक्षित अस्थायी फ़ाइल में कॉपी करें.
Chrome रिमोट डेस्कटॉप के साथ VM इंस्टेंस से कनेक्ट करें
आप क्रोम रिमोट ऑफिस एप्लिकेशन का उपयोग करके वीएम इंस्टेंस से कनेक्ट कर सकते हैं.
- अपने स्थानीय कंप्यूटर पर, ऑफिस वेबसाइट रिमोट क्रोम पर जाएं.
- पर क्लिक करें मेरे कंप्यूटर तक पहुँचें.
- यदि आप अभी तक Google से कनेक्ट नहीं हुए हैं, तो उसी Google खाते के साथ लॉग इन करें जैसा कि कार्यालय सेवा Chrome रिमोट को कॉन्फ़िगर करने के लिए उपयोग किया जाता है. VM CRDHOST का आपका नया उदाहरण सूची में प्रदर्शित किया गया है सुदूर उपकरण.
- रिमोट डेस्कटॉप इंस्टेंस पर क्लिक करें.
- जब आपको आमंत्रित किया जाता है, तो आपके द्वारा पहले बनाए गए कोड को दर्ज करें, फिर तीर पर क्लिक करें Arrow_forward आपको कनेक्ट करने के लिए. अब आप अपने कंप्यूट इंजन डिस्टेंट इंस्टेंस के विंडोज कनेक्शन स्क्रीन से जुड़े हुए हैं.
- यदि आपको आमंत्रित किया जाता है, तो हमेशा ऑफिस एप्लिकेशन रिमोट को अपने क्रैंस को पढ़ने के लिए अधिकृत करें और स्थानीय और दूर के अनुप्रयोगों को कॉपी और पेस्ट करें.
- किसी भी बटन को दबाएं, फिर विंडोज उपयोगकर्ता पासवर्ड दर्ज करें जो आपने पहले उत्पन्न किया था. ध्यान दें कि डिफ़ॉल्ट रूप से दूरस्थ कीबोर्ड अमेरिकी अंग्रेजी में है. नतीजतन, दर्ज किए गए वर्ण आपके स्थानीय कीबोर्ड के अनुरूप नहीं हो सकते हैं. न ही आप पासवर्ड कॉपी और पेस्ट कर सकते हैं.
अब आप विंडोज डेस्क रिमोट से जुड़े हैं.
दूरस्थ डेस्कटॉप में उपयोगकर्ता अनुभव में सुधार करें
यह खंड दूरस्थ डेस्कटॉप में उपयोगकर्ता अनुभव को बेहतर बनाने के लिए मापदंडों को संशोधित करने के लिए निर्देश प्रदान करता है.
Chrome Office एप्लिकेशन रिमोट इंस्टॉल करें
क्रोम रिमोट डेस्कटॉप एप्लिकेशन एक अलग विंडो में डिस्प्ले की अनुमति देता है और कीबोर्ड शॉर्टकट प्रदान करता है जो सामान्य रूप से रिमोट सिस्टम पर उपयोग किए जाने वाले क्रोम द्वारा इंटरसेप्ट किए जाते हैं.
यदि यह एप्लिकेशन इंस्टॉल नहीं किया गया है, तो निम्नानुसार आगे बढ़ें:
- पैनल खोलें सत्र विकल्प बटन का उपयोग करना chevron_left जो तब दिखाई देता है जब आप माउस को खिड़की के किनारे पर ले जाते हैं.
- खंड में एप्लिकेशन इंस्टॉल करो (एप्लिकेशन इंस्टॉल करें), पर क्लिक करें शुरू (आरंभ करना).
- पर क्लिक करें स्थापित करना.
रिमोट डेस्कटॉप सत्र फिर से अपने स्वयं के एप्लिकेशन विंडो में खुलता है.
आप आइकन पर क्लिक करके सभी डेस्कटॉप सत्रों को क्रोम टैब से एप्लिकेशन विंडो में स्थानांतरित कर सकते हैं के साथ खोलें Open_new एड्रेस बार में.
स्क्रीन रिज़ॉल्यूशन में सुधार करें
रिमोट ऑफिस डिफ़ॉल्ट रिज़ॉल्यूशन को आपके स्थानीय कंप्यूटरों के कार्यालय के संकल्प के लिए बेहतर मेल खाने के लिए संशोधित किया जा सकता है.
- दूर से कार्यालय की पृष्ठभूमि पर राइट क्लिक करें, फिर चुनें प्रदर्शन सेटिंग्स.
- ड्रॉप -डाउन सूची में संकल्प, एक और स्क्रीन रिज़ॉल्यूशन का चयन करें.
- संवाद बॉक्स में नए स्क्रीन रिज़ॉल्यूशन की पुष्टि करें.
सेवा को फिर से सक्रिय करें
यदि आपके पास क्लाइंट एप्लिकेशन में रिमोट इंस्टेंस के लिए गलती से अक्षम कनेक्शन हैं, तो आप सेवा को फिर से कॉन्फ़िगर कर सकते हैं, फिर कॉन्फ़िगर ब्यूरो सर्विस क्रोम पर निर्देशों का पालन करके इसे फिर से सक्रिय कर सकते हैं.
को साफ
इस ट्यूटोरियल के दौरान उपयोग किए जाने वाले संसाधनों को आपके Google क्लाउड खाते पर बिल करने के लिए, संसाधनों वाले प्रोजेक्ट को हटाने के लिए, या परियोजना को रखने और व्यक्तिगत संसाधनों को हटाने के लिए.
परियोजना को हटा दें
बिलिंग को रोकने का सबसे आसान तरीका इस ट्यूटोरियल के लिए आपके द्वारा बनाई गई परियोजना को हटाना है.
परियोजना को हटाने के लिए:
-
ध्यान : किसी परियोजना के विलोपन के निम्नलिखित प्रभाव होंगे:
- परियोजना की सभी सामग्री हटा दी गई है. यदि आपने इस दस्तावेज़ के कार्यों के लिए एक मौजूदा परियोजना का उपयोग किया है, जब आप इसे हटा देते हैं, तो आप परियोजना में किए गए किसी अन्य कार्य को भी हटा देते हैं.
- व्यक्तिगत परियोजनाएं आईडी खो जाती हैं. जब आपने यह प्रोजेक्ट बनाया है, तो आपने एक व्यक्तिगत प्रोजेक्ट आईडी बनाई होगी जिसका आप भविष्य में उपयोग करना चाहते हैं. प्रोजेक्ट आईडी का उपयोग करने वाले URL को रखने के लिए, जैसे कि AppSpot URL.com, पूरे प्रोजेक्ट को हटाने के बजाय परियोजना में चयनित संसाधनों को हटा दें.
यदि आप कई आर्किटेक्चर, ट्यूटोरियल और तेजी से शुरुआती गाइडों का पता लगाने की योजना बनाते हैं, तो परियोजनाओं का पुन: उपयोग करने से आपको परियोजनाओं की कोटा सीमा से अधिक नहीं होने में मदद मिल सकती है.
कंप्यूट इंस्टेंस इंजन निकालें
पूर्ण परियोजना को हटाने के बजाय, आप इस ट्यूटोरियल के लिए बनाए गए वीएम बॉडी को हटा सकते हैं. उसके लिए, निम्नलिखित के रूप में आगे बढ़ें:

- Google क्लाउड कंसोल में, VM इंस्टेंसेस पेज पर एक्सेस करें: VM इंस्टेंसेस पेज तक पहुँचें
- पहले बनाए गए उदाहरण के नाम की जाँच करें (CRDHOST).
- बटन पर क्लिक करें मिटाना (हटाएं) पृष्ठ के शीर्ष पर. शरीर के उन्मूलन में कुछ क्षण लगते हैं.
क्रोम रिमोट ऑफिस में शरीर को सौंपे गए प्राधिकरण को रद्द करें
यदि आप अब VM उदाहरण से कनेक्ट नहीं करना चाहते हैं, तो आप इसे निष्क्रिय कर सकते हैं और इसे सूची से हटा सकते हैं सुदूर उपकरण (दूरस्थ उपकरण).
- अपने स्थानीय कंप्यूटर पर, क्रोम रिमोट डेस्कटॉप रिमोट डिवाइस सूची (क्रोम रिमोट डेस्कटॉप के लिए दूरस्थ डेस्कटॉप सूची की सूची) पर जाएं.
- Crdhost उदाहरण के नाम के बगल में हटाएं पर क्लिक करें
- पर क्लिक करें ठीक है यह पुष्टि करने के लिए कि आप रिमोट डिवाइस से कनेक्शन को निष्क्रिय करना चाहते हैं.
पीछे पीछे जाना
- लिनक्स वर्चुअल मशीनों पर क्रोम रिमोट डेस्कटॉप को कॉन्फ़िगर करने का तरीका जानें.
- वर्चुअल वर्कस्टेशन बनाने के लिए अन्य विकल्पों की खोज करें.
- Google क्लाउड से संबंधित संदर्भ आर्किटेक्चर, पैटर्न और अच्छी प्रथाओं की खोज करें. हमारे क्लाउड आर्किटेक्चर सेंटर से परामर्श करें.
टिप्पणी
जब तक अन्यथा इंगित नहीं किया जाता है, इस पृष्ठ की सामग्री एक क्रिएटिव कॉमन्स असाइनमेंट 4 लाइसेंस द्वारा नियंत्रित होती है.0, और कोड के नमूने अपाचे 2 लाइसेंस द्वारा शासित होते हैं.0. अधिक जानकारी के लिए, Google डेवलपर्स साइट के नियम देखें. जावा ओरेकल और/या इसकी संबद्ध कंपनियों का एक पंजीकृत ट्रेडमार्क है.
2022/11/16 (UTC) पर अंतिम अद्यतन.
Favicons SERP डेस्कटॉप Google पर लौटते हैं

एक विफल पहले प्रयास के लगभग 3 साल बाद, Google SERP डेस्कटॉप में Favicons को पुष्ट करता है ताकि उन्हें मोबाइल परिणामों के अपने पृष्ठों को जितना संभव हो उतना एकजुट किया जा सके.
आइए हम तथ्यों को याद करते हैं: जनवरी 2020 में, Google ने मोबाइल पर एक SERP डेस्कटॉप स्थापित किया था, विशेष रूप से प्रत्येक परिणाम के सामने साइट के फ़ेविकॉन के प्रदर्शन के साथ -साथ पृष्ठ के URL के लिए रंग परिवर्तन भी , विशेष रूप से. यहाँ यह था:
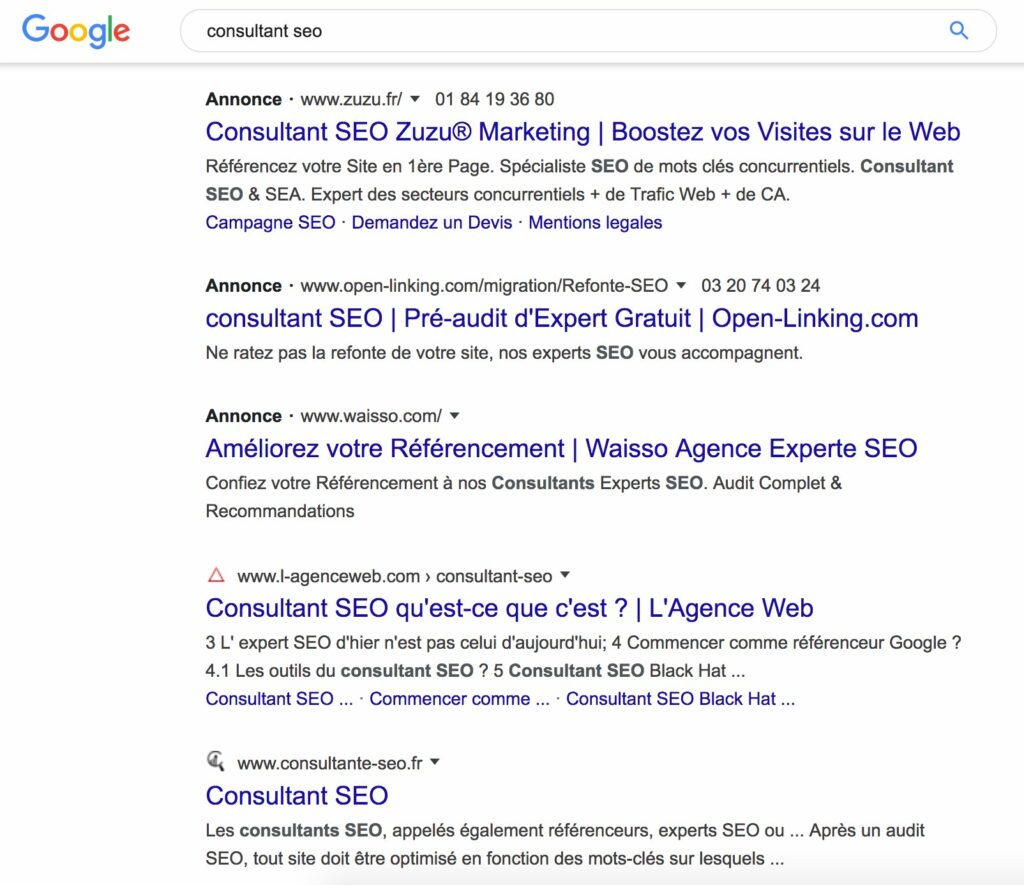
Favicons के साथ और 2020 की शुरुआत में विज्ञापनों के साथ Google Google. स्रोत: ट्विटर
इस परिवर्तन के बाद, एक आक्रोश जल्दी से सुना गया, यह तर्क देते हुए कि विज्ञापनों और प्राकृतिक परिणामों के बीच का अंतर इस नए प्रदर्शन के साथ पहले की तुलना में कम स्पष्ट था. इसके अलावा, कुछ दिनों बाद, Google ने उन्हें केवल विज्ञापनों पर रखने के लिए प्राकृतिक परिणामों पर favicons को पीछे हटाया और हटा दिया था. उस समय, Google ने यह संकेत दिया था कि यह SERP के कुछ अन्य स्थानों में favicons को जगह देने (या नहीं) करने के लिए कई परीक्षण स्थापित करेगा ..
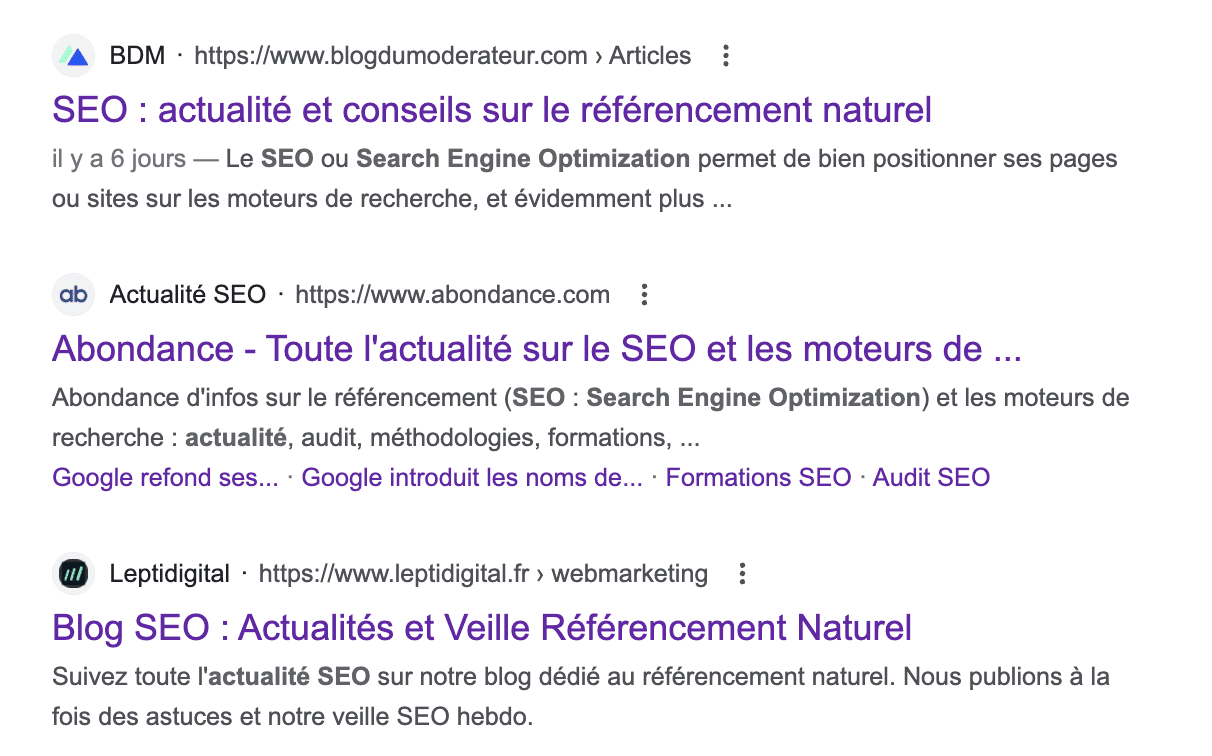
ऐसा लगता है कि, लगभग 3 साल बाद, Favicons SERP डेस्कटॉप Google में फिर से प्रकट हो गए हैं, हमारे साथ से, कई दिनों के लिए 4 अलग -अलग ब्राउज़रों पर किए गए परीक्षणों के बाद, वे अब ‘स्थान के बाईं ओर अच्छी तरह से स्थापित हैं साइट और पेज URL के नाम के लिए आरक्षित (नीचे चित्र देखें). कई इंटरनेट उपयोगकर्ताओं ने यह भी पुष्टि की है कि आज अपने SERP में Favicons भी मौजूद थे. इसलिए हम कल्पना कर सकते हैं कि यह अब एक छोटा -सेस्केल परीक्षण नहीं है और अंतिम तैनाती चल रही है. Favicon इस बार रंग की पृष्ठभूमि में प्रदर्शित होने लगता है.
Googles विज्ञापनों के विज्ञापनों के लिए, एक ही प्रदर्शन, लेकिन ऊपर “प्रायोजित” उल्लेख के साथ. ध्यान दें कि यह नया प्रावधान अभी भी प्राकृतिक परिणामों को थोड़ा और नीचे धकेलता है, क्योंकि पिछली स्थिति के विपरीत, “प्रायोजित” का उल्लेख करने के बाद लाइन के लिए एक छलांग है, जहां उल्लेख “विज्ञापन” को बाएं URL पर तैनात किया गया था.
फिलहाल, इस डिस्प्ले के लिए Google टीमों की नींद को परेशान करने के लिए शील्ड्स का कोई भी उठाना नहीं आया है, हालांकि पहले की पेशकश की थी. लेकिन छुट्टियों का मौसम निश्चित रूप से इस प्रकार के शोर सुधार को शुरू करने के लिए अधिक अनुकूल है ..
Favicons के साथ और विज्ञापन के बिना Google Google. स्रोत: बहुतायत
Favicons के साथ और विज्ञापनों के साथ Google Google. स्रोत: बहुतायत
अतिरिक्त लेख:
- Google अपने मोबाइल SERP में साइटों के नाम पेश करता है
कुछ के लिए Google मोबाइल Serps में डबल नवीनता. - Google SERP में छवियों के लिए नया प्रदर्शन
Google ने अपने चित्रों को प्रदर्शित करने की अपनी विधि बदल दी है. - Google डेस्कटॉप पर 25% SERP किसी भी क्लिक को उत्पन्न नहीं करता है [अध्ययन]
सेमरश इंटरनेट उपयोगकर्ताओं के व्यवहार पर एक अध्ययन प्रदान करता है जब वे. - Google का SERP डेस्कटॉप का नया डिज़ाइन अब जगह में है
अब से, डेस्कटॉप खोज परिणामों में नई जानकारी है.


 Ilyass बैरी – 26 जून, 2023
  मैं आपके साथ अपने बुरे अनुभव b नया एस्ट्रा साझा करता हूं . महीनों में खरीदी गई कार 10/22 में मुझे कैमरे की समस्याओं को समायोजित करने के लिए 360 और एयर कंडीशनिंग को समायोजित करने के लिए -Sales सेवा से लगभग 9 बार स्थानांतरित करने के लिए मजबूर किया गया था और अब मैं एक एनवी समस्या के सामने हूं: कॉकपिट और स्क्रीन जो अपने आप बंद हो जाती है . हैची कामेल और याला वास्लाह डब्ल्यू 5900 किमी वास्तव में मैं निराश हूं .
 WAFA HH – 22 फरवरी, 2022
  लेई राम – 23 फरवरी, 2022