रिमोट डेस्कटॉप सेवाओं और दूरस्थ पीसी के लिए रिमोट डेस्कटॉप ग्राहक – विंडोज सर्वर | Microsoft लर्न, रिमोट डेस्कटॉप – नेटवर्क के बाहर से अपने पीसी तक पहुंच का अनुदान | Microsoft सीखें
रिमोट डेस्कटॉप – अपने पीसी नेटवर्क के बाहर से अपने पीसी तक पहुंच दें
Contents
- 1 रिमोट डेस्कटॉप – अपने पीसी नेटवर्क के बाहर से अपने पीसी तक पहुंच दें
- 1.1 रिमोट डेस्कटॉप सेवाओं और दूरस्थ पीसी के लिए दूरस्थ डेस्कटॉप ग्राहक
- 1.2 अपने दूरस्थ पीसी से कनेक्शन
- 1.3 रिमोट डेस्कटॉप – अपने पीसी नेटवर्क के बाहर से अपने पीसी तक पहुंच दें
- 1.4 अपने राउटर पर पोर्ट को सक्रिय करें
- 1.5 एक वीपीएन का उपयोग करें
- 1.6 विंडोज के लिए रिमोट डेस्कटॉप एप्लिकेशन के साथ अच्छी तरह से शुरू करें
- 1.7 दूर से कार्यालय आवेदन प्राप्त करें और इसका उपयोग करना शुरू करें
- 1.8 आंतरिक संसाधनों तक पहुंचने के लिए एक दूरस्थ डेस्कटॉप गेटवे से कनेक्ट करें
- 1.9 सामान्य अनुप्रयोग पैरामीटर
- 1.10 अपने दूरस्थ सत्र नेविगेट करें
- 1.11 अपनी टिप्पणी भेजें
उपयोगकर्ता खाते को हटाने के लिए:
रिमोट डेस्कटॉप सेवाओं और दूरस्थ पीसी के लिए दूरस्थ डेस्कटॉप ग्राहक
Microsoft दूरस्थ डेस्कटॉप ग्राहकों के साथ, आप विंडोज सर्वर और पीसी रिमोट से रिमोट डेस्कटॉप सेवाओं से कनेक्ट कर सकते हैं और उन कार्यालयों और अनुप्रयोगों का उपयोग और नियंत्रण कर सकते हैं जो आपके व्यवस्थापक ने आपको उपलब्ध कराया है. विभिन्न प्लेटफार्मों और फॉर्म कारकों पर कई अलग -अलग प्रकार के उपकरणों के लिए ग्राहक उपलब्ध हैं, जैसे डेस्कटॉप कंप्यूटर और लैपटॉप, टैबलेट, स्मार्टफोन और वेब ब्राउज़र के माध्यम से. डेस्कटॉप कंप्यूटर और लैपटॉप पर अपने वेब ब्राउज़र का उपयोग करके, आप सॉफ़्टवेयर डाउनलोड या इंस्टॉल किए बिना कनेक्ट कर सकते हैं.
कई विशेषताएं हैं जिनका उपयोग आप अपने दूरस्थ अनुभव को बेहतर बनाने के लिए कर सकते हैं, विशेष रूप से निम्नलिखित:
- कई मॉनिटरों के लिए समर्थन.
- व्यक्तिगत प्रदर्शन संकल्प.
- गतिशील प्रदर्शन संकल्प और पैमाना.
- वेबकैम, स्टोरेज डिवाइस और प्रिंटर जैसे उपकरणों का पुनर्निर्देशन.
- रिमोट पीसी पर इंस्टॉल किए गए ऐप्स का उपयोग करें.
- दूरस्थ पीसी पर नेटवर्क फ़ाइलों और संसाधनों तक पहुंचें.
- जब आप ग्राहक को बंद करते हैं तो एप्लिकेशन को खुला छोड़ दें.
कुछ सुविधाएँ केवल कुछ ग्राहकों के साथ उपलब्ध हैं. इसलिए दूरस्थ कार्यालय सेवाओं या दूर के पीसी से कनेक्ट होने पर मतभेदों को समझने के लिए दूरस्थ कार्यालय ग्राहकों की कार्यक्षमताओं की तुलना करना महत्वपूर्ण है.
आप एज़्योर वर्चुअल डेस्कटॉप के साथ -साथ विंडोज सर्वर या एक रिमोट पीसी में रिमोट डेस्कटॉप सेवाओं के लिए कनेक्ट करने के लिए दूर से डेस्कटॉप क्लाइंट के अधिकांश संस्करणों का उपयोग कर सकते हैं. यदि आप इसके बजाय Azure वर्चुअल डेस्कटॉप पर जानकारी चाहते हैं, तो ग्राहकों को Azure वर्चुअल डेस्कटॉप के लिए दूरस्थ कार्यालय देखें.
यहां रिमोट डेस्कटॉप क्लाइंट क्लाइंट एप्लिकेशन और रिमोट डेस्कटॉप सेवाओं या रिमोट पीसी पर हमारे प्रलेखन की एक सूची दी गई है, जहां आप डाउनलोड लिंक, नई सुविधाएँ और प्रत्येक ग्राहक को स्थापित करने और उपयोग करने के बारे में जानकारी पा सकते हैं.
| सुदूर कार्यालय ग्राहक | दस्तावेज़ और डाउनलोड लिंक | संस्करण जानकारी |
|---|---|---|
| वेब | दूरस्थ डेस्कटॉप सेवाओं और दूरस्थ कार्यालय के ग्राहकों को दूरस्थ रूप से वेब के लिए कनेक्ट करें | सस्ता माल |
| मैक ओएस | MacOS के लिए दूरस्थ डेस्कटॉप सेवाओं और दूरस्थ कार्यालय ग्राहकों से दूरस्थ रूप से कनेक्ट करें | सस्ता माल |
| iOS/iPados | IOS और iPados के लिए रिमोट डेस्कटॉप सेवाओं और दूरस्थ कार्यालय ग्राहकों से कनेक्ट करें | सस्ता माल |
| एंड्रॉइड/क्रोम ओएस | Android और Chrome OS के लिए रिमोट डेस्कटॉप सेवाओं और दूरस्थ डेस्कटॉप ग्राहकों से कनेक्ट करें | सस्ता माल |
| विंडोज स्टोर रिमोट डेस्कटॉप | विंडोज स्टोर के साथ दूरस्थ डेस्कटॉप सेवाओं और रिमोट डेस्कटॉप से कनेक्ट करें | सस्ता माल |
अपने दूरस्थ पीसी से कनेक्शन
इससे पहले कि आप अपने दूरस्थ पीसी से कनेक्ट कर सकें, आपको इसे दूर से सक्रिय करना होगा. अधिक जानकारी के लिए, अपने पीसी पर दूर से कार्यालय को सक्रिय करें.
रिमोट डेस्कटॉप – अपने पीसी नेटवर्क के बाहर से अपने पीसी तक पहुंच दें
जब आप एक दूरस्थ कार्यालय ग्राहक का उपयोग करके अपने पीसी से कनेक्ट करते हैं, तो आप एक सहकर्मी से पीयर कनेक्शन बनाते हैं. इसका मतलब है कि आपको पीसी तक सीधी पहुंच की आवश्यकता है (कभी -कभी “होस्ट” कहा जाता है). यदि आपको नेटवर्क के बाहर से अपने पीसी से कनेक्ट करने की आवश्यकता है और आपका कंप्यूटर चालू है, तो आपको इस एक्सेस को सक्रिय करना होगा. आपके पास दो संभावनाएं हैं: पोर्ट तक पहुंचें या वीपीएन को कॉन्फ़िगर करें.
अपने राउटर पर पोर्ट को सक्रिय करें
पोर्ट पहुंचता है बस पोर्ट पर अपने राउटर (अपने सार्वजनिक आईपी पते) के आईपी पते पर पोर्ट को मैप करता है और उस पीसी के आईपी पते पर जिस पर आप एक्सेस करना चाहते हैं.
पोर्ट तक पहुंचने के लिए कदम आपके द्वारा उपयोग किए जाने वाले राउटर पर निर्भर करते हैं, इसलिए आपको अपने राउटर के लिए ऑनलाइन निर्देशों की खोज करनी चाहिए. चरणों का एक सामान्य विवरण प्राप्त करने के लिए, एक राउटर पर पोर्ट की पहुंच को कॉन्फ़िगर करने के लिए विकीहो से परामर्श करें.
पोर्ट को मैप करने से पहले, आपको निम्नलिखित तत्वों की आवश्यकता होगी:
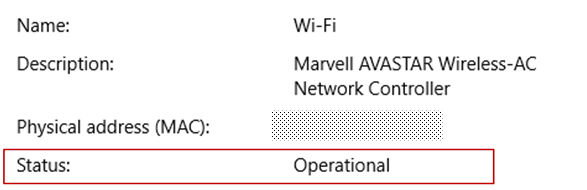
- पीसी का आंतरिक आईपी पता: में देखो सेटिंग्स> नेटवर्क और इंटरनेट> स्टेट> अपने नेटवर्क गुण प्रदर्शित करें. “परिचालन” राज्य के साथ नेटवर्क कॉन्फ़िगरेशन का पता लगाएं, और पुनर्प्राप्त करेंIPv4 पता.
- आपका सार्वजनिक आईपी पता (राउटर का आईपी पता). इस जानकारी को खोजने के कई तरीके हैं: आप (बिंग या Google में) “मेरा आईपी पता” खोज सकते हैं या वाई-फाई नेटवर्क के गुणों से परामर्श कर सकते हैं (विंडोज 10 के लिए).
- मैप्ड पोर्ट नंबर. ज्यादातर मामलों में यह पोर्ट 3389 है, जो रिमोट डेस्कटॉप कनेक्शन के लिए डिफ़ॉल्ट पोर्ट है.
- व्यवस्थापक आपके राउटर तक पहुंच.
चेतावनी आप अपने पीसी को इंटरनेट एक्सेस के लिए खोलते हैं, जो अनुशंसित नहीं है. यदि आप बाध्य हैं, तो अपने पीसी के लिए एक मजबूत पासवर्ड को परिभाषित करना सुनिश्चित करें. वीपीएन का उपयोग करना सबसे अच्छा है.
एक बार जब आप पोर्ट को मैप करते हैं, तो आप अपने राउटर के सार्वजनिक आईपी पते से कनेक्ट करके स्थानीय नेटवर्क के बाहर से अपने होस्ट पीसी से कनेक्ट कर सकते हैं (उपरोक्त चिप्स का दूसरा इनपुट).
आईपी राउटर पता बदल सकता है: आपका इंटरनेट सेवा प्रदाता किसी भी समय एक नया आईपी पता दे सकता है. इस समस्या का सामना करने से बचने के लिए, एक गतिशील DNS का उपयोग करने पर विचार करें: यह आपको IP पते के बजाय डोमेन नाम को याद करने के लिए एक आसान का उपयोग करके पीसी से कनेक्ट करने की अनुमति देता है. यदि यह बदलता है, तो आपका राउटर अपने नए आईपी पते के साथ DDNS सेवा को स्वचालित रूप से अपडेट करता है.
अधिकांश राउटर के साथ, आप परिभाषित कर सकते हैं कि कौन सा स्रोत आईपी पता या कौन सा स्रोत नेटवर्क पोर्ट मैपिंग का उपयोग कर सकता है. इसलिए, यदि आप जानते हैं कि आप केवल कार्यालय से कनेक्ट करना चाहते हैं, तो आप अपने पेशेवर नेटवर्क के आईपी पते को जोड़ सकते हैं, जो आपको इंटरनेट पर पोर्ट के उद्घाटन से बचने की अनुमति देता है. यदि आप जो होस्ट का उपयोग करते हैं, वह डायनेमिक आईपी पते का उपयोग करता है, तो इस इंटरनेट सेवा प्रदाता के समुद्र तट से पहुंच की अनुमति देने के लिए स्रोत प्रतिबंध को परिभाषित करें.
आप अपने पीसी पर एक स्थिर आईपी पते के कॉन्फ़िगरेशन पर भी विचार कर सकते हैं ताकि आंतरिक आईपी पता बदल न जाए. यदि आप ऐसा करते हैं, तो राउटर पोर्ट तक पहुंचता है हमेशा सही आईपी पते की ओर इशारा करेगा.
एक वीपीएन का उपयोग करें
यदि आप एक वर्चुअल प्राइवेट नेटवर्क (VPN) का उपयोग करके अपने स्थानीय नेटवर्क से कनेक्ट करते हैं, तो आपको अपने पीसी को सार्वजनिक इंटरनेट पर खोलने की आवश्यकता नहीं है. इसके बजाय, जब आप वीपीएन से कनेक्ट करते हैं, तो आपका दूरस्थ कार्यालय ग्राहक ऐसा व्यवहार करता है जैसे कि वे एक ही नेटवर्क का हिस्सा थे और यदि यह आपके पीसी तक पहुंचने में सक्षम था. कई वीपीएन सेवाएं हैं: आप उस व्यक्ति का उपयोग कर सकते हैं जो आपको सबसे अच्छा लगता है.
विंडोज के लिए रिमोट डेस्कटॉप एप्लिकेशन के साथ अच्छी तरह से शुरू करें
विंडोज के लिए रिमोट डेस्कटॉप एप्लिकेशन आपको किसी अन्य विंडोज डिवाइस से दूर से पीसी और विंडोज एप्लिकेशन का उपयोग करने की अनुमति देता है.
शुरू करने के लिए निम्नलिखित जानकारी में मदद करें. यदि आपके कोई प्रश्न हैं तो प्रश्न मंच (FAQ) से परामर्श करें.
यदि आप रिमोट डेस्कटॉप सेवाओं या एक रिमोट पीसी के बजाय Azure वर्चुअल डेस्कटॉप से कनेक्ट करना चाहते हैं,.
हम अब नई सुविधाओं के साथ विंडोज के लिए रिमोट डेस्कटॉप एप्लिकेशन को अपडेट नहीं करते हैं और भविष्य में एज़्योर वर्चुअल डेस्कटॉप के प्रबंधन को हटा दिया जाएगा.
Azure वर्चुअल डेस्कटॉप के एक इष्टतम अनुभव से लाभ उठाने के लिए, नवीनतम सुविधाओं और अपडेट के साथ, हम अनुशंसा करते हैं कि आप इसके बजाय विंडोज ऑफिस ग्राहक डाउनलोड करें.
दूर से कार्यालय आवेदन प्राप्त करें और इसका उपयोग करना शुरू करें
अपने विंडोज 10 डिवाइस पर दूर से डेस्कटॉप के साथ शुरू करने के लिए इन चरणों को करें:
- Microsoft स्टोर से ऑफिस एप्लिकेशन रिमोट डाउनलोड करें.
- दूरस्थ कनेक्शन स्वीकार करने के लिए अपने पीसी को कॉन्फ़िगर करें.
- एक दूरस्थ पीसी कनेक्शन या एक कार्यक्षेत्र जोड़ें. एक RemoteApp कार्यक्रम, एक सत्र या अपने व्यवस्थापक द्वारा प्रकाशित एक वर्चुअल कार्यालय के आधार पर एक कार्यालय, एक कार्यालय, एक कार्यालय से सीधे कनेक्ट करने के लिए एक कनेक्शन का उपयोग करें.
- दूर से कार्यालय तक पहुंचने के लिए आइटम को दूर से पिन करें.
एक दूरस्थ पीसी कनेक्शन जोड़ें
एक दूरस्थ पीसी कनेक्शन बनाने के लिए:
- कनेक्शन केंद्र में, दबाएं + जोड़ना, तब से पीसी.
- उस कंप्यूटर के लिए निम्नलिखित जानकारी दर्ज करें जिसे आप कनेक्ट करना चाहते हैं:
- पीसी नाम : कंप्यूटर का नाम. यह पीसी नाम एक विंडोज कंप्यूटर नाम, एक इंटरनेट डोमेन नाम या आईपी पता हो सकता है. आप पीसी के नाम पर पोर्ट जानकारी भी जोड़ सकते हैं (उदाहरण के लिए, Mydesktop: 3389 या 10.0.0.1: 3389)).
- उपभोक्ता खाता : रिमोट पीसी तक पहुंचने के लिए उपयोग करने के लिए उपयोगकर्ता खाता. दबाएं + एक नया खाता जोड़ने या किसी मौजूदा खाते का चयन करने के लिए. उपयोगकर्ता नाम को निम्नलिखित प्रारूपों में से एक का सम्मान करना चाहिए: उपयोगकर्ता नाम, डोमेन नाम, या User_name@डोमेन.कॉम. चुनना हमेशा मुझसे पूछें यदि आप चाहते हैं कि उपयोगकर्ता को कनेक्ट होने पर अपने पहचानकर्ताओं में प्रवेश करने के लिए आमंत्रित किया जाए.
- आप दबाकर अतिरिक्त विकल्पों को भी परिभाषित कर सकते हैं अधिक प्रदर्शित करें ::
- प्रदर्शित होने वाला नाम : उस पीसी के लिए याद रखना आसान है जिस पर आप लॉग करें. आप किसी भी चैनल को चुन सकते हैं, लेकिन यदि आप एक दोस्ताना नाम निर्दिष्ट नहीं करते हैं, तो पीसी का नाम प्रदर्शित होता है.
- बैंड : बाद में अपने कनेक्शन को आसानी से खोजने के लिए एक समूह निर्दिष्ट करें. दबाकर एक नया समूह जोड़ें + या सूची में से एक का चयन करें.
- पुल : रिमोट पीसी गेटवे जिसके साथ आप एक आंतरिक व्यापार नेटवर्क में एक सत्र के आधार पर वर्चुअल पीसी, रेमोटेप्प और पीसी कार्यक्रमों से कनेक्ट करना चाहते हैं. अपने सिस्टम एडमिनिस्ट्रेटर से गेटवे की जानकारी पूछें.
- व्यवस्थापक सत्र से कनेक्ट करें : इस विकल्प के साथ, आप विंडोज सर्वर को प्रशासित करने के लिए कंसोल सत्र से कनेक्ट कर सकते हैं.
- माउस बटन : इस विकल्प के साथ, आप दाएं माउस बटन पर बाएं माउस बटन के कार्यों को स्वैप कर सकते हैं. माउस बटन के बीच झुकाव आवश्यक है जब आप एक बाएं -हंगेड उपयोगकर्ता के लिए कॉन्फ़िगर किए गए पीसी का उपयोग करते हैं, लेकिन आपके पास केवल दाएं -हैंडर्स के लिए एक माउस है.
- मेरे दूरस्थ सत्र के संकल्प को परिभाषित करें : सत्र के लिए वांछित संकल्प का चयन करें. मेरे लिए चुनें : ग्राहक के आकार के अनुसार संकल्प को परिभाषित करता है.
- डिस्प्ले के आकार को संशोधित करें : यदि आप सत्र के लिए एक उच्च स्थैतिक संकल्प का चयन करते हैं, तो आप इस सेटिंग्स का उपयोग स्क्रीन पर तत्वों को बढ़ाने के लिए लेगिबिलिटी को बेहतर बनाने के लिए कर सकते हैं. यह सेटिंग केवल विंडोज 8 कनेक्शन के लिए लागू होती है.1 या बाद में.
- आकार बदलने के बाद दूरस्थ सत्र के संकल्प को अपडेट करें : जब यह विकल्प सक्रिय हो जाता है, तो ग्राहक गतिशील रूप से ग्राहक के आकार के अनुसार सत्र के संकल्प को अपडेट करता है. यह सेटिंग केवल विंडोज 8 कनेक्शन के लिए लागू होती है.1 या बाद में.
- क्लिपबोर्ड : जब यह सक्रिय हो जाता है, तो यह विकल्प आपको दूरस्थ पीसी से या या छवियों को कॉपी करने की अनुमति देता है.
- ऑडियो रीडिंग : अपने दूरस्थ सत्र के दौरान ऑडियो के लिए उपयोग किए जाने वाले डिवाइस का चयन करें. आप स्थानीय उपकरणों या दूरस्थ पीसी पर ध्वनि को सक्रिय करने के लिए, या ध्वनि को पूरी तरह से निष्क्रिय करने के लिए चुन सकते हैं.
- ऑडियो रिकॉर्डिंग : सक्रिय होने पर, यह विकल्प आपको एक दूरस्थ पीसी पर अनुप्रयोगों के साथ एक स्थानीय माइक्रोफोन का उपयोग करने की अनुमति देता है.
- दबाएं बचाना.
आपको इन सेटिंग्स को संशोधित करना होगा ? ओवरटेकिंग मेनू दबाएं ( . ) पीसी के नाम के बगल में, फिर दबाएं संशोधित करना.
आप कनेक्शन को हटाना चाहते हैं ? फिर से, ओवरटेकिंग मेनू दबाएं ( . ), फिर प्रेस मिटाना.
एक कार्यक्षेत्र जोड़ें
वर्कस्पेस रिमोटेप प्रोग्राम, कार्यालय हो सकते हैं, एक सत्र के आधार पर और रिमोट ऑफिस सेवाओं का उपयोग करके आपके व्यवस्थापक द्वारा प्रकाशित वर्चुअल कार्यालय.
एक कार्यक्षेत्र जोड़ने के लिए:
- कनेक्शन केंद्र स्क्रीन में, दबाएं + जोड़ना, तब से कार्यस्थानों.
- उसे दर्ज करेंप्रवाहित उर आपके व्यवस्थापक द्वारा प्रदान किया गया और प्रेस प्रवाह के लिए खोजें.
- जब आपको आमंत्रित किया जाता है, तो प्रवाह की सदस्यता के लिए आवश्यक पहचान जानकारी दर्ज करें.
कार्यक्षेत्र कनेक्शन केंद्र में प्रदर्शित किए जाएंगे.
कार्यक्षेत्रों को हटाने के लिए:
- कनेक्शन केंद्र में, ओवरटेकिंग मेनू दबाएं ( . ) कार्यक्षेत्र के बगल में.
- दबाएं मिटाना.
अपने प्रारंभ मेनू में एक रिकॉर्ड किया गया पीसी पिन करें
अपने स्टार्ट मेनू से कनेक्शन पिन करने के लिए, ओवरटेकिंग मेनू दबाएं ( . ) पीसी के नाम के बगल में, फिर दबाएं स्टार्ट मेनू पर पिन करें.
अब आप इसे दबाकर अपने स्टार्ट मेनू से सीधे पीसी कनेक्शन शुरू कर सकते हैं.
आंतरिक संसाधनों तक पहुंचने के लिए एक दूरस्थ डेस्कटॉप गेटवे से कनेक्ट करें
एक दूरस्थ डेस्कटॉप गेटवे आपको इंटरनेट पर कहीं से भी एक व्यवसाय नेटवर्क पर एक दूरस्थ कंप्यूटर से कनेक्ट करने की अनुमति देता है. आप कार्यालय एप्लिकेशन रिमोट का उपयोग करके अपने पुलों को बना और प्रबंधित कर सकते हैं.
एक नए दूरस्थ कार्यालय गेटवे को कॉन्फ़िगर करने के लिए:
- कनेक्शन केंद्र में, दबाएं समायोजन.
- गेटवे के बगल में, दबाएं + एक नया गेटवे जोड़ने के लिए.
नोट आप एक नया कनेक्शन जोड़ने पर एक गेटवे भी जोड़ सकते हैं.
- सर्वर का नाम : कंप्यूटर का नाम जिसे आप गेटवे के रूप में उपयोग करना चाहते हैं. यह सर्वर नाम एक विंडोज कंप्यूटर नाम, एक इंटरनेट डोमेन नाम या आईपी पता हो सकता है. आप सर्वर नाम में पोर्ट जानकारी भी जोड़ सकते हैं (उदाहरण के लिए: Rdgateway: 443 या 10.0.0.1: 443)).
- उपभोक्ता खाता : रिमोट पीसी गेटवे के साथ उपयोग करने के लिए एक उपयोगकर्ता खाता चुनें या जोड़ें जिससे आप कनेक्ट करें. आप भी चयन कर सकते हैं कार्यालय उपयोगकर्ता खाते का उपयोग करें यदि आप दूरस्थ पीसी से कनेक्शन के लिए उपयोग किए जाने वाले समान पहचान की जानकारी रखना पसंद करते हैं.
सामान्य अनुप्रयोग पैरामीटर
आप अपने क्लाइंट पर निम्नलिखित सामान्य सेटिंग्स को दबाकर परिभाषित कर सकते हैं समायोजन ::
प्रबंधित तत्व
- उपभोक्ता खाता : आपको ग्राहक पर सहेजे गए उपयोगकर्ता खातों को जोड़ने, संशोधित करने और हटाने की अनुमति देता है. आप उस खाते का पासवर्ड भी अपडेट कर सकते हैं जिसे बदल दिया गया है.
- पुल : आपको ग्राहक पर सहेजे गए गेटवे सर्वर को जोड़ने, संशोधित करने और हटाने की अनुमति देता है.
- बैंड : आपको ग्राहक पर सहेजे गए समूहों को जोड़ने, संशोधित करने और हटाने की अनुमति देता है. आप यहां कनेक्शन को भी समूहित कर सकते हैं.
सत्र पैरामीटर
- पूर्ण स्क्रीन में कनेक्शन शुरू करें : जब यह विकल्प सक्रिय हो जाता है, तो हर बार एक कनेक्शन शुरू कर रहा है, ग्राहक अपनी संपूर्णता में सक्रिय स्क्रीन का उपयोग करता है.
- एक नई विंडो में प्रत्येक कनेक्शन शुरू करें : जब यह विकल्प सक्रिय हो जाता है, तो प्रत्येक कनेक्शन एक अलग विंडो में शुरू किया जाता है. इस प्रकार आप अलग -अलग स्क्रीन में कनेक्शन कर सकते हैं और टास्कबार के माध्यम से एक से दूसरे तक जा सकते हैं.
- जब आवेदन का आकार बदल रहा है : आपको यह नियंत्रित करने की अनुमति देता है कि ग्राहक की खिड़की के आकार के आकार के बाद क्या हो रहा है. डिफ़ॉल्ट कार्रवाई है सामग्री को खिंचाव करें, इसके अनुपात को बनाए रखें.
- साथ कीबोर्ड कमांड का उपयोग करें : आपको यह निर्दिष्ट करने की अनुमति देता है कि कीबोर्ड कमांड कहाँ पसंद करता है जीतना या Alt+Tab उपयोग किया जाता है. डिफ़ॉल्ट रूप से, ये आदेश केवल सत्र में भेजे जाते हैं जब कनेक्शन पूर्ण स्क्रीन मोड में होता है.
- स्क्रीन की समाप्ति को रोकें : आपको एक सत्र के सक्रिय होने पर स्क्रीन को समाप्त करने से रोकने की अनुमति देता है. समाप्ति को रोकना उन कनेक्शनों के लिए उपयोगी है जिन्हें लंबी अवधि के लिए बातचीत की आवश्यकता नहीं है.
अनुप्रयोग सेटिंग
- पीसी पूर्वावलोकन दिखाएं : आपको कनेक्ट करने से पहले कनेक्शन केंद्र में एक पीसी का पूर्वावलोकन प्रदर्शित करने की अनुमति देता है. यह सेटिंग डिफ़ॉल्ट रूप से सक्षम है.
- दूरस्थ रूप से कार्यालय को बेहतर बनाने में हमारी मदद करें : Microsoft को अनाम डेटा भेजें. हम ग्राहक को बेहतर बनाने के लिए इस डेटा का उपयोग करते हैं. इस बारे में अधिक जानने के लिए कि हम इस अनाम व्यक्तिगत डेटा का उपयोग कैसे करते हैं, Microsoft गोपनीयता घोषणा देखें. यह सेटिंग डिफ़ॉल्ट रूप से सक्षम है.
अपने उपयोगकर्ता खातों का प्रबंधन करें
जब आप एक पीसी या कार्यक्षेत्र से कनेक्ट करते हैं, तो आप बाद में कनेक्ट करने के लिए खाता जानकारी सहेज सकते हैं. जब आप पीसी में लॉग इन करते हैं तो आप उपयोगकर्ता डेटा को सहेजने के बजाय ग्राहक से उपयोगकर्ता खातों को भी परिभाषित कर सकते हैं.
उपयोगकर्ता खाता बनाने के लिए:
- कनेक्शन केंद्र में, दबाएं समायोजन.
- उपयोगकर्ता खाते के आगे, दबाएं + एक नया उपयोगकर्ता खाता जोड़ने के लिए.
- निम्नलिखित जानकारी दर्ज करें:
- उपयोगकर्ता नाम : एक दूरस्थ कनेक्शन के साथ इसका उपयोग करने के लिए इसे सहेजने के लिए उपयोगकर्ता नाम. इन प्रारूपों में से किसी एक में उपयोगकर्ता नाम दर्ज करें: NOM_UTILIZER, DOMAIN \ NOM_UTILIZER या USER_NAME@डोमेन.कॉम.
- पासवर्ड : निर्दिष्ट उपयोगकर्ता के साथ जुड़ा हुआ पासवर्ड. इस फ़ील्ड को खाली छोड़ दें यदि आप चाहते हैं कि उपयोगकर्ता को कनेक्ट होने पर पासवर्ड दर्ज करने के लिए आमंत्रित किया जाए.
- दबाएं बचाना.
उपयोगकर्ता खाते को हटाने के लिए:
- कनेक्शन केंद्र में, दबाएं समायोजन.
- उपयोगकर्ता खाते के तहत सूची से हटाए जाने वाले खाते का चयन करें.
- उपयोगकर्ता खाते के अलावा, संशोधन आइकन दबाएं.
- दबाएं इस खाते को हटा दें उपयोगकर्ता खाते को हटाने के लिए नीचे.
- आप उपयोगकर्ता खाता भी बदल सकते हैं और प्रेस कर सकते हैं बचाना.
अपने दूरस्थ सत्र नेविगेट करें
यह खंड सेवा से जुड़े एक बार अपने सत्र को दूर से ब्राउज़ करने में मदद करने के लिए उपलब्ध उपकरणों का वर्णन करता है.
एक दूरस्थ सत्र शुरू करें
- सत्र शुरू करने के लिए आप जिस कनेक्शन का उपयोग करना चाहते हैं, उसका नाम दबाएं.
- यदि आपने कनेक्शन के लिए पहचान की जानकारी दर्ज नहीं की है, तो आपको दर्ज करने के लिए आमंत्रित किया जाता है उपयोगकर्ता नाम और एक पासवर्ड.
- यदि आपको अपने कार्यक्षेत्र या पीसी के प्रमाण पत्र की जांच करने के लिए आमंत्रित किया गया है, तो जानकारी की समीक्षा करें और जांचें कि कंप्यूटर दबाने से पहले एक विश्वसनीय पीसी है संबंध. आप भी चयन कर सकते हैं अब मुझसे इस प्रमाण पत्र के बारे में जानकारी नहीं पूछें इस प्रमाण पत्र को स्वचालित रूप से स्वीकार करने के लिए.
संबंध बार
कनेक्शन बार आपको अतिरिक्त नेविगेशन चेक तक पहुंच प्रदान करता है. डिफ़ॉल्ट रूप से, कनेक्शन बार को स्क्रीन के शीर्ष पर, बीच में रखा जाता है. बार को दबाएं और इसे स्थानांतरित करने के लिए बाईं या दाएं स्लाइड करें.
- पैनोरमिक नियंत्रण : आपको स्क्रीन को बढ़ाने और स्थानांतरित करने की अनुमति देता है. पैनोरमिक नियंत्रण केवल स्पर्श उपकरणों पर और प्रत्यक्ष स्पर्शक बातचीत मोड में उपलब्ध है.
- पैनोरमिक कंट्रोल को सक्रिय या निष्क्रिय करने के लिए, नियंत्रण प्रदर्शित करने के लिए कनेक्शन बार में मनोरम आइकन दबाएं. जब नयनाभिराम नियंत्रण सक्रिय होता है तो स्क्रीन ज़ूम करता है. नियंत्रण को छिपाने के लिए कनेक्शन बार में फिर से पैनोरमिक आइकन दबाएं और स्क्रीन को उसके मूल रिज़ॉल्यूशन में अस्वीकार कर दें.
- पैनोरमिक कंट्रोल का उपयोग करने के लिए, लंबे समय तक मनोरम नियंत्रण दबाएं और इसे उस दिशा में खींचें, जिसे आप स्क्रीन को स्थानांतरित करना चाहते हैं.
- पैनोरमिक कंट्रोल को स्थानांतरित करने के लिए, इसे स्क्रीन पर स्थानांतरित करने के लिए लंबे समय तक पैनोरमिक कंट्रोल दबाएं.
नियंत्रण बार
दबाएं . कनेक्शन बार में स्क्रीन के दाईं ओर नियंत्रण पट्टी प्रदर्शित करने के लिए.
- स्वागत : कंट्रोल बार से कनेक्शन सेंटर में लौटने के लिए होम बटन का उपयोग करें.
- आप उसी कार्रवाई के लिए पिछले बटन का भी उपयोग कर सकते हैं. यदि आप पिछले बटन का उपयोग करते हैं, तो आपका सक्रिय सत्र डिस्कनेक्ट नहीं किया जाएगा, जो आपको अतिरिक्त कनेक्शन लॉन्च करने की अनुमति देता है.
प्रत्यक्ष टच प्रविष्टियों और माउस फैशन का उपयोग करें
आप उपलब्ध दो माउस मोड का उपयोग करके अपने सत्र के साथ बातचीत कर सकते हैं:
- प्रत्यक्ष स्पर्श बातचीत : सत्र के लिए सभी स्पर्शक बातचीत संपर्कों को पास करें ताकि वे दूरस्थ रूप से व्याख्या की जाएं.
- इस मोड का उपयोग उसी तरह से किया जाता है जैसे विंडोज डिवाइस पर टच स्क्रीन के साथ.
- इस मोड का उपयोग उसी तरह से किया जाता है जैसे कि विंडोज डिवाइस पर टचपैड के साथ.
विंडोज संस्करण 8 या बाद के संस्करण में, देशी स्पर्शक बातचीत आंदोलनों को प्रत्यक्ष स्पर्शक बातचीत मोड में समर्थित किया जाता है.
माउस मोड माउस के साथ कार्रवाई आंदोलन प्रत्यक्ष स्पर्श बातचीत बायां क्लिक उँगलिया प्रत्यक्ष स्पर्श बातचीत राइट -क्लिक पर लंबाई पर एक उंगली दबाएं माऊस पाइंटर बायां क्लिक उँगलिया माऊस पाइंटर लेफ्ट क्लिक और शिफ्ट लंबे समय तक दो बार उंगली दबाएं, फिर स्लाइड करें माऊस पाइंटर राइट -क्लिक पर नल माऊस पाइंटर राइट क्लिक और शिफ्ट दो उंगलियों के साथ एक लंबा समय दबाएं, फिर स्लाइड करें माऊस पाइंटर माउस रूलेट दो उंगलियों के साथ लंबी प्रेस, फिर ऊपर या नीचे स्लाइड करें माऊस पाइंटर ज़ूम रियर ज़ूम करने के लिए दो उंगलियों को कस लें या सामने ज़ूम करने के लिए अपनी उंगलियों को फैलाएं अपनी टिप्पणी भेजें
आप एक कार्यक्षमता का सुझाव देना चाहते हैं या किसी समस्या की रिपोर्ट करना चाहते हैं ? टिप्पणी हब के बारे में हमें सब कुछ बताएं.
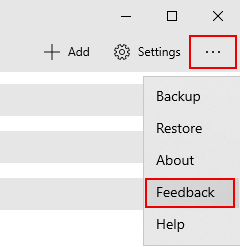
आप हमें निलंबन बिंदु बटन का चयन करके अपनी टिप्पणियों के बारे में भी बता सकते हैं (. ) क्लाइंट एप्लिकेशन में, फिर टिप्पणियाँ, जैसा कि निम्नलिखित छवि में सचित्र है.
आपकी बेहतर मदद करने के लिए, हमें आपको समस्या पर यथासंभव विस्तृत जानकारी देने की आवश्यकता है. उदाहरण के लिए, आप स्क्रीनशॉट या उन कार्यों के पंजीकरण को शामिल कर सकते हैं जो आपको समस्या के लिए प्रेरित करते हैं. उपयोगी टिप्पणियां प्रदान करने के बारे में अधिक सलाह के लिए, टिप्पणियाँ देखें.

 Ilyass बैरी – 26 जून, 2023
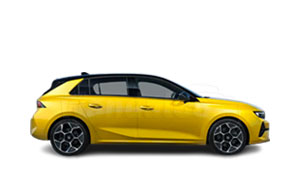
  मैं आपके साथ अपने बुरे अनुभव b नया एस्ट्रा साझा करता हूं . महीनों में खरीदी गई कार 10/22 में मुझे कैमरे की समस्याओं को समायोजित करने के लिए 360 और एयर कंडीशनिंग को समायोजित करने के लिए -Sales सेवा से लगभग 9 बार स्थानांतरित करने के लिए मजबूर किया गया था और अब मैं एक एनवी समस्या के सामने हूं: कॉकपिट और स्क्रीन जो अपने आप बंद हो जाती है . हैची कामेल और याला वास्लाह डब्ल्यू 5900 किमी वास्तव में मैं निराश हूं .
 WAFA HH – 22 फरवरी, 2022
  लेई राम – 23 फरवरी, 2022