OpenVPN और डेबियन के साथ अपना VPN सर्वर कैसे बनाएं, कैसे एक सर्वर पर अपने स्वयं के VPN को माउंट करें – न्यूमरेमा
कैसे एक सर्वर पर अपने स्वयं के वीपीएन माउंट करने के लिए
Contents
- 1 कैसे एक सर्वर पर अपने स्वयं के वीपीएन माउंट करने के लिए
- 1.1 डेबियन 11 और OpenVPN: अपना खुद का वीपीएन सर्वर कैसे बनाएं ?
- 1.2 द्वितीय. डेबियन 11 पर OpenVPN सर्वर की स्थापना
- 1.3 तृतीय. वीपीएन कनेक्शन का परीक्षण करें
- 1.4 चतुर्थ. निष्कर्ष
- 1.5 कैसे एक सर्वर पर अपने स्वयं के वीपीएन माउंट करने के लिए
- 1.6 एक रास्पबेरी पाई पर एक घर का बना वीपीएन स्थापित करें
- 1.7 Algo VPN स्थापित करके एक वर्चुअल मशीन पर एक VPN स्थापित करें
- 1.8 मेजबानों के टर्नकी समाधान के माध्यम से जाओ
- 1.9 आसान, लेकिन सीमित
- 1.10 एक अच्छा वीपीएन आपूर्तिकर्ता सरल है
OpenVPN पर आधारित एक VPN सर्वर सेट करने के लिए, अलग -अलग समाधान हैं: PfSense जैसे फ़ायरवॉल पर झुकें, एक लिनक्स मशीन का उपयोग करें, एक विंडोज मशीन का उपयोग करें, आदि।. आज, हम डेबियन 11 के तहत इस मामले में एक लिनक्स मशीन पर कार्यान्वयन में रुचि रखते हैं.
डेबियन 11 और OpenVPN: अपना खुद का वीपीएन सर्वर कैसे बनाएं ?
इस ट्यूटोरियल में, हम ओपनवीपीएन के साथ डेबियन 11 के तहत एक वीपीएन सर्वर को कॉन्फ़िगर करना सीखेंगे, एक वीपीएन सर्वर बनाने के उद्देश्य से, जिस पर हम इंटरनेट पर नेविगेट करने के लिए भरोसा करेंगे. यह ट्यूटोरियल आदर्श है यदि आप अपने स्वयं के वीपीएन सर्वर को सेट करना चाहते हैं, तो vps सर्वर पर OVHCloud या अन्य पर क्लाउड में. इस प्रकार, एक दूरस्थ क्लाइंट मशीन OpenVPN सर्वर से कनेक्ट कर सकती है ताकि OpenVPN सर्वर के कनेक्शन का शोषण करके इंटरनेट का उपयोग किया जा सके, लेकिन यह भी दूरस्थ बुनियादी ढांचे के लिए, चाहे वह VPN सर्वर ही हो, या उसी नेटवर्क का कोई अन्य सर्वर. वास्तव में, यह सिद्धांत “क्लाइंट-टू-साइट” वीपीएन के कार्यान्वयन पर आधारित है.
एक अनुस्मारक के रूप में, वीपीएन मतलब वीवास्तविक पीराइवेट करना नहींएबोर्क और एक वीपीएन का उद्देश्य सरल है: वीपीएन दो अंकों के बीच एक आभासी लिंक बनाएगा, उदाहरण के लिए दो व्यावसायिक नेटवर्क (वीपीएन साइट टू साइट), या एक ग्राहक पीसी और एक व्यावसायिक नेटवर्क (साइट पर वीपीएन ग्राहक) के बीच. इस लिंक के भीतर, जिसे कहा जाता है एक सुरंग, डेटा होगा मात्रा निर्धारित और ट्रैफ़िक के बाकी हिस्सों से अलग -थलग, यह सभी वीपीएन की रुचि है और “निजी” की यह धारणा है. आजकल, व्यक्तिगत उपयोग के लिए वीपीएन सेंसरशिप के आसपास जाने के लिए बहुत लोकप्रिय हैं, इंटरनेट पर अपने नेविगेशन को छिपाएं, आदि।.
OpenVPN पर आधारित एक VPN सर्वर सेट करने के लिए, अलग -अलग समाधान हैं: PfSense जैसे फ़ायरवॉल पर झुकें, एक लिनक्स मशीन का उपयोग करें, एक विंडोज मशीन का उपयोग करें, आदि।. आज, हम डेबियन 11 के तहत इस मामले में एक लिनक्स मशीन पर कार्यान्वयन में रुचि रखते हैं.
यहाँ दिन के बुनियादी ढांचे के बारे में कुछ जानकारी दी गई है:
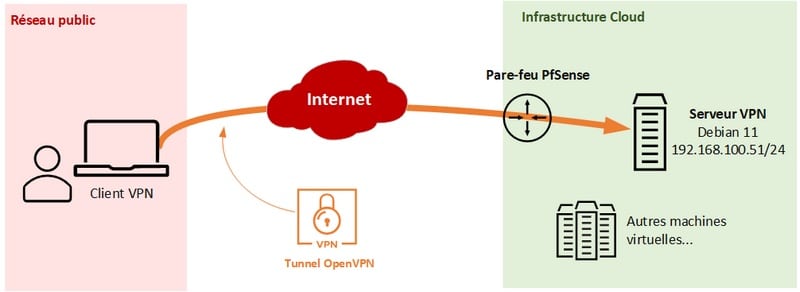
कई संभावित आर्किटेक्चर हैं, जिनमें शामिल हैं:
- OpenVPN सर्वर में एक सार्वजनिक IP पता (VPS का मामला) है इसलिए हम सीधे इसके सार्वजनिक IP पते से कनेक्ट करते हैं
- OpenVPN सर्वर एक राउटर / फ़ायरवॉल के पीछे नकाबपोश है, और इसलिए एक NAT के पीछे. परिणाम, हम उपकरण (राउटर/फ़ायरवॉल) के सार्वजनिक आईपी पते से जुड़ते हैं और एक पोर्ट पुनर्निर्देशन नियम के लिए धन्यवाद, हम अपने वीपीएन से जुड़ते हैं – मैं इस मामले में हूं, इस डेमो के हिस्से के रूप में
एक बार वीपीएन क्लाइंट से वीपीएन से जुड़ा होने के बाद, सभी ट्रैफ़िक ट्रैफ़िक वीपीएन के माध्यम से जाता है और OpenVPN सर्वर के इंटरनेट कनेक्शन के माध्यम से छोड़ देता है.
द्वितीय. डेबियन 11 पर OpenVPN सर्वर की स्थापना
हम ओपनवीपीएन सर्वर को मैन्युअल रूप से कॉन्फ़िगर कर सकते हैं, और हमारे डेबियन 11 सर्वर पर कदम से कदम. हालांकि, हम उपयोग करेंगे एक इंस्टॉलेशन स्क्रिप्ट जो एक वीपीएन सर्वर को बहुत आसानी से और जल्दी से तैनात करने की अनुमति देगा. यह स्क्रिप्ट, संगत डेबियन, रॉकी लिनक्स, फेडोरा, उबंटू, आदि।. GitHub पर उपलब्ध है: आप इसके कोड को संशोधित कर सकते हैं.
यह स्थापना क्या है ? यह स्क्रिप्ट बहुत व्यावहारिक है, लेकिन यह मशीन पर क्या करेगा ?
- एक डेबियन मशीन पर, वह निम्नलिखित पैकेज स्थापित करेगा: OpenVPN, iptables, OpenSSL, WGET, CA-QUERIPTATES, CURL, UNBOUND
- कॉन्फ़िगरेशन फ़ाइल के माध्यम से OpenVPN कॉन्फ़िगर करें:/etc/openvpn/सर्वर.अस्पष्ट
- प्रवाह की अनुमति देने के लिए सर्वर पर iptables कॉन्फ़िगर करें
- वीपीएन सर्वर पर रूटिंग को सक्रिय करें (“Sysctl जाल.आईपीवी 4.ip_forward = 1 “in /etc /systeml.D/ 99 -openvpn.अस्पष्ट ))
OpenVPN सर्वर को स्थापित करने से परे, स्क्रिप्ट VPN के उचित कामकाज के लिए एक आवश्यक प्रमाण पत्र उत्पन्न करने के लिए एक स्थानीय PKI पर भरोसा करेगी.
शुरू करने से पहले, सुनिश्चित करें कि आपका वीपीएन सर्वर इंटरनेट से अच्छी तरह से जुड़ा हुआ है और इसमें एक निश्चित आईपी पता है.
है. स्थापना स्क्रिप्ट डाउनलोड करें
अपने भविष्य के VPN सर्वर से कनेक्ट करें, और पैकेज कैश को अपडेट करके शुरू करें. हम कर्ल स्थापित करने का अवसर भी लेते हैं.
Sudo apt-get अपडेट sudo apt-get इंस्टॉल कर्ल
फिर कर्ल के साथ इंस्टॉलेशन स्क्रिप्ट डाउनलोड करें:
कर्ल -ओ https: // कच्चा.गठिया.com/Aggristan/OpenVPN Install/मास्टर/OpenVPN- इंस्टॉल.श
जैसे ही स्क्रिप्ट डाउनलोड की जाती है, आपको बाद में निष्पादित करने में सक्षम होने के लिए निष्पादन अधिकार जोड़ना होगा:
CHMOD +X OpenVPN- इंस्टॉल.श
फिर OpenVPN सर्वर के चरण द्वारा कॉन्फ़िगरेशन चरण शुरू करने के लिए स्क्रिप्ट चलाएं:
सूदो ./OpenVPN- इंस्टॉल.श
बी. VPN कॉन्फ़िगर करें
संदेश “ओपनवीपीएन स्थापित टन का स्वागत करते हैं!”प्रभावित करता है और कॉन्फ़िगरेशन चरण जुड़े होंगे. सबसे पहले, यह आवश्यक है वीपीएन सर्वर के IPv4 पते को इंगित करें, लेकिन अच्छी खबर यह है कि यह स्वचालित रूप से वापस चला जाता है. यदि यह स्थानीय आईपी पता है, तो इसका मतलब है कि एक एनएटी है और इस मामले में, यह तार्किक है. अन्यथा, आपके सर्वर का सार्वजनिक आईपी पता, आपके VPS सर्वर के उदाहरण के लिए, यहां प्रदर्शित किया जाएगा. यहाँ, स्क्रिप्ट अच्छी तरह से वापस जाती है “192.168.100.51 “मान्य करें.

अलावा, स्क्रिप्ट एनएटी की उपस्थिति का पता लगाता है और सार्वजनिक आईपी पते को इंगित करता है. जब तक आप एक विशिष्ट डोमेन नाम निर्दिष्ट नहीं करना चाहते हैं या स्क्रिप्ट द्वारा उठाई गई जानकारी को सही नहीं करना चाहते हैं, तब तक मान्य करें (जो आपके सार्वजनिक आईपी को पुनर्प्राप्त करने के लिए कर्ल पर निर्भर करता है).

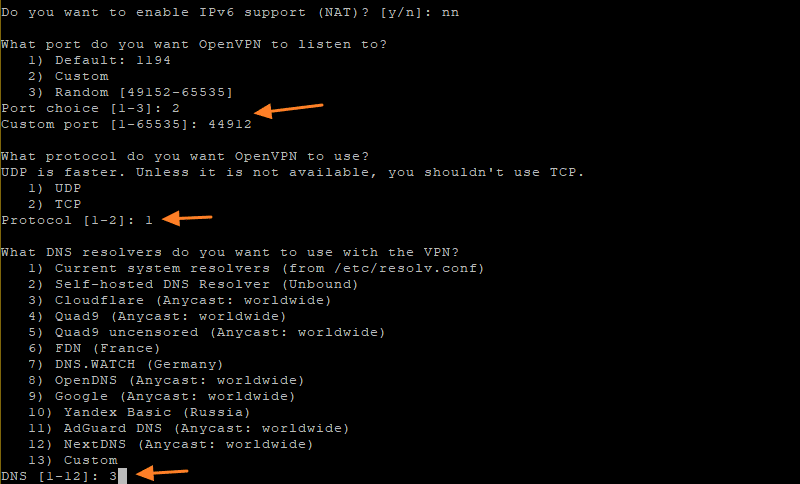
यह अनुरोध किया जाता है कि यदि आप IPv6 समर्थन को सक्रिय करना चाहते हैं, तो आप इनकार करने के लिए “n” को इंगित कर सकते हैं.
- आप किस पोर्ट को चाहते हैं कि OpenVPN सूची में?
फिर आपको उस पोर्ट को चुनना होगा जिस पर वीपीएन सर्वर सुनेंगे. डिफ़ॉल्ट रूप से, यह पोर्ट 1194 है, लेकिन मेरा सुझाव है कि आप अपने वीपीएन को छिपाने के लिए एक व्यक्तिगत पोर्ट का उपयोग करें (आप किसी अन्य प्रोटोकॉल (उदाहरण: 443/https) द्वारा उपयोग किए जाने वाले पोर्ट का उपयोग कर सकते हैं, कुछ फ़ायरवॉल के माध्यम से अधिक आसानी से पास करने के लिए).
एक व्यक्तिगत पोर्ट को परिभाषित करने के लिए, “2” को इंगित करें फिर पोर्ट नंबर को इंगित करें. उदाहरण के लिए मेरे उदाहरण में “44912”.
- आप किस प्रोटोकॉल का उपयोग करना चाहते हैं ?
OpenVPN UDP ट्रांसपोर्ट प्रोटोकॉल के साथ तेज है, और इसके अलावा यह इसका डिफ़ॉल्ट ऑपरेटिंग मोड है. मैं आपको UDP पर रहने के लिए प्रोत्साहित करता हूं, जब तक कि आप फ़ायरवॉल से गुजरने की कोशिश नहीं करते हैं: यदि आप पोर्ट 443 का उपयोग करते हैं, तो HTTPS की तरह करने के लिए TCP का उपयोग करना अधिक सुसंगत है !
- DNS रिज़ॉल्वर क्या आप VPN के साथ उपयोग करना चाहते हैं ?
एक बार वीपीएन से जुड़ा हुआ है, जो वीपीएन सर्वर आप नाम रिज़ॉल्यूशन के लिए उपयोग करना चाहते हैं. आप चॉइस 13 के साथ एक व्यक्तिगत सर्वर चुन सकते हैं, या अपने नंबर को इंगित करने वाली सूची में से एक का चयन कर सकते हैं.
सवालों की पहली श्रृंखला के लिए बहुत कुछ. चलो चलते हैं.
- क्या आप संपीड़न का उपयोग करना चाहते हैं ?
स्क्रिप्ट की सिफारिश है कि हम संपीड़न का उपयोग नहीं करते हैं, क्योंकि इसका उपयोग Voracle हमलों द्वारा किया जाता है. “एन” को इंगित करें और मान्य करें.
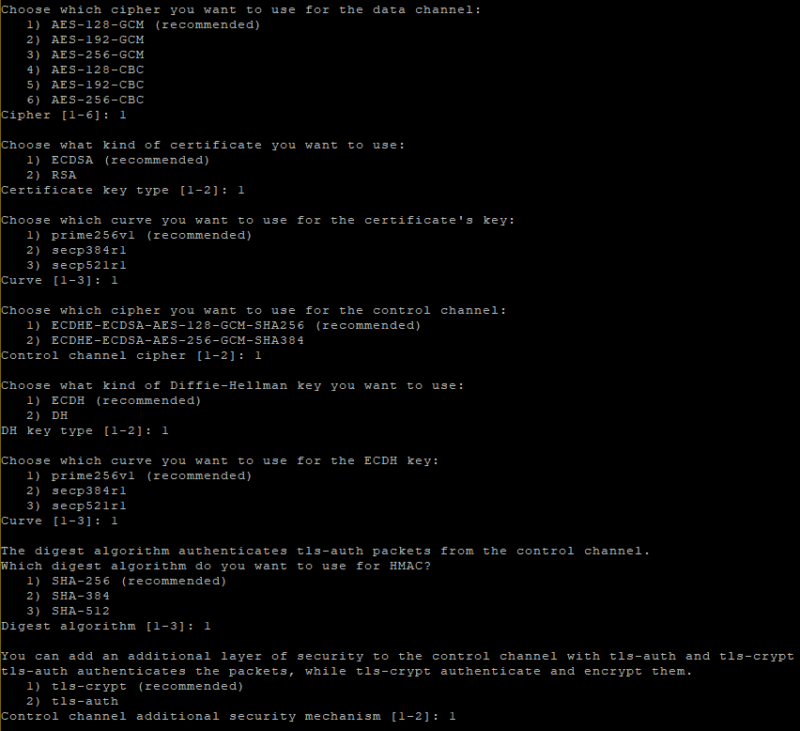
- एन्क्रिप्शन सेटिंग्स को अनुकूलित करें ?
स्क्रिप्ट पहले से ही वीपीएन टनल के एन्क्रिप्शन और इसकी सुरक्षा के लिए कुछ मापदंडों का उपयोग करने के लिए पहले से ही पूर्वानुमानित है. आपके पास “y” को इंगित करके अपने स्वयं के मापदंडों को परिभाषित करने की संभावना है, अन्यथा बस “n” करें.

नीचे, यहां विभिन्न विकल्प दिए गए हैं (साथ ही अनुशंसित विकल्प और स्वचालित कॉन्फ़िगरेशन के अनुरूप) उन लोगों के लिए जो एन्क्रिप्शन विकल्पों को निजीकृत करने का निर्णय लेते हैं.
पूछताछ का पहला भाग समाप्त हो गया है ! अब तक, स्क्रिप्ट ने अभी तक स्थानीय मशीन को नहीं बदला है. दूसरी ओर, इस सटीक क्षण पर यदि आप “एंटर” कुंजी दबाते हैं (या एक और स्पर्श), OpenVPN सर्वर की स्थापना शुरू हो जाएगी.
![]()
बनाम. पहले ग्राहक का निर्माण
वीपीएन सर्वर के कॉन्फ़िगरेशन के बाद, स्क्रिप्ट के माध्यम से स्थापना पहले वीपीएन ग्राहक के निर्माण के साथ जारी है. पीसी का नाम इंगित करें जो वीपीएन (बस अपना रास्ता खोजने के लिए) का उपयोग करेगा, उदाहरण के लिए “पीसी-फ्लो“” “. फिर सवाल “क्या आप एक पासवर्ड के साथ कॉन्फ़िगरेशन फ़ाइल की सुरक्षा करना चाहते हैं?“प्रदर्शित,” 2 “को हाँ के लिए इंगित करें एक पासवर्ड को परिभाषित करें जो वीपीएन कनेक्शन स्थापित करने के लिए आवश्यक होगा.

यह उपयोग में उपयोगकर्ता प्रोफ़ाइल में एक OVPN कॉन्फ़िगरेशन फ़ाइल उत्पन्न करेगा. यहां, मैं एक रूट के रूप में जुड़ा हुआ हूं इसलिए कॉन्फ़िगरेशन “/रूट/” में उत्पन्न होता है।. वीपीएन सर्वर के दृष्टिकोण से, इस ग्राहक का जोड़ दो फाइलें उत्पन्न करेगा:
- में ग्राहक प्रमाणपत्र /etc/openvpn/easy-rsa/pki/जारी/.सीआरटी
- में ग्राहक के लिए निजी कुंजी /etc/openvpn/easy-psa/pki/private/.चाबी
टिप्पणी : किसी भी समय, आप कॉन्फ़िगर फ़ाइल को संशोधित करके अपने OpenVPN सर्वर के कॉन्फ़िगरेशन को बदल सकते हैं: /etc/openvpn/सर्वर.अस्पष्ट
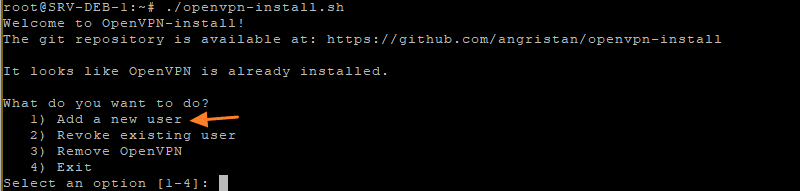
डी. एक नया OpenVPN ग्राहक जोड़ें
किसी भी समय, आप एक नया शुद्ध ग्राहक जोड़ सकते हैं कि प्रत्येक मशीन जो जोड़ती है उसका अपना प्रमाण पत्र है. चाहे एक नए ग्राहक को जोड़ें या हटाएं, बस स्क्रिप्ट को फिर से करें और पसंद करें “1” बनाएं.
सूदो ./OpenVPN- इंस्टॉल.श
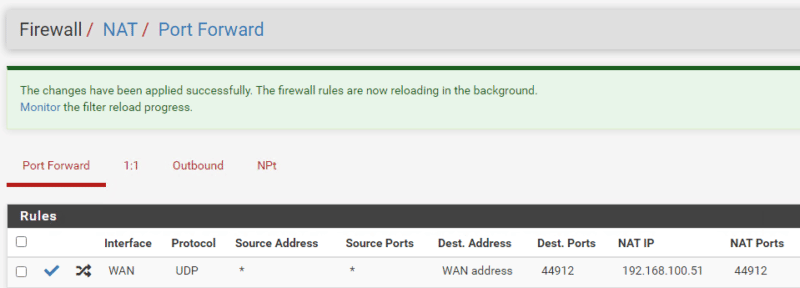
इ. NAT मोड में: पोर्ट पुनर्निर्देशन नियम
NAT मोड में, यह एक राउटर/फ़ायरवॉल के पीछे जुड़े एक वीपीएन सर्वर के साथ कहना है जहां एनएटी सक्रिय है, आपको करना होगा एक पोर्ट पुनर्निर्देशन नियम बनाएं. अन्यथा, पोर्ट 44912 पर अपने सार्वजनिक आईपी पते के लिए प्रवाह को वीपीएन सर्वर पर पुनर्निर्देशित नहीं किया जाएगा.
- यदि ये अवधारणाएं आपके लिए धुंधली हैं: शुरुआती के लिए NAT और PAT
इस प्रकार, मेरे फ़ायरवॉल पर, मैं VPN सर्वर (192) के लिए अपने सार्वजनिक IP पते के लिए UDP/44912 प्रवाह को पुनर्निर्देशित करने के लिए एक नियम बनाता हूं।.168.100.५१).
तृतीय. वीपीएन कनेक्शन का परीक्षण करें
पहले से उत्पन्न कॉन्फ़िगरेशन फ़ाइल (/रूट/पीसी-फ्लो.ओवीपीएन) उपयोगकर्ता प्रोफ़ाइल को कंप्यूटर में स्थानांतरित किया जाना चाहिए जो वीपीएन से कनेक्ट होना चाहिए. यदि आप विंडोज पर हैं, तो आप WINSCP या SCP का उपयोग कर सकते हैं, और लिनक्स के तहत आप SCP का उपयोग कर सकते हैं.
है. खिड़कियों पर
विंडोज पर, आपको OpenVPN GUI या OpenVPN कनेक्ट इंस्टॉल करना होगा. व्यक्तिगत रूप से, मैं उपयोग करता हूं OpenVPN GUI इसलिए मुझे निम्नलिखित निर्देशिका में OVPN फ़ाइल को कॉपी और पेस्ट करना है:
C: \ Program Files \ OpenVPN \ config
इस प्रकार, मेरे वीपीएन क्लाइंट में, मैं अपने नए वीपीएन कनेक्शन को दिखाई दे सकता हूं जो ओवीपीएन फ़ाइल के नाम के लिए लेता है:
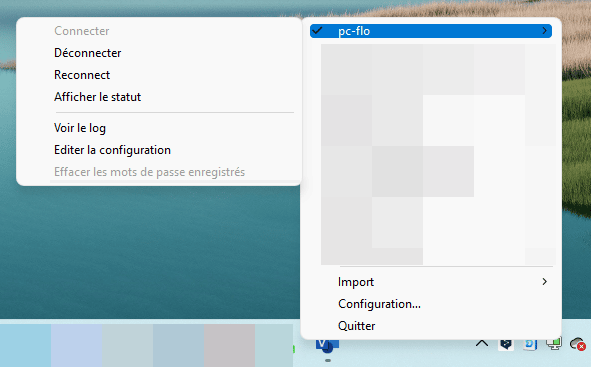
क्लिक करना “जोड़ना“, मुझे करना होगा “PC-FLO” ग्राहक से जुड़े पासवर्ड दर्ज करें मुझे अपने प्रमाण पत्र के साथ प्रमाणित करने के लिए.
एक बार कनेक्ट होने के बाद, मैं कर सकता हूं अपने स्थानीय आईपी पते के लिए SSH में मेरे डेबियन 11 सर्वर को एक्सेस करें, जानने के “192.168.100.51“” “. मैं अपने रिमोट इन्फ्रास्ट्रक्चर में अन्य सर्वरों तक भी पहुंच सकता हूं. यदि मैं इंटरनेट का उपयोग करता हूं, तो मैं अपने वीपीएन से गुजरता हूं और इसलिए मैं अपने वीपीएन इंटरनेट कनेक्शन का उपयोग करता हूं !
विंडोज साइड पर, मेरी मशीन के आईपी कॉन्फ़िगरेशन को देखते हुए, मैं देखता हूं कि वीपीएन टनल नेटवर्क पर काम करता है “10.8.0.0/24“चूंकि मेरे पास आईपी पता है”10.8.0.2/24“” “. यह सबनेट फ़ाइल “/etc/openvpn/सर्वर में परिभाषित किया गया है.”सर्वर 10 लाइन” के माध्यम से वीपीएन सर्वर से “कॉन्फिडेंस”.8.0.0 255.255.255.० “. DNS सर्वर के संदर्भ में, CloudFlare के लोगों को परिभाषित किया गया है (1.0.0.1 और 1.1.1.1) और यह कि मैंने प्रारंभिक कॉन्फ़िगरेशन के दौरान चुना था.

बी. लिनक्स पर
यदि आपका ग्राहक पोस्ट, जिसे वीपीएन का उपयोग करना चाहिए, लिनक्स के तहत है, तो आप इस कमांड के माध्यम से OpenVPN स्थापित कर सकते हैं:
Sudo apt-get Install OpenVPN
तब OVPN कॉन्फ़िगरेशन फ़ाइल इस स्थान पर जमा की जानी चाहिए:
/etc/openvpn/ग्राहक/
इस कॉन्फ़िगरेशन फ़ाइल के आधार पर कनेक्शन को ट्रिगर करने के लिए, यह करने के लिए पर्याप्त होगा:
OpenVPN-क्लाइंट-कॉन्फ़िग/etc/openvpn/ग्राहक/PC-FLO.ओवीपीएन
बनाम. वीपीएन सर्वर पर समाचार पत्र
ग्राहक की स्थिति का कनेक्शन वीपीएन सर्वर के समाचार पत्रों में नीचे दिए गए ऑर्डर को निष्पादित करके दिखाई देता है.
JournalCTL-IDENTIVING OVPN-Server
उदाहरण के लिए, मेरे विंडोज कस्टमर पोस्ट से कनेक्ट होने पर, निम्नलिखित समाचार पत्र दिखाई देते हैं:
SRV-DEB-1 OVPN-Server [436393]: MULTI: MULTI_INIT, R = 256 V = 256 SRV-DEB-1 OVPN-Server [436393]: Ifconfig पूल IPv4: आधार = 10.8.0.2 आकार = 252 SRV-DEB-1 OVPN-Server [436393]: IFCONFIG पूल लिस्ट SRV-DEB-1 OVPN-Server [436393]: इनिशियलाइज़ेशन सीक्वेंस ने SRV-DEB-1 OVPN-Server [436393] ::: 53471 आउटगोइंग चैनल एन्क्रिप्शन को पूरा किया: ' AES-256-CTR '256 बिट कुंजी SRV-DEB-1 OVPN-Server [436393] :: 53471 आउटगोइंग कंट्रोल चैनल एन्क्रिप्शन के साथ इनिशियलाइज़ किया गया: HMAC प्रमाणीकरण के लिए 256 बिट संदेश हैश' SHA256 'का उपयोग करना SRV-DEB-1 OVPN-Server- सर्वर [436393] :: 53471 इनकमिंग कंट्रोल चैनल एन्क्रिप्शन: CIPHER 'AES-256-CTR' इनिशियलाइज़्ड इन आरंभिक के साथ इनिशियलाइज़्ड विथ 256 बिट प्रमुख SRV-DEB-1 OVPN-Server [436393] ::::: 53471 इनकमिंग कंट्रोल चैनल एन्क्रिप्शन: 256 बिट हैश का उपयोग करना ' HMAC प्रमाणीकरण के लिए SHA256.87.49.50: 53471, SID = EB971C1D A6A6884B SRV-DEB-1 OVPN-Server [436393] :: 53471 सत्यापित करें OK: गहराई: 1, CN = CN_UIEY50OEG1ZHZHNLA8 SRV-DEB-1 OVPN-1-TOR [436393], CN = PC-FLO Srv-deb-1 ovpn-server [436393] :: 53471 सहकर्मी जानकारी: iv_ver = 2.5.6 SRV-DEB-1 OVPN-Server [436393] :: 53471 सहकर्मी जानकारी: Iv_plat = जीत Srv-deb-1 ovpn-server [436393] :: 53471 सहकर्मी जानकारी: iv_proto = 6 srv-deb-1 ovpn-server [436393] :::: 53471 सहकर्मी जानकारी: iv_ncp = 2 srv-deb-1 ovpn-server [ 436393] :: 53471 सहकर्मी जानकारी: IV_CIPHERS = AES-256-GCM: AES-128-GCM SRV-DEB-1 OVPN-Server [436393] ::::: 53471 सहकर्मी जानकारी: IV_LZ4 = 1 SRV-DEB-1 OVPN-SERVER ] = 1 SRV-DEB-1 OVPN-Server [436393] :: 53471 सहकर्मी जानकारी: IV_COMP_STUBV2 = 1 SRV-DEB-1 OVPN-Server [436393] ::::: 53471 सहकर्मी जानकारी: IV_TCPNL = 1 SRV-DEB-1-1 सर्वर [436393] :: 53471 सहकर्मी जानकारी: iv_gui_ver =OpenVPN_GUI_11 SRV-DEB-1 OVPN-Server [436393] :: 53471 सहकर्मी जानकारी: IV_SSO = OPENURL, CRTEXT SRV-DEB-1 OVPN-Server [436393] :: 53471 नियंत्रण चैनल: TLSV1.3, सिफर TLSV1.3 TLS_AES_256_GCM_SHA384, 256 बिट EC, वक्र: Prime256V1 SRV-DEB-1 OVPN-Server [436393] :: 53471 [PC-FLO] पीयर कनेक्शन [AF_INET] के साथ शुरू किया गया। : 53471
इसके अलावा, आप नीचे दिए गए कमांड के साथ iptable नियमों की कल्पना कर सकते हैं:
iptables -t nat -l -n -v
इस कमांड को आपको यह देखने की अनुमति देनी चाहिए कि पोस्ट -ft श्रृंखला में यह लाइन है:
2200 971K मस्करेड ऑल - * ENS192 10.8.0.0/24 0.0.0.0/0
वीपीएन के लिए एक आवश्यक रेखा सही ढंग से रूट और परिवहन की जाती है.
चतुर्थ. निष्कर्ष
यह ट्यूटोरियल समाप्त हो रहा है: हमने अभी एक सरल तरीका देखा है डेबियन 11 के तहत एक OpenVPN सर्वर सेट करें इस शानदार इंस्टॉलेशन स्क्रिप्ट का उपयोग करना. मैंने आपको यह समझाने के लिए समय लिया कि स्क्रिप्ट क्या कर रही थी ताकि आप समझ सकें कि आप क्या कर रहे हैं, उसी समय. पता है कि OpenVPN के साथ VPN के कार्यान्वयन के लिए कई संभावित कॉन्फ़िगरेशन हैं.
एक पूर्ण बुनियादी ढांचे से कनेक्ट करने के लिए एक वीपीएन स्थापित करने के लिए, मैं सलाह देता हूं कि आप इसे अपने फ़ायरवॉल पर सेट करें ताकि इस स्तर पर सीधे प्रवाह का प्रबंधन करने में सक्षम हो सके. वीपीएन सुरंग में केवल कुछ प्रोटोकॉल को अधिकृत करना या केवल कुछ मेजबानों को प्रवाह की अनुमति देना आसान होगा. दूसरी ओर, एक वीपीएन के लिए जो आप व्यक्तिगत उपयोग के लिए उपयोग करते हैं, उदाहरण के लिए सेंसरशिप को बायपास करने के लिए, यह समाधान आदर्श है.
इस लेख का हिस्सा 


- ← पिछला Text4Shell: अपाचे कॉमन्स टेक्स्ट लाइब्रेरी में एक महत्वपूर्ण सुरक्षा दोष
- इन मैलवेयर और अगले एंड्रॉइड एप्लिकेशन → के लिए 20 मिलियन से अधिक संचित डाउनलोड →
फ्लोरियन बर्नल
सिस्टम और नेटवर्क इंजीनियर, आईटी-कनेक्ट और माइक्रोसॉफ्ट एमवीपी के सह-संस्थापक “क्लाउड और डेटासेंटर प्रबंधन”. मैं अपने लेखों के माध्यम से अपने अनुभव और अपनी खोजों को साझा करना चाहता हूं. Microsoft समाधान और स्क्रिप्टिंग के लिए एक विशेष आकर्षण के साथ सामान्यवादी. अच्छा पढ़ने.
फ्लोरियन में 4966 पोस्ट और गिनती हैं.फ्लोरियन द्वारा सभी पोस्ट देखें
कैसे एक सर्वर पर अपने स्वयं के वीपीएन माउंट करने के लिए
क्योंकि एक वीपीएन का कामकाज सर्वर, नेटवर्क प्रोटोकॉल और जटिल सुरक्षा प्रौद्योगिकियों पर आधारित है, अपने स्वयं के वीपीएन को बढ़ते हुए सरल नश्वर की पहुंच से बाहर हो सकता है. क्या वास्तव में यह मामला है ? हमने खुद एक सर्वर पर अपना वीपीएन स्थापित करने की कोशिश की.
क्या यह इतना मुश्किल है कि यह आपकी खुद की वीपीएन सेवा सेट करता है ? और “रेडी-टू-यूज़” वीपीएन सेवा की तुलना में ऑपरेशन लाभदायक है, जैसे कि एक्सप्रेसवीपीएन ? इसका जवाब देने के लिए, हम खुद को एक संभावित उपयोगकर्ता के जूते में डालते हैं और वेब की खोज करके शुरू करते हैं. विषय पर साहित्य हार नहीं मानता है, लेकिन जो कुछ निश्चित है, वह यह है कि घर का बना वीपीएन बनाने के दर्जनों तरीके हैं, बहुत विविध कठिनाइयों की डिग्री तक.
इस लेख के लिए, हमने तीन को बरकरार रखा है और हम सबसे “सरल” विधि के बारे में विस्तार से बताएंगे. अपने वीपीएन को खुद को बढ़ाने के लिए जरूरी नहीं कि बड़े कंप्यूटर ज्ञान की आवश्यकता हो. दूसरी ओर, आपके पास अपने सामने समय होना चाहिए और अपने हाथों को सीच में डालने से न डरें.
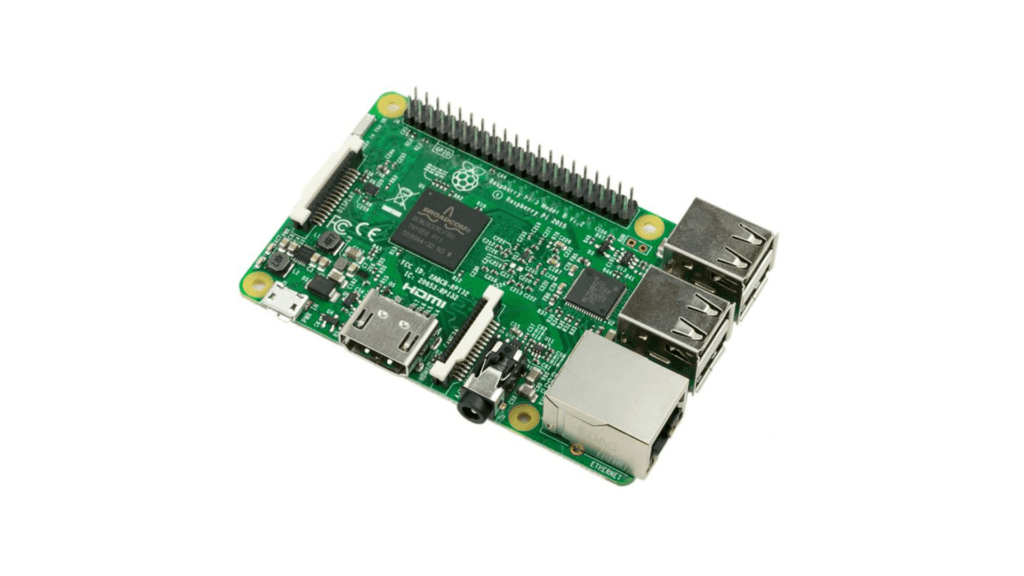
एक रास्पबेरी पाई पर एक घर का बना वीपीएन स्थापित करें
Piratelab ने एक रास्पबेरी पाई पर एक वीपीएन स्थापित करने के लिए फ्रेंच में एक लंबा बहुत विस्तृत ट्यूटोरियल प्रकाशित किया. यह वह विधि है जिसमें सबसे अधिक आवश्यक शर्तें की आवश्यकता होती है: रास्पबेरी पाई का कॉन्फ़िगरेशन, इंटरनेट बॉक्स फिर एप्लिकेशन. सिद्धांत छोटे कंप्यूटर को बदलने के लिए है जो रास्पबेरी पाई को एक वीपीएन सर्वर में बदल देगा जिसे हम खुद को कॉन्फ़िगर करेंगे. इसे जोड़ने से, आप फिर अपने रास्पबेरी पाई के आईपी पते से गुजरेंगे और आप इंटरनेट कनेक्शन (और संबंधित आईपी) से लाभान्वित होंगे, जिससे यह जुड़ा हुआ है (उदाहरण के लिए आपके घर से). यदि यह एक फाइबर कनेक्शन है, तो प्रवाह उत्कृष्ट होगा, लेकिन यदि यह एक ADSL कनेक्शन है, तो आप यंत्रवत् सीमित होंगे.
Algo VPN स्थापित करके एक वर्चुअल मशीन पर एक VPN स्थापित करें
यदि आप वास्तव में वर्चुअल मशीन पर कमांड लाइनों से डरते नहीं हैं, तो ALGO VPN समाधान आपके लिए है. यह वीपीएन समाधान (लेकिन कॉन्फ़िगर करने के लिए बहुत कम), ओपन सोर्स को स्थापित करना बहुत आसान है, जो आपको कई वर्चुअल मशीनों पर वीपीएन (वायरगार्ड या आईपीएसईसी प्रोटोकॉल के साथ) स्थापित करने की अनुमति देता है. अमेरिकन डेवलपर लेनी ज़ेल्टर ने अपने ब्लॉग पर इस विषय पर अंग्रेजी में एक बहुत ही पूर्ण ट्यूटोरियल लिखा था.
मेजबानों के टर्नकी समाधान के माध्यम से जाओ
लेकिन आम जनता के लिए, सबसे सरल समाधान, अपने स्वयं के वीपीएन को बनाने के लिए मेजबानों के “टर्नकी” समाधान के माध्यम से जाना है. यह वह समाधान है जिसे हम नीचे विस्तार से बताने जा रहे हैं. इसका उपयोग करने के लिए हम मेजबान स्केलवे का उदाहरण लेंगे (अन्य होस्ट समान समाधान प्रदान करते हैं, चाहे ओवीएच या डिजिटलोसियन में). वह वास्तव में “InstantApps” का उपयोग करने के लिए अपने उदाहरण विकल्पों में प्रदान करता है.
ठोस रूप से, दो क्लिक और कुछ मिनटों में, एक वितरण के साथ एक सर्वर होना संभव है (उबंटू एमएल) और एक प्रीइंस्टॉल एप्लिकेशन. तब उपयोगकर्ता को केवल सर्वर के किराये का भुगतान करना होगा और उनके ऑनलाइन कमांड एप्लिकेशन को कॉन्फ़िगर करना होगा.
अपना सर्वर किराए पर लें
शुरू करने के लिए, स्केलवे में एक खाता खोलें. पंजीकरण नि: शुल्क है, लेकिन एक बैंक कार्ड नंबर दर्ज करने और 2 यूरो का भुगतान पूर्व-प्राधिकरण करने की आवश्यकता है. यह सामान्य है, आप एक सर्वर किराए पर लेने वाले हैं और इनकी कीमत महीने में या मिनट पर होती है.
इंटरफ़ेस में, उदाहरण पर क्लिक करें, बाएं साइडबार में, फिर ग्रीन बटन पर ” एक उदाहरण बनाएं ». बधाई हो, आप अपना पहला सर्वर स्थापित करने वाले हैं. एक सर्वर निजीकरण मेनू तब प्रदर्शित होता है. चरण 1 में (” एक छवि चुनें »), InstantApps पर क्लिक करें, फिर OpenVPN चुनें.
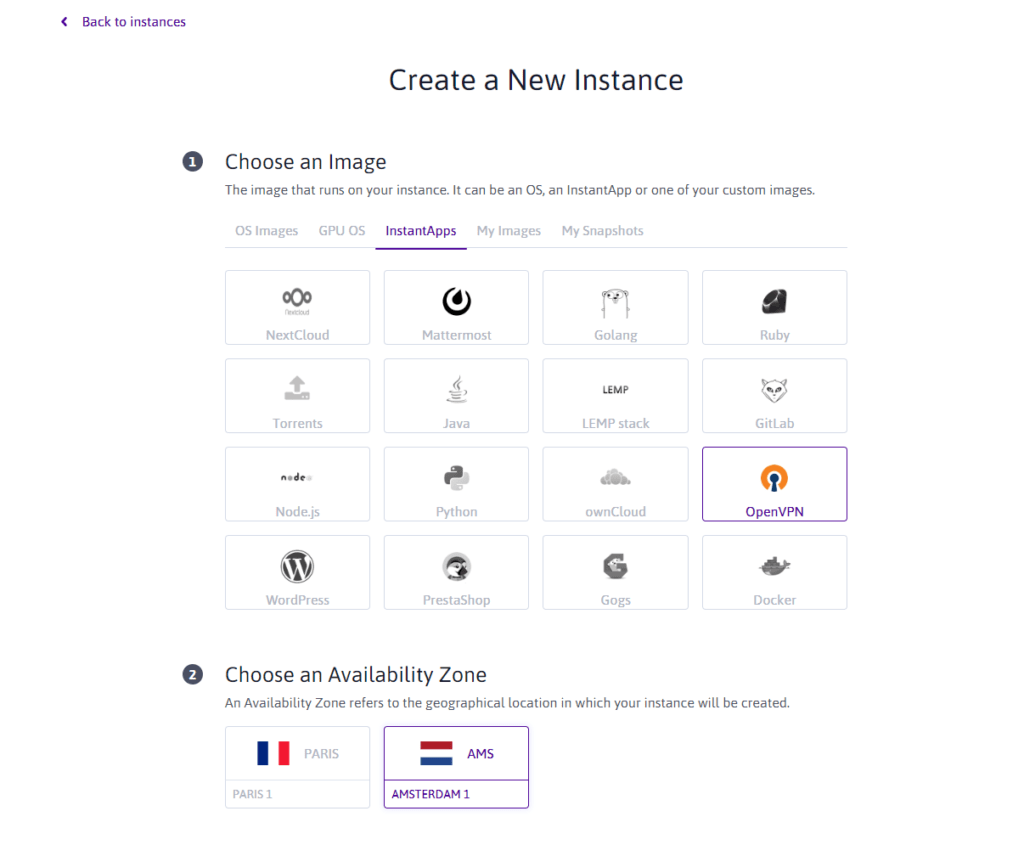
यह वह जगह है जहाँ आप अपने सर्वर को कॉन्फ़िगर करेंगे. हमने नीदरलैंड में एम्स्टर्डम में अपने सर्वर का पता लगाने के लिए चुना है. यह है कि हमारे भविष्य के आईपी पते को स्थानांतरित कर दिया जाएगा.
अब सर्वर प्रकार का विकल्प आता है. हमें एक छोटे से सर्वर की आवश्यकता है जो हमारे आईपी पते को स्थानांतरित करने और हमारे लिए इंटरनेट पर नेविगेट करने का ध्यान रखेगा. हमें यहां एक शक्तिशाली सर्वर की आवश्यकता नहीं है, सबसे सस्ता इस ट्यूटोरियल की जरूरतों के लिए ट्रिक करेगा.
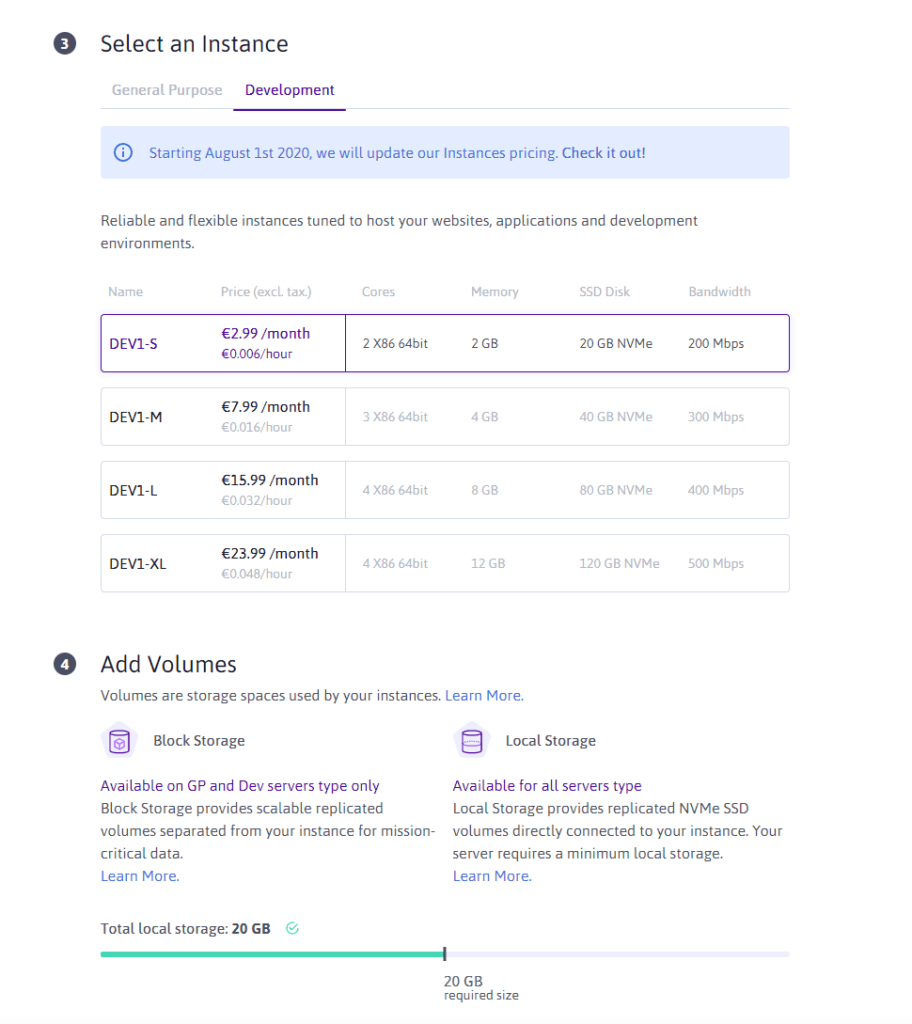
विकास टैब पर जाएं और सबसे सस्ता विकल्प लें, कि 200 एमबी/एस के अधिकतम प्रवाह के साथ.
आपको बस अपने शरीर को थोड़ा नाम देना होगा और विशेष रूप से इसे SSH कुंजी के साथ जोड़ने के लिए. हम यह नहीं समझाने जा रहे हैं कि कैसे एक SSH कुंजी उत्पन्न करें और इसे उदाहरण के साथ संबद्ध करें, Scaleway या OVH इसे पूरी तरह से उनके प्रलेखन में समझाएं. इस ट्यूटोरियल के बाकी हिस्सों के लिए, हम कमांड लाइनों में प्रवेश करने के लिए पुट्टी सॉफ्टवेयर से गुजरेंगे.
OpenVPN कॉन्फ़िगर करें
यदि ये सभी चरण किए जाते हैं, तो आप अब एक सर्वर के कब्जे में हैं जिस पर OpenVPN स्थापित है. अब हमें सर्वर पर सीधे OpenVPN कॉन्फ़िगर करना होगा.
सर्वर से कनेक्ट करें, या तो टर्मिनल के माध्यम से (मैक और लिनक्स पर), या पुट्टी (विंडोज) के माध्यम से. जब सर्वर आपको खुद को पहचानने के लिए कहता है, तो बस रूट दर्ज करें. अब हम OpenVPN को कॉन्फ़िगर करेंगे ताकि जब हम VPN एप्लिकेशन के साथ जुड़ते हैं तो यह हमें सर्वर पर पहचान सकता है. अधिक विशेष रूप से, हम एक उपयोगकर्ता प्रोफ़ाइल बनाएंगे.
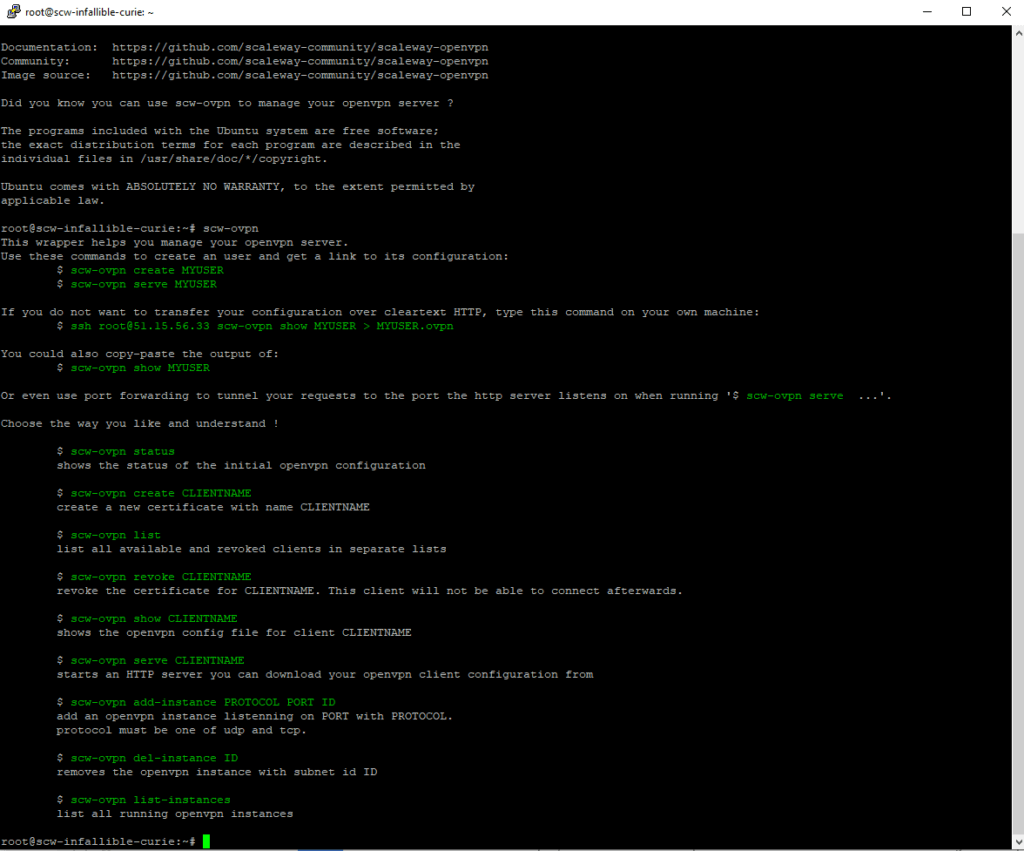
शुरू करने के लिए, “रूट” कमांड दर्ज करें. सर्वर इंगित करता है कि OpenVPN स्थापित किया गया है और यह उपयोग करने के लिए तैयार है.
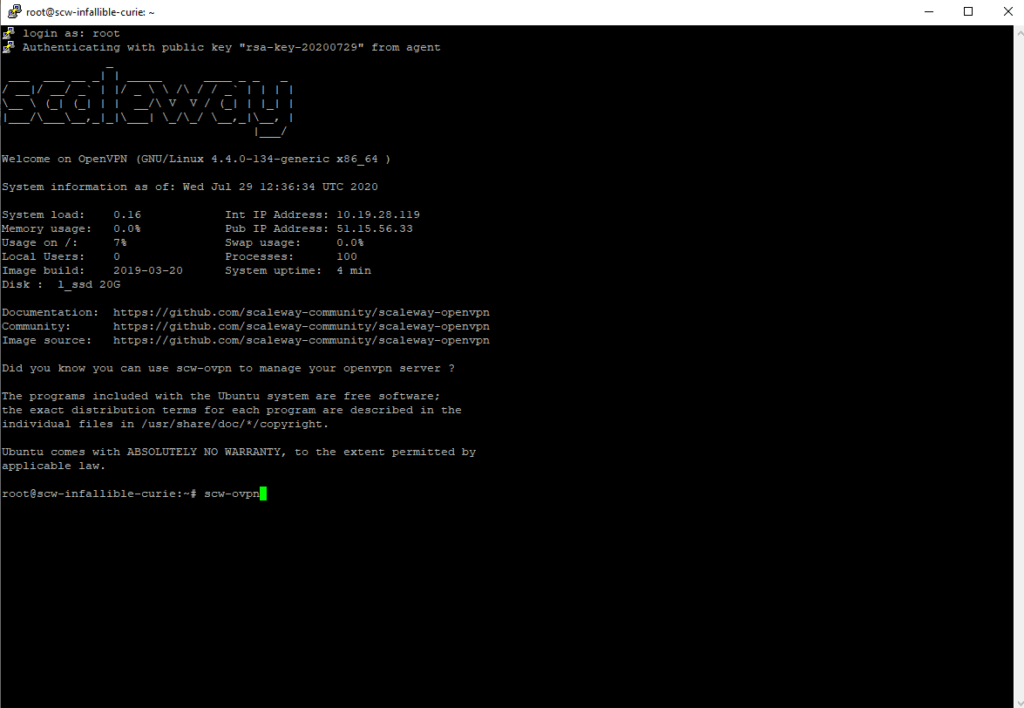
फिर “SCW-OVPN” कमांड दर्ज करें, जो एक नया उपयोगकर्ता बनाएगा.
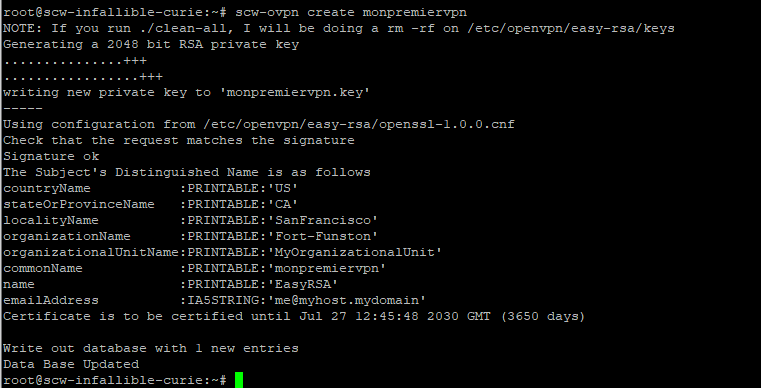
एक नया उपयोगकर्ता बनाने के लिए, “SCW-ovpn Create Name” कमांड, या Nomutilizer दर्ज करें, जैसा कि इसका नाम बताता है, उपयोगकर्ता का नाम जिसे आप लेने जा रहे हैं. यहाँ हमने “monpremiervpn” रखा है.
अब जब यह बनाया गया है, तो आपको फ़ाइल की आवश्यकता है .OVPN जो आपको कनेक्ट करने के लिए अपने VPN ग्राहक का उपयोग करने पर सर्वर पर खुद को पहचानने की अनुमति देगा.
फ़ाइल उत्पन्न करने के लिए .OVPN “SCW-OVPN पर सर्विसिंग” कमांड दर्ज करें. सर्वर तब एक लिंक उत्पन्न करेगा जो आपको फ़ाइल डाउनलोड करने की अनुमति देता है .ओवीपीएन.
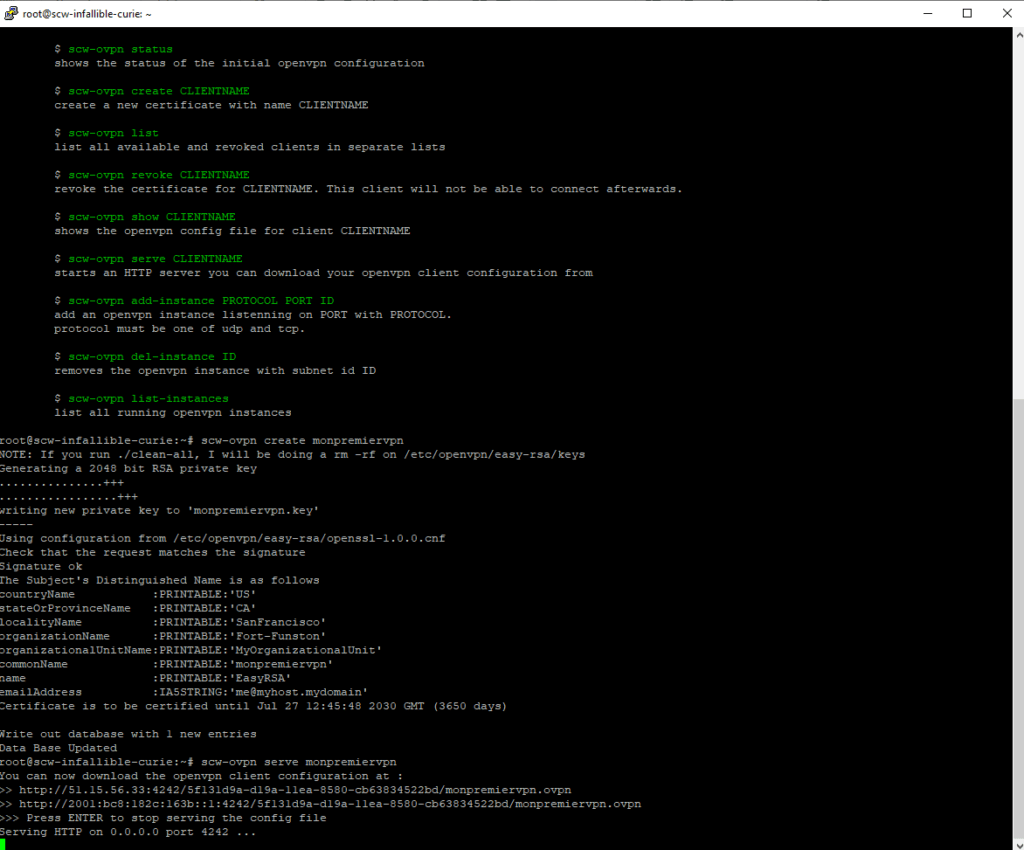
अपने ब्राउज़र पर OpenVPN द्वारा स्वचालित रूप से उत्पन्न लिंक को कॉपी करें (या फ़ाइल डाउनलोड करने के लिए यदि आप एक कमांड लाइन हैं तो इसे SSH कमांड के साथ डाउनलोड करें). कृपया ध्यान दें, लिंक केवल इस आदेश के समय के दौरान उपलब्ध है: जैसे ही आप प्रविष्टि दबाते हैं, लिंक समाप्त हो जाएगा.
एक वीपीएन ग्राहक का उपयोग करें
एक बार जब आप फ़ाइल बरामद कर लेते हैं .OVPN, सबसे कठिन बनाया गया है. आपको बस एक वीपीएन ग्राहक डाउनलोड करना है. OpenVPN का मामला बहुत अच्छी तरह से करता है. इसे डाउनलोड करें, फिर इसे इंस्टॉल करें. तो बस फ़ाइल आयात करें .एक सुरंग के माध्यम से सर्वर से कनेक्ट करने के लिए ग्राहक में OVPN.
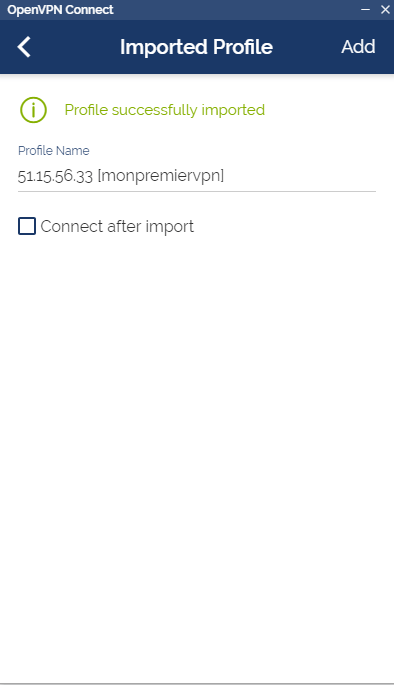
बधाई हो, आप सिर्फ अपना पहला वीपीएन डालते हैं !
आसान, लेकिन सीमित
उस प्रश्न का उत्तर देने के लिए जो हमें रुचिकर करता है: नहीं, अपना खुद का वीपीएन बनाना बहुत जटिल नहीं है. लेकिन बाधाएं कई हैं और आम जनता के लिए दी जाने वाली सेवा वास्तव में एक्सप्रेसवीपीएन जैसे समाधान की तुलना में फायदेमंद नहीं है.
एक लंबी स्थापना
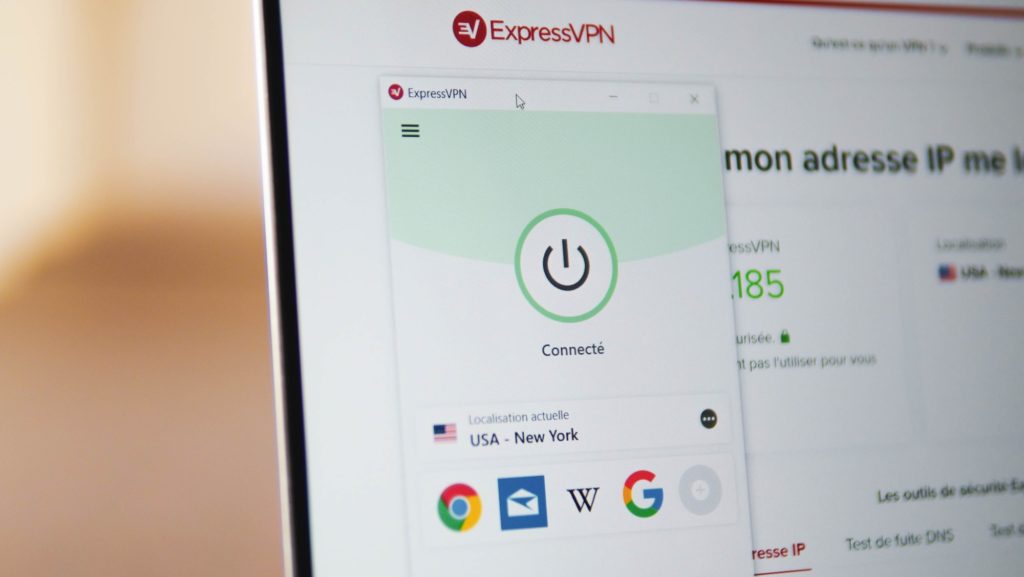
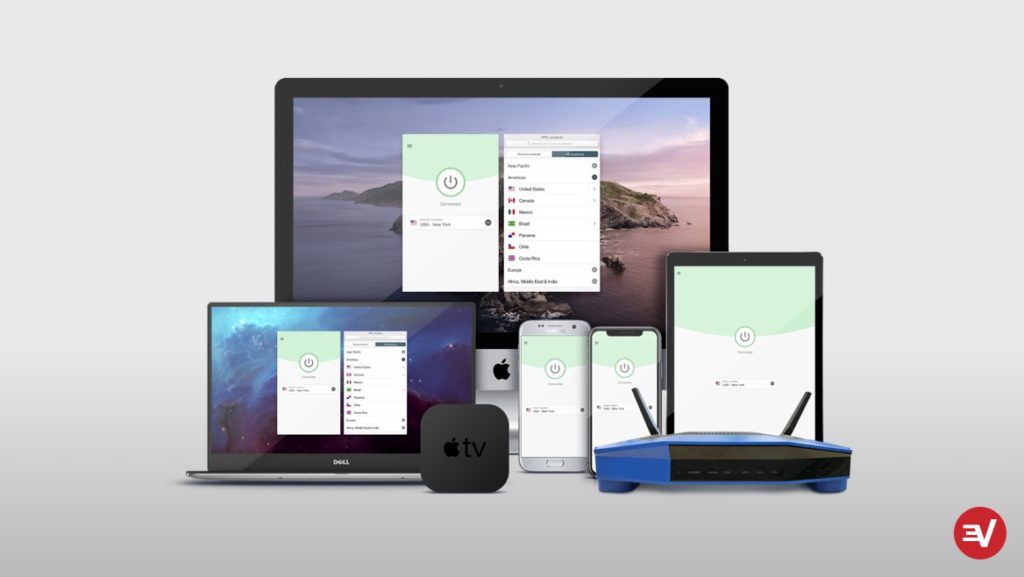
आपको वास्तव में कई सॉफ़्टवेयर (OpenVPN, putty) स्थापित करने के लिए समय निकालना चाहिए, सीखें और समझें कि एक SSH कुंजी कैसे काम करती है और एक होस्ट के साथ एक खाता खोलती है. ExpressVPN के पास बड़ी संख्या में उपकरणों (कंप्यूटर, मोबाइल, आदि) पर एक एप्लिकेशन उपलब्ध है, जिसमें केवल तीन क्लिकों को व्यवस्थित करने की आवश्यकता होती है और जो पूरी तरह से फ्रेंच में अनुवादित है.
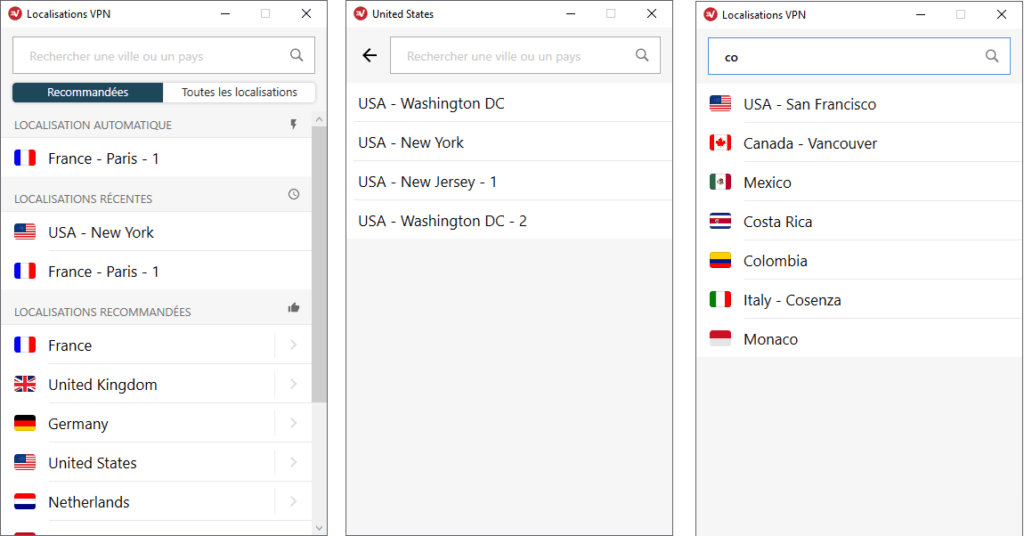
उस देश को चुनना संभव है जिसमें हम कनेक्ट करना चाहते हैं और कुछ मामलों में, सटीक शहर जिसमें हम कनेक्ट करना चाहते हैं. एक खोज इंजन भी मौजूद है.
एक अनाकर्षक मूल्य
हमारे उदाहरण में, स्केलवे प्रति माह 4.99 यूरो (आउट-टैक्स) की कीमत पर अपनी InstantApp OpenVPN सेवा प्रदान करता है. एक्सप्रेसवीपीएन वर्तमान में 6 यूरो से कम प्रति माह के लिए अपनी एक वर्ष की सदस्यता प्रदान करता है. यह सेवा की एक बहुत अलग गुणवत्ता के लिए लगभग बराबर है.
सीमित विशेषताएं
पूछने के लिए अच्छा सवाल यह जानना बहुत कुछ नहीं है कि क्या यह आपके स्वयं के वीपीएन को बनाना जटिल है कि आप अपने वीपीएन के साथ क्या करना चाहते हैं. हमारे उदाहरण में, हमारा वीपीएन नीदरलैंड में स्थित है और एक बुनियादी एप्लिकेशन, OpenVPN के साथ काम करता है.
दूसरे शब्दों में, आपके पास केवल एक सर्वर है जहां एक्सप्रेसवीपीएन 160 विभिन्न स्थानों में 3,000 से अधिक प्रदान करता है. आपके पास स्प्लिट टनलिंग सुविधाओं या प्रोटोकॉल की एक बड़ी पसंद तक पहुंच नहीं होगी. हमारे हाउस वीपीएन का प्रवाह भी एक्सप्रेसवीपीएन सर्वर द्वारा पेश किए गए की तुलना में कम है. अंत में, यूरोप में स्थित यह अनूठा सर्वर आपको SVOD प्लेटफार्मों के विदेशी कैटलॉग तक पहुंचने की अनुमति नहीं देगा.
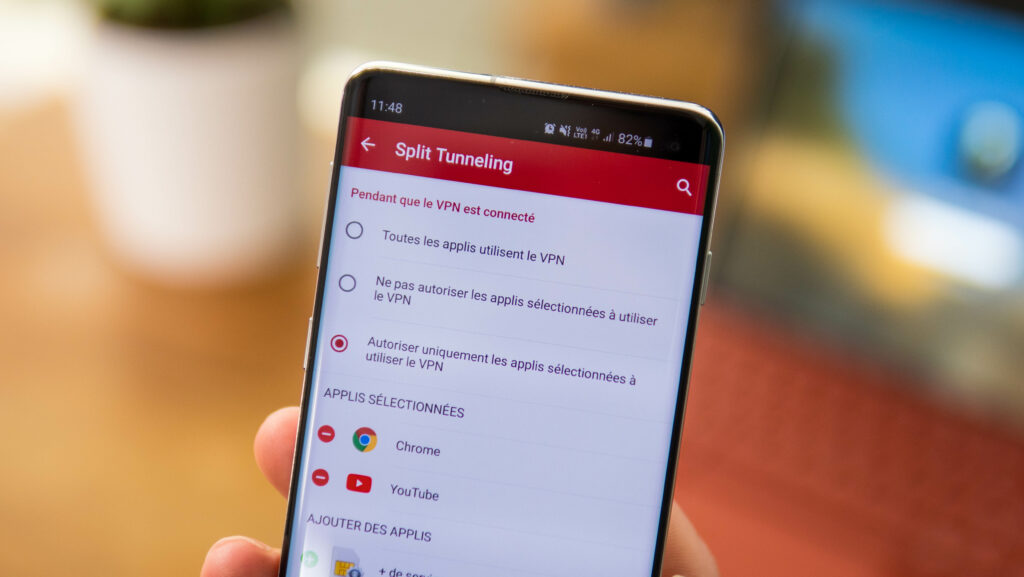
स्प्लिट टनलिंग आपको विशिष्ट अनुप्रयोगों के लिए वीपीएन कनेक्शन को पार करने की अनुमति देता है.
वर्तमान में, बहुत कम मेजबान संयुक्त राज्य में स्थित सर्वर प्रदान करते हैं. और यहां तक कि अगर वे करते हैं, तो नेटफ्लिक्स के अमेरिकी कैटलॉग तक पहुंच की गारंटी नहीं है. ExpressVPN जैसे समाधान के साथ, प्रश्न उत्पन्न नहीं होता है: बस विदेशी कैटलॉग तक पहुंचने के लिए एक अमेरिकी या कनाडाई सर्वर से कनेक्ट करें।
एक अच्छा वीपीएन आपूर्तिकर्ता सरल है
संक्षेप में, यदि आपको एकल सर्वर, सीमित सुविधाओं के साथ एक वीपीएन की आवश्यकता है और आप अपने हाथों को नियंत्रण लाइनों में रखने से डरते नहीं हैं, तो आप अपने खुद के वीपीएन को मज़ा कर सकते हैं. यदि आपको एक समाधान की आवश्यकता है जो दो क्लिक में काम करता है, हजारों सर्वर और एक मजबूत गोपनीयता नीति के साथ, एक्सप्रेसवीपीएन इस समय के सर्वश्रेष्ठ विकल्पों में से एक है.
एक्सप्रेसवीपीएन वर्तमान में अपनी एक वर्ष की सदस्यता पर एक विशेष प्रस्ताव प्रदान करता है. यह एक तीन मुफ्त महीने हैं. इसलिए यह सदस्यता प्रति माह 6 यूरो से कम है. सेवा की गुणवत्ता का एक विचार प्राप्त करने के लिए, आपके पास “संतुष्ट या प्रतिपूर्ति” परीक्षण के 30 दिन भी हैं, जिसके दौरान आप रुक सकते हैं और अपनी सदस्यता के बाद किसी भी समय-बिक्री सेवा से संपर्क करके प्रतिपूर्ति कर सकते हैं, इसके बिना यह सवाल नहीं है.
आपको आश्चर्य है कि सबसे अच्छा वीपीएन क्या है ? सबसे अच्छा vpns का हमारा चयन हमारे तुलनित्र में है
यह लेख ExpressVPN के सहयोग से किया गया था
यह मानवीय XP इकाई के भीतर स्वतंत्र संपादकों द्वारा बनाई गई सामग्री है. न्यूमरेमा की संपादकीय टीम ने इसके निर्माण में भाग नहीं लिया. हम अपने पाठकों के लिए प्रतिबद्ध हैं ताकि ये सामग्री दिलचस्प, गुणात्मक और उनके हितों के अनुरूप हो.


 Ilyass बैरी – 26 जून, 2023
  मैं आपके साथ अपने बुरे अनुभव b नया एस्ट्रा साझा करता हूं . महीनों में खरीदी गई कार 10/22 में मुझे कैमरे की समस्याओं को समायोजित करने के लिए 360 और एयर कंडीशनिंग को समायोजित करने के लिए -Sales सेवा से लगभग 9 बार स्थानांतरित करने के लिए मजबूर किया गया था और अब मैं एक एनवी समस्या के सामने हूं: कॉकपिट और स्क्रीन जो अपने आप बंद हो जाती है . हैची कामेल और याला वास्लाह डब्ल्यू 5900 किमी वास्तव में मैं निराश हूं .
 WAFA HH – 22 फरवरी, 2022
  लेई राम – 23 फरवरी, 2022