मैक – ऐप्पल असिस्टेंस (सीए) पर फ़ोटो में दोषों और दागों को सही करने के लिए एक तस्वीर को रीटच करें, एक फोटो को कैसे रीटच करें? ग्राफिक डिजाइनर
कैसे एक तस्वीर को छूने के लिए
Contents
- 1 कैसे एक तस्वीर को छूने के लिए
- 1.1 मैक पर तस्वीरों में दोषों और दागों को सही करने के लिए एक तस्वीर को फिर से पढ़ें
- 1.2 कैसे एक तस्वीर को छूने के लिए ?
- 1.3 1. संदर्भ देना
- 1.4 2. फोटो के रंग तापमान को समायोजित करें
- 1.5 3. अपनी तस्वीर की चमक सेट करें
- 1.6 4. फोटो की संतृप्ति को समायोजित करें
- 1.7 5. फोटो के विपरीत में सुधार करें
- 1.8 6. काले और सफेद रंग में एक तस्वीर कन्वर्ट करें
- 1.9 7. एक फोटो फ़िल्टर का उपयोग करें
- 1.10 8. अपनी तस्वीर का एक अवांछित तत्व गायब कर दें
- 1.11 9. अपनी तस्वीर को गहराई और आंदोलन दें
संतृप्ति के साथ खेलने से, हम छवि के कुछ हिस्सों को, और दूसरों की संतृप्ति के तहत उल्लेखनीय रूप से उजागर कर सकते हैं, ताकि वांछित तत्वों की ओर दर्शक के टकटकी को उन्मुख किया जा सके.
मैक पर तस्वीरों में दोषों और दागों को सही करने के लिए एक तस्वीर को फिर से पढ़ें

आप एक तस्वीर में दाग, धूल अनाज और अन्य छोटे दोषों को हटा सकते हैं.
ध्यान दिया : फोटो एडिटिंग टूल का उपयोग करके वीडियो को छूना संभव नहीं है. संशोधित करें और एक वीडियो अनुभाग में सुधार करें.
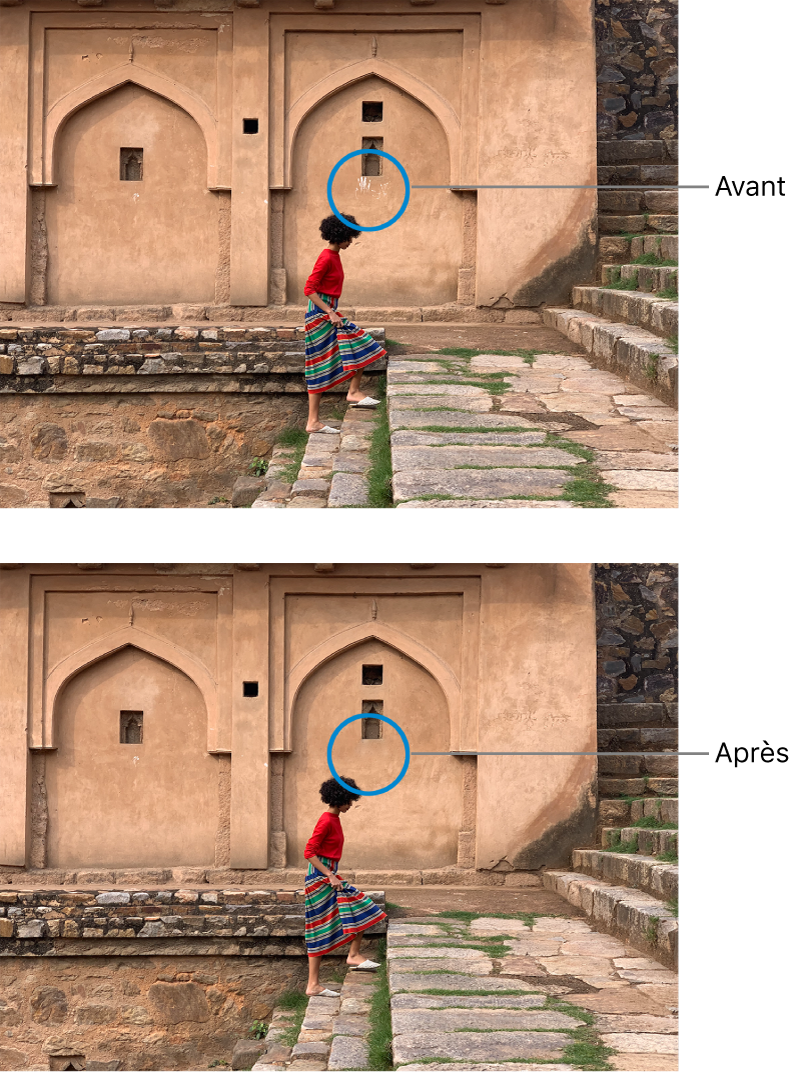
- फोटो ऐप में अपने मैक पर, फोटो पर डबल-क्लिक करें, फिर टूलबार में प्रकाशन पर क्लिक करें.
- टूलबार में समायोजित करें पर क्लिक करें.
- उप-बाड़ के समायोजन में, तीर पर क्लिक करें
 रीटचिंग के बगल में स्थित है.
 - ब्रश आकार का चयन करने के लिए आकार कर्सर को स्लाइड करें. ब्रश आकार का चयन करने के लिए कर्सर को खींचने के बाद, आप बाएं ([) और दाएं (]) हुक (]) को दबाकर ब्रश के आकार को भी बदल सकते हैं .
- ब्रश को दोष के ऊपर रखें, फिर उस पर क्लिक करें या इसे मिटाने के लिए ब्रश को खींचें. यदि दोष बहुत छोटा है और पहले प्रयास से फीका नहीं है, तो अधिक सटीक परिवर्तन करने के लिए फोटो को बड़ा करने का प्रयास करें.
चाल : यदि आपको अपेक्षित परिणाम नहीं मिलते हैं, तो आप फोटो के दूसरे हिस्से में पिक्सेल कॉपी कर सकते हैं और उन्हें दोष पर लागू कर सकते हैं. उस क्षेत्र पर क्लिक करते समय विकल्प कुंजी दबाएं जिसमें वांछित बनावट है, फिर रिटचिंग टूल का उपयोग करके संशोधन लागू करें. नियंत्रण कुंजी को पकड़ते समय छवि पर क्लिक करें, फिर क्षेत्र में पिक्सेल की नकल करने से रोकने के लिए “मैनुअल रीटचिंग के स्रोत को मिटा दें” चुनें.
कैसे एक तस्वीर को छूने के लिए ?
हालांकि एक फोटो कैमरे या फोन की छोटी स्क्रीन पर अच्छा लग सकता है, यह दुर्लभ है कि यह एकदम सही है. पेशेवर क्षेत्र में, एक प्रभावशाली छवि एक छवि है जो इसकी पूर्णता के कारण द्रव्यमान से बाहर खड़ी है. अकेले फोटो लक्षित दर्शकों के साथ संबंध बनाने में सक्षम है. इसलिए आपको आवश्यक रूप से अपनी छवियों को छूने में सक्षम होना चाहिए ताकि जितना संभव हो सके, पूर्णता के लिए संपर्क करें, और इस प्रकार अपने लक्ष्यों तक पहुंचें.
यहां खोजें कि 9 चरणों में एक फोटो को कैसे छूना है !
1. संदर्भ देना
एक तस्वीर को छूने के लिए, हम इसे फसल से शुरू करते हैं:
- अवांछित या कष्टप्रद तत्वों को हटाएं;
- रचना में सुधार;
- एक केंद्र बिंदु को हाइलाइट करें.
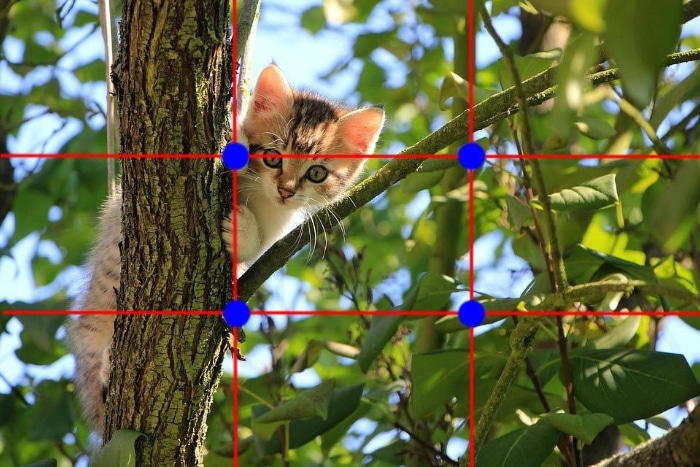
हमेशा यह जाँच कर शुरू करें कि आपकी तस्वीर सीधे है. एक आदर्श फ्रेमिंग उत्कृष्ट छवि की स्थिति को एक अच्छी छवि देने का आश्वासन है.
फोटोग्राफी और सिनेमा का मौलिक सिद्धांत, “थर्ड पार्टी रूल” एक फ्रेमिंग और रीटचिंग तकनीक है जो आपको अपनी फोटो को और अधिक दिलचस्प बनाने की अनुमति देगा.
+ग्राफिक डिजाइनर पर उपलब्ध 30,000 ग्राफिक डिजाइनर.कॉम


मुफ्त उद्धरण प्राप्त करें
तेज, स्वतंत्र और बिना दायित्व के
2. फोटो के रंग तापमान को समायोजित करें
आपके फोटो में जरूरी रंग का रंग है. यह स्पष्ट रूप से आपकी शूटिंग के परिवेश प्रकाश व्यवस्था से जुड़ा हुआ है.
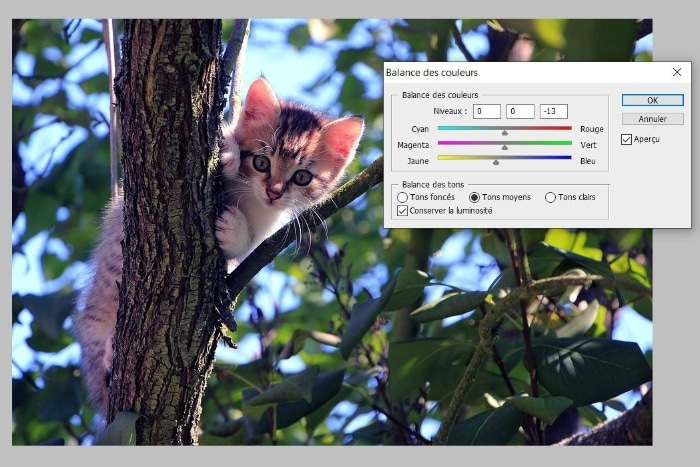
उदाहरण: कृत्रिम प्रकाश एक तस्वीर के लिए एक नारंगी प्रमुख लाल देता है, और इसलिए एक गर्म वातावरण.
इस प्रमुख रंग को कम करने के लिए, और इस प्रकार तटस्थता के करीब पहुंचें, सफेद संतुलन या अपने रीटचिंग सॉफ़्टवेयर के रंग संतुलन का उपयोग करें. गर्म या ठंडे टन के बीच नौकायन करके, आप छवि के समग्र तापमान को समायोजित कर पाएंगे.
3. अपनी तस्वीर की चमक सेट करें
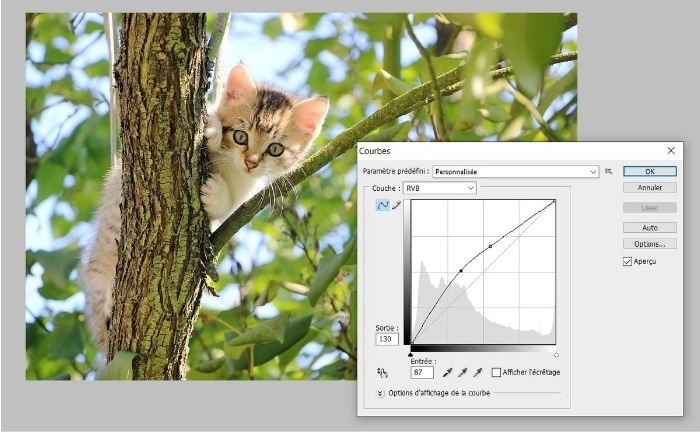
एक छवि की चमक को समायोजित करना विभिन्न स्लाइडर्स के समायोजन के माध्यम से जाता है:
- टोन वक्र और प्रदर्शनी बैकलाइट को छूना संभव बनाती है, एक छवि की अत्यधिक स्पष्टता, या इसके विपरीत इसके प्रतिपादन बहुत अंधेरा है;
- चमक और विरोधाभास एक छवि को गहराई देते हैं.
एक संतोषजनक परिणाम प्राप्त करने के लिए, इसलिए आपको चर के इस सेट को सूक्ष्मता से संयोजित करना चाहिए.
4. फोटो की संतृप्ति को समायोजित करें
जितना अधिक छवि संतृप्त है, उतना ही अधिक इसके रंगों की आजीविका बढ़ जाती है. इसके विपरीत, संतृप्ति जितनी कम होगी, आपकी फोटो ग्रे स्तर के करीब पहुंचती है.
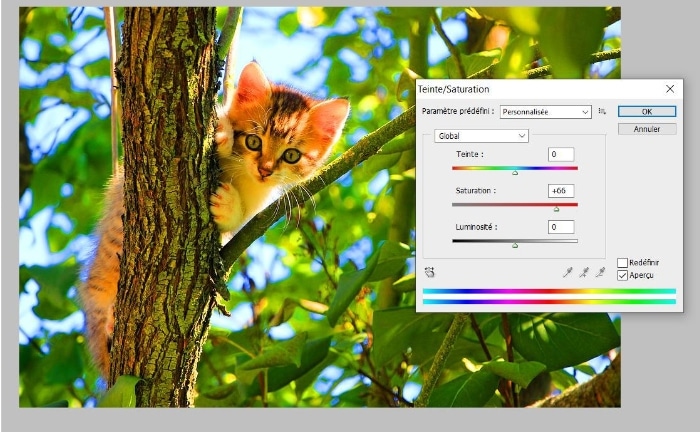
ध्यान दें कि संतृप्ति सीधे प्रभाव डालती है, और बहुत महत्वपूर्ण बात यह है कि एक तस्वीर की रचना और वातावरण. यह इसे और अधिक आकर्षक बनाने के बिंदु पर सुधार कर सकता है.
संतृप्ति के साथ खेलने से, हम छवि के कुछ हिस्सों को, और दूसरों की संतृप्ति के तहत उल्लेखनीय रूप से उजागर कर सकते हैं, ताकि वांछित तत्वों की ओर दर्शक के टकटकी को उन्मुख किया जा सके.
5. फोटो के विपरीत में सुधार करें
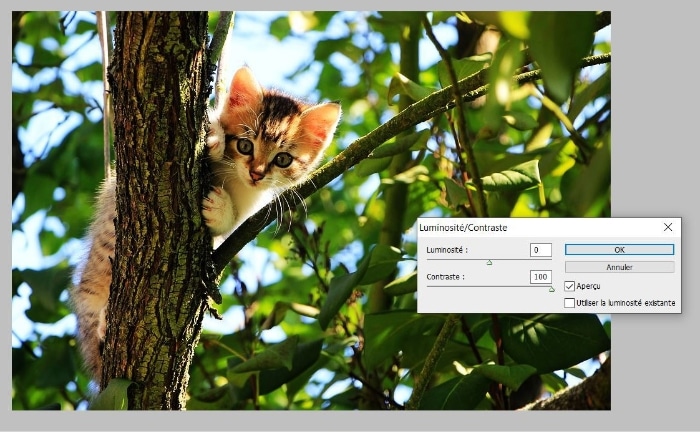
इसके विपरीत भी किसी फोटो के वातावरण को ठीक करना संभव बनाता है. यह एक तस्वीर को आयाम देता है.
- अंतरछात्र छवि से सफेद और अंधेरे भागों को स्पष्ट रूप से अलग करना संभव बनाता है.
- अंतरकमज़ोर स्पष्टता और परिभाषा हटा देता है.
- रंग -समान आपको अपने पृष्ठभूमि विषय को अलग करने की अनुमति देता है.
- टन के विपरीत आपको फोटो से स्पष्ट और अंधेरे भागों को अलग करने की अनुमति देता है.
- बनावट विपरीत आपको पृष्ठभूमि से एक अलग बनावट देकर विषय को उच्चारण करने की अनुमति देता है.
6. काले और सफेद रंग में एक तस्वीर कन्वर्ट करें
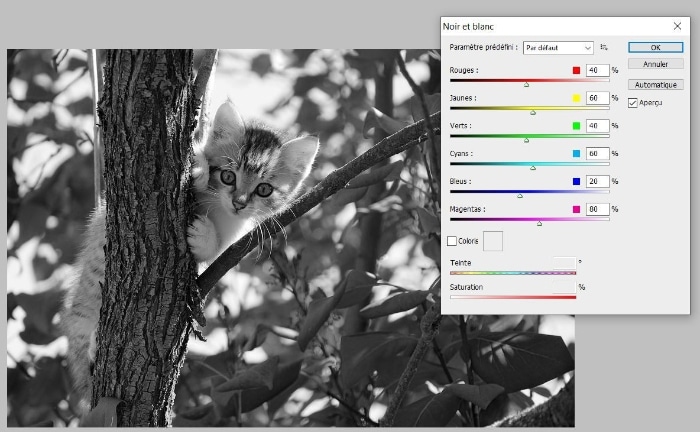
कुछ छवियां अधिक प्रभावशाली होती हैं जब वे काले और सफेद होते हैं. लेकिन एक रंगीन तस्वीर को काले और सफेद में परिवर्तित करने के बाद, ऊपर उल्लिखित मूल सेटिंग्स पर भी आगे बढ़ें:
- सुर;
- चमक;
- विरोधाभासों.
7. एक फोटो फ़िल्टर का उपयोग करें
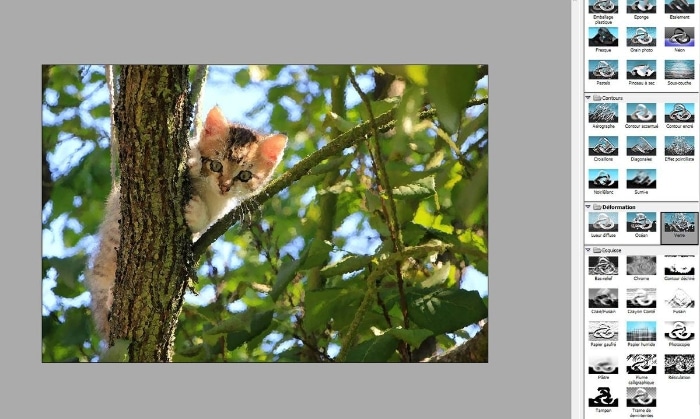
आपके रीटचिंग सॉफ्टवेयर के फिल्टर कभी -कभी बहुत मूल प्रभाव प्रदान करके आपकी छवि को बेहतर बना सकते हैं.
- फ़ोटो फ़िल्टर तापमान आपको इसे गर्म या ठंडा करने की अनुमति देता है;
- सीपिया फ़िल्टर छवि को एक वृद्ध प्रभाव देना संभव बनाता है;
- कलात्मक फ़िल्टर (पेंटिंग, चमक, अनाज, आदि) आपको अपनी तस्वीरों के रंगों या बनावट को संशोधित करने की अनुमति देता है.
8. अपनी तस्वीर का एक अवांछित तत्व गायब कर दें
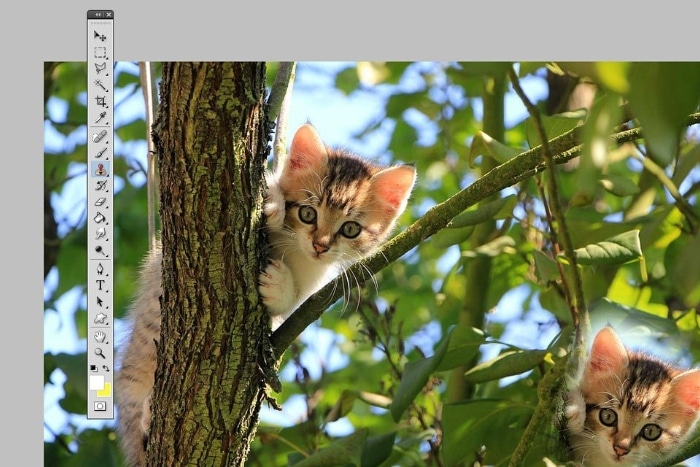
इलेक्ट्रिक केबल, सिग्नलिंग पैनल, अज्ञात वॉकर … कष्टप्रद तत्व आपके फोटो से आपके रिटचिंग सॉफ्टवेयर के बफर टूल के लिए धन्यवाद से हटाए जा सकते हैं. यह आपको एक मूल पैलेट के रूप में छवि के बाकी हिस्सों का उपयोग करके अवांछित क्षेत्र को छिपाने की अनुमति देता है. क्लोन करने के लिए क्षेत्र पर एक नमूना बिंदु को परिभाषित करके शुरू करें, और फिर आप को गायब करना चाहते हैं.
9. अपनी तस्वीर को गहराई और आंदोलन दें

फ़ोटो एडिटिंग सॉफ्टवेयर पर उपलब्ध धुंधली फिल्टर की विस्तृत श्रृंखला का उपयोग क्षेत्र की गहराई में सुधार करने के लिए किया जा सकता है. फिर “डायाफ्राम अस्पष्टता”, “फील्ड डेप्थ का धब्बा”, या “गौसियन ब्लर” का उपयोग करें. टूल आपको छवि को धुंधला करने की अनुमति देता है, सिवाय उस क्षेत्र को छोड़कर जिसे आप स्पष्ट रखना चाहते हैं.
धब्बा भी आंदोलन देने के लिए एक बहुत ही उपयोगी उपकरण है या एक स्थिर फोटो के लिए गति की छाप है.
आप एक ग्राफिक डिज़ाइनर की तलाश कर रहे हैं जो अपनी तस्वीरों को छूने में सक्षम है ताकि उन्हें यथासंभव सही बनाया जा सके ? ग्राफिक डिजाइनर पर जाएं.कॉम.
ग्राफिक डिजाइनर पर सबसे अच्छा ग्राफिक डिजाइनर खोजें.कॉम
2 मिनट में एक विज्ञापन प्रकाशित करें और अपने पहले उद्धरण प्राप्त करें.
अपना बनाएं
प्रतीक चिन्ह
+ 17,000 लोगो ग्राफिक डिजाइनर उपलब्ध हैं
अपने आदेश
रेखांकन
+ 8,000 चित्रकार उपलब्ध हैं
आपने में सुधार लाएं
वेब डिजाइन
+ 7,000 वेब डिजाइनर उपलब्ध हैं
अपना बनाओ
पैकेजिंग
+ 2,500 डिजाइनर पैकेजिंग उपलब्ध


 Ilyass बैरी – 26 जून, 2023
  मैं आपके साथ अपने बुरे अनुभव b नया एस्ट्रा साझा करता हूं . महीनों में खरीदी गई कार 10/22 में मुझे कैमरे की समस्याओं को समायोजित करने के लिए 360 और एयर कंडीशनिंग को समायोजित करने के लिए -Sales सेवा से लगभग 9 बार स्थानांतरित करने के लिए मजबूर किया गया था और अब मैं एक एनवी समस्या के सामने हूं: कॉकपिट और स्क्रीन जो अपने आप बंद हो जाती है . हैची कामेल और याला वास्लाह डब्ल्यू 5900 किमी वास्तव में मैं निराश हूं .
 WAFA HH – 22 फरवरी, 2022
  लेई राम – 23 फरवरी, 2022