Playlist को Spotify करने के लिए Deezer कन्वर्ट करें | मेरे संगीत को ट्यून करें, टुटो कैसे प्लेलिस्ट डीएज़र को Spotify और इसके विपरीत स्थानांतरित करें?
Spotify और इसके विपरीत प्लेलिस्ट Deezer को कैसे स्थानांतरित करें
Contents
- 1 Spotify और इसके विपरीत प्लेलिस्ट Deezer को कैसे स्थानांतरित करें
- 1.1 Spotify में Deezer को परिवर्तित करें
- 1.2 कुछ चरणों में Spotify प्लेलिस्ट में अपने Deezer संगीत लाइब्रेरी को स्थानांतरित करें
- 1.3 Spotify और इसके विपरीत प्लेलिस्ट Deezer को कैसे स्थानांतरित करें ?
- 1.4 भाग —- पहला. प्लेलिस्ट को Spotify करने के लिए मेरे Deezer को कैसे स्थानांतरित करें ?
- 1.5 भाग 2. कैसे अपने Spotify को Deezer Playlists में स्थानांतरित करने के लिए ?
- 1.6 भाग 3. पीसी और मोबाइल के तहत डीज़र पर एक प्लेलिस्ट कैसे बनाएं ?
- 1.7 भाग 4. डीएज़र प्लेलिस्ट के बारे में जानकारी
लगभग 73 मिलियन खिताबों के साथ, डेज़र सबसे लोकप्रिय संगीत सुनने वाले प्लेटफार्मों में से एक है. लेकिन एक बेहतर सुनने के लिए, आपको प्लेलिस्ट बनाना चाहिए. कैसे एक प्लेलिस्ट बनाने के लिए deezer ? यहाँ जवाब है.
Spotify में Deezer को परिवर्तित करें
कुछ चरणों में Spotify प्लेलिस्ट में अपने Deezer संगीत लाइब्रेरी को स्थानांतरित करें
शुरू
रीडिंग सूचियों को डीएज़र से Spotify में बदलें
क्या आपने डेज़र पर गीतों की एक अद्भुत सूची सुनी है लेकिन आप Spotify का उपयोग करते हैं ? यह अब कोई समस्या नहीं है. Tunemymusic के साथ आप कुछ चरणों में Spotify के लिए किसी भी Deezer प्लेलिस्ट को बदल सकते हैं !
कैसे पढ़ने की सूची को Spotify करने के लिए Deezer को स्थानांतरित करने के लिए ?
अपने deezer और खातों को Spotify और tunemymusic को अधिकृत करें.
ट्रांसफर करने के लिए क्या चुनें – हम आपके पसंदीदा गीतों, आपके पसंदीदा कलाकारों, आपके पसंदीदा एल्बम और आपके रीडिंग लिस्ट का आयोजन करते हैं.
करना! आपकी प्लेलिस्ट और संगीत स्वचालित रूप से आपके Spotify खाते में स्थानांतरित हो जाएगा.
कुछ शांत सामग्री पढ़ें
Spotify बनाम Deezer – Spotify और Deezer संगीत स्ट्रीमिंग सेवाओं की तुलना करना स्ट्रीमिंग उद्योग संगीत ऐप्स से भर गया है जो बहुत समान सुविधाओं की पेशकश करते हैं. मैंने इस बाजार में दो प्रमुख लोगों की कोशिश की है, Spotify और Deezer. अच्छा, बुरा और फैसला, आपके द्वारा संक्षिप्त और बिंदु तक रखा गया. Spotify बनाम Deezer के मामले में अंतिम फैसला. पढ़ें पोस्ट
Spotify पर एक प्लेलिस्ट कैसे बनाएं. मोबाइल और डेस्कटॉप ऐप्स पर Spotify पर एक प्लेलिस्ट बनाएं. पढ़ें पोस्ट
Spotify क्या है? म्यूजिक प्लेटफॉर्म के बारे में सब कुछ जानें? सबसे बड़े संगीत ऐप के INS और outs के बारे में सब कुछ जानें. पढ़ें पोस्ट
आज उपलब्ध सर्वश्रेष्ठ संगीत स्ट्रीमिंग सेवाओं की अंतिम सूची के लिए अब सर्वश्रेष्ठ संगीत स्ट्रीमिंग सेवाओं की सूची की सूची अब चेक करें. सभी रैंक और सुविधा की तुलना में सुविधा. पढ़ें पोस्ट
Spotify और इसके विपरीत प्लेलिस्ट Deezer को कैसे स्थानांतरित करें ?
Deezer दुनिया के सर्वश्रेष्ठ संगीत सामग्री अनुप्रयोगों में से एक है. कई लोग अपनी प्लेलिस्ट को डाउनलोड करने के लिए, इसे बनाए रखें और इसे सुनें जैसे वे फिट देखते हैं. Spotify, नवागंतुक, आपको ऑनलाइन या ऑफ में संगीत सुनने की अनुमति देता है. दो अनुप्रयोगों को भी जोड़ा जा सकता है, जिसका अर्थ है कि आप अपनी बात सुन सकते हैं प्लेलिस्ट देइज़र स्पॉटिफाई पर.
कई आश्चर्य है कि यदि संभव हो, और यदि हां, तो यह कैसे करें. यही कारण है कि यह लेख आपकी मदद कर सकता है और आपको दिखा सकता है कि कैसे Spotify के लिए एक Deezer प्लेलिस्ट ट्रांसफर करें. वह आपको यह भी दिखाएगा कि कैसे एक Spotify प्लेलिस्ट को Deezer में स्थानांतरित करें, कैसे एक Deezer प्लेलिस्ट बनाने के लिए, कैसे एक Deezer प्लेलिस्ट साझा करें और अंत में आपको Wondershare Uniconverter, सबसे अच्छी प्लेलिस्ट Spotify Deezer Converter सॉफ्टवेयर के बारे में बताएं.
- भाग —- पहला. प्लेलिस्ट को Spotify करने के लिए मेरे Deezer को कैसे स्थानांतरित करें ?
- भाग 2. कैसे अपने Spotify को Deezer Playlists में स्थानांतरित करने के लिए ?
- भाग 3. पीसी और मोबाइल के तहत डीज़र पर एक प्लेलिस्ट कैसे बनाएं ?
- भाग 4. डीएज़र प्लेलिस्ट के बारे में जानकारी
भाग —- पहला. प्लेलिस्ट को Spotify करने के लिए मेरे Deezer को कैसे स्थानांतरित करें ?
Deezer और Spotify दोनों इंटरनेट उपयोगकर्ताओं द्वारा बहुत सराहना की जाती हैं जो संगीत सुनना पसंद करते हैं. उनके उपयोग और पहुंच में आसानी सभी को आरामदायक होने की अनुमति देती है. हालांकि, सभी सुविधाओं में महारत हासिल करना आसान नहीं है. लेकिन, यह लेख आपको कई तरीकों से मदद करेगा. शुरू करने के लिए, यहां बताया गया है कि Spotify के लिए प्लेलिस्ट Deezer को कैसे स्थानांतरित किया जाए.
चरण 1 एक वेब एप्लिकेशन खोलें और अपनी प्लेलिस्ट का चयन करें
Songshift की तरह चुने हुए वेब एप्लिकेशन को खोलें. यह जानना महत्वपूर्ण है कि सॉन्गशिफ्ट एक Spotify deezer प्लेलिस्ट कनवर्टर है. अपने संग्रह में प्लेलिस्ट टैब का चयन करें.
चरण 2 Deezer कनेक्ट करें और अपने Deezer प्लेलिस्ट का चयन करें
बाएं बार में अपने बुलबुले पर क्लिक करके Deezer को कनेक्ट करें. प्रत्येक प्लेलिस्ट के बाईं ओर संबंधित बॉक्स की जाँच करके, उन डीएज़र प्लेलिस्ट का चयन करें जिन्हें आप स्थानांतरित करना चाहते हैं.
चरण 3 रूपांतरण उपकरण का चयन करें और Spotify का चयन करें
सूची के शीर्ष पर टूलबार में, रूपांतरण उपकरण का चयन करें. गंतव्य सेवा में Spotify का चयन करें. यदि एप्लिकेशन आपको Spotify कनेक्ट करने के लिए कहता है, तो इसे कनेक्ट करें.
चरण 4 प्लेलिस्ट को Spotify करने के लिए अपने deezer को स्थानांतरित करना शुरू करें
एक बार जब आप गंतव्य सेवा में Spotify का चयन करते हैं तो स्थानांतरण शुरू होता है. अब, यदि आप एक समय में कई प्लेलिस्ट स्थानांतरित करते हैं, तो यह पृष्ठभूमि में किया जाएगा. यदि Spotify पर संबंधित फ़ाइलें हैं, तो आपकी प्लेलिस्ट Spotify पर उपलब्ध होगी. आइए अपने Spotify Ver Deezer Playlists को स्थानांतरित करना सीखें.
भाग 2. कैसे अपने Spotify को Deezer Playlists में स्थानांतरित करने के लिए ?
पिछले भाग में, हमने प्लेलिस्ट को Spotify करने के लिए आपके Deezer को स्थानांतरित करना सीखा. यह बहुत जटिल नहीं था. इस भाग में, आप देखेंगे कि प्लेलिस्ट Spotify को Deezer में कैसे स्थानांतरित किया जाए.
चरण 1 एक वेब एप्लिकेशन खोलें और संगीत के स्रोत का चयन करें
शुरू करने के लिए, Spotify द्वारा अधिकृत वेब अनुप्रयोगों में से एक को खोलें, जैसे साउंडिज़ और पहले संगीत के स्रोत का चयन करें. यह जानना महत्वपूर्ण है कि साउंडिज़ एक प्लेलिस्ट Spotify Deezer कनवर्टर है.
चरण 2 Spotify प्लेलिस्ट को Deezer में स्थानांतरित करने के लिए चुनें
Spotify प्लेलिस्ट चुनें जिसे हम Deezer में स्थानांतरित करना चाहते हैं.
चरण 3 प्लेटफ़ॉर्म का चयन करें
अन्य प्लेटफार्मों से एक प्लेटफॉर्म के रूप में Deezer का चयन करें, प्लेटफ़ॉर्म जिसमें प्लेलिस्ट को स्थानांतरित किया जाएगा. चुने गए वेब एप्लिकेशन के आधार पर, कभी -कभी आपको सूची के शीर्ष पर टूलबार में रूपांतरण टूल का चयन करना पड़ता है.
चरण 4 Deezer प्लेलिस्ट के लिए Spotify का हस्तांतरण लॉन्च करें
Deezer प्लेटफ़ॉर्म का चयन करने के बाद, चयनित प्लेलिस्ट का सारांश दिखाई देता है. यह वह क्षण है जब आप ट्रांसफर लॉन्च कर सकते हैं. यदि पत्राचार हैं, तो आपकी प्लेलिस्ट डेज़र पर उपलब्ध होगी. यदि आप एक समय में कई प्लेलिस्ट स्थानांतरित करते हैं, तो प्रक्रिया पृष्ठभूमि में होगी.
भाग 3. पीसी और मोबाइल के तहत डीज़र पर एक प्लेलिस्ट कैसे बनाएं ?
लगभग 73 मिलियन खिताबों के साथ, डेज़र सबसे लोकप्रिय संगीत सुनने वाले प्लेटफार्मों में से एक है. लेकिन एक बेहतर सुनने के लिए, आपको प्लेलिस्ट बनाना चाहिए. कैसे एक प्लेलिस्ट बनाने के लिए deezer ? यहाँ जवाब है.
1. कैसे एक कंप्यूटर पर एक deezer प्लेलिस्ट बनाने के लिए ?
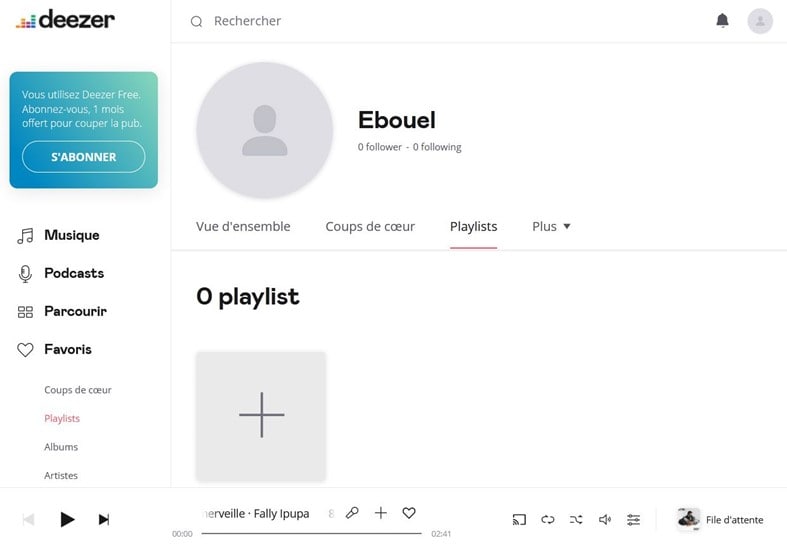
चरण 1 Deezer पसंदीदा में प्लेलिस्ट का चयन करें
Deezer पर, पसंदीदा पर जाएं. प्लेलिस्ट चुनें, फिर एक प्लेलिस्ट बनाएँ चुनें.
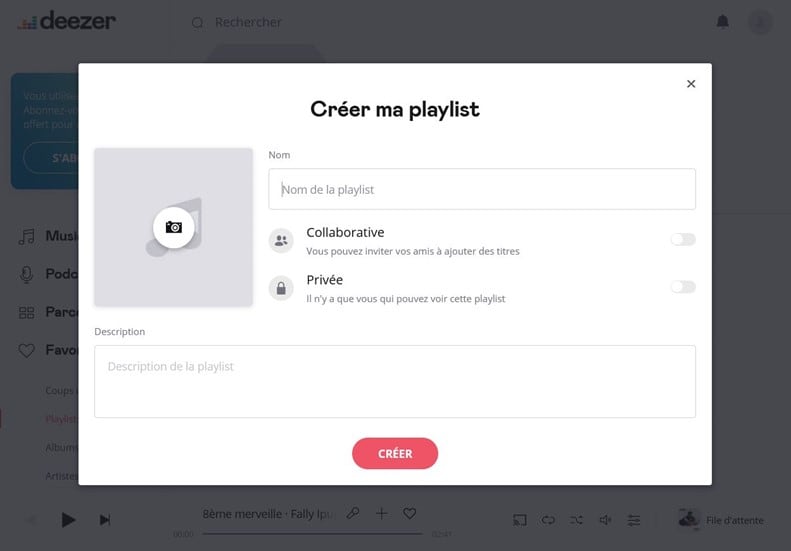
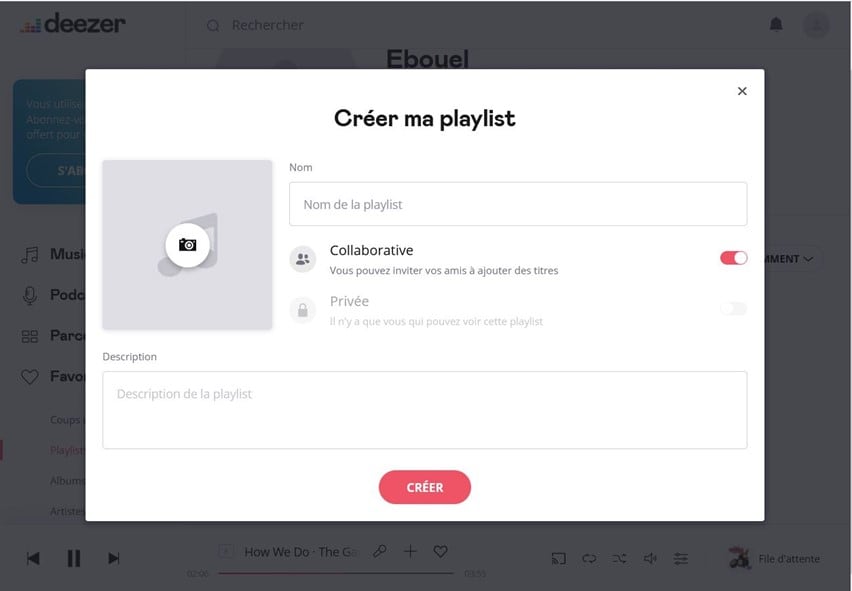
चरण 2 अपने Deezer प्लेलिस्ट से जानकारी दर्ज करें
अपनी प्लेलिस्ट का नाम दर्ज करें. यदि आप एक छवि डाउनलोड करना चाहते हैं तो कैमरा आइकन का चयन करें. अपनी प्लेलिस्ट को निजी या सहयोगी बनाने के लिए बॉक्स की जाँच करें.
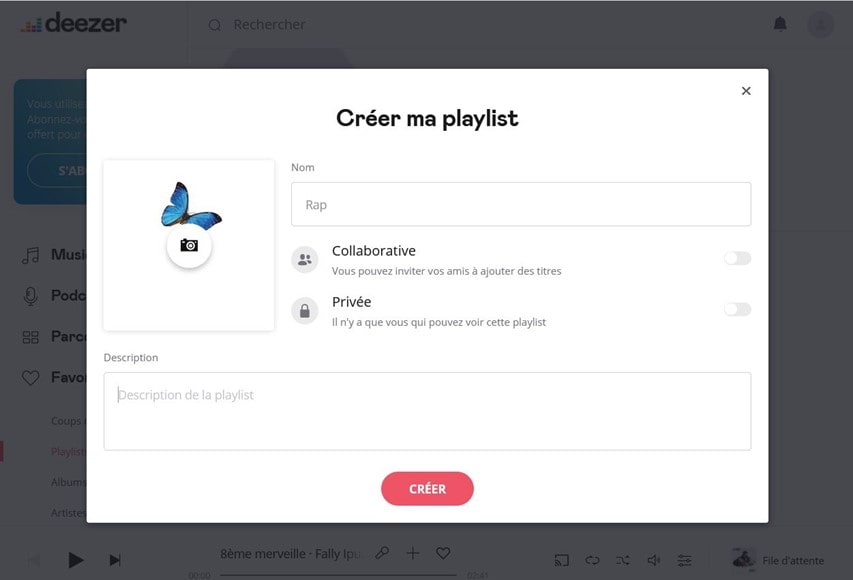
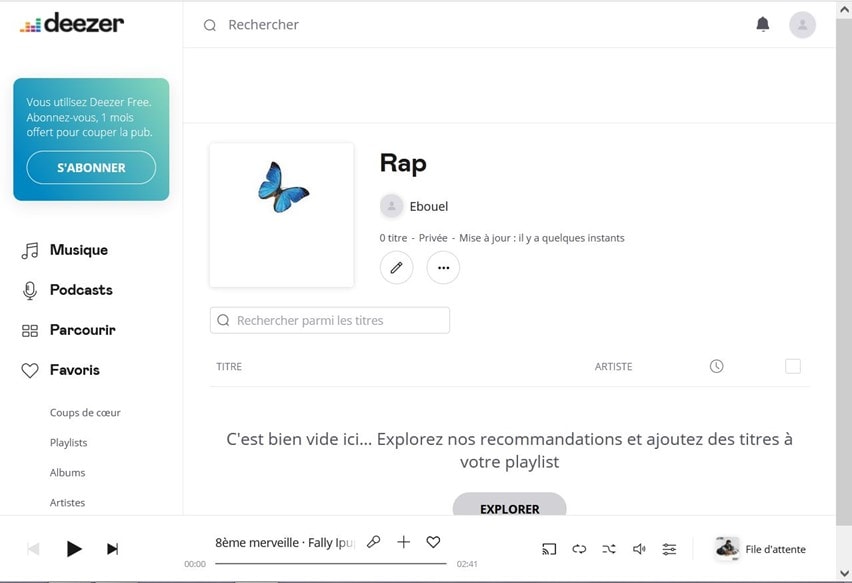
चरण 3 Deezer पर एक प्लेलिस्ट बनाने के लिए बनाएँ का चयन करें
Create Create और यहाँ आपकी Deezer Playlist बनाई गई है !
2. मोबाइल पर एक Deezer प्लेलिस्ट कैसे बनाएं ?
चरण 1 पसंदीदा पर जाएं और प्लेलिस्ट का चयन करें
Deezer ऐप पर पसंदीदा पर जाएं. संगीत में प्लेलिस्ट का चयन करें, फिर “एक नई प्लेलिस्ट बनाएँ” चुनें.
चरण 2 प्लेलिस्ट देइज़र जानकारी को पूरा करें
अपने Deezer Playlist का नाम दर्ज करें. अपनी प्लेलिस्ट का आइकन चुनें या तो फोटो लेकर या छवि डाउनलोड करके. कर्सर के लिए धन्यवाद, चुनें कि क्या आपकी प्लेलिस्ट निजी या सहयोगी है. एक सहयोगी प्लेलिस्ट एक सार्वजनिक प्लेलिस्ट है. सहयोगी विकल्प केवल Android पर उपलब्ध है. IOS उपयोगकर्ता साइट पर या कंप्यूटर एप्लिकेशन पर सहयोगी प्लेलिस्ट सेटिंग्स को संशोधित कर सकते हैं.
चरण 3 Deezer पर अपनी प्लेलिस्ट बनाएं
Playlist Deezer का निर्माण करने के लिए Create Create का चयन करें.
भाग 4. डीएज़र प्लेलिस्ट के बारे में जानकारी
समय के साथ देइज़र में सुधार हुआ है. वर्तमान में आपकी डीएज़र प्लेलिस्ट में हेरफेर करना बहुत आसान है. सभी प्लेटफार्मों (वेब, मोबाइल एप्लिकेशन और कंप्यूटर एप्लिकेशन) से सहयोगी Deezer प्लेलिस्ट बनाना संभव और आसान है. हालांकि, यह ध्यान दिया जाना चाहिए कि आवश्यक शर्तें आवश्यक हैं. इंस्टाग्राम स्टोरीज बनाने के लिए, आपको iOS 8 की आवश्यकता होगी.3.0 या एक उच्च संस्करण, या Android 6.1.16 या एक उच्च संस्करण. फेसबुक कहानियों पर देइज़र को साझा करने के लिए, आपको iOS 8 की आवश्यकता होगी.21 या एक उच्च संस्करण या Android 6.2.9 या एक उच्च संस्करण. फेसबुक स्टोरीज में शेयरिंग टूल iOS या Android के साथ उपलब्ध है. अंत में, स्नैपचैट के लिए, आपको iOS 13 या उच्च संस्करण या Android 6 की आवश्यकता होगी.1.16 या एक उच्च संस्करण. इस भाग में, हम देखेंगे कि कैसे एक डेज़र प्लेलिस्ट साझा करें और यह कैसे एक सहयोगी Deezer प्लेलिस्ट काम करता है.
1. फेसबुक पर एक Deezer प्लेलिस्ट कैसे साझा करें ?
आइए एक Deezer प्लेलिस्ट साझा करने के लिए शुरू करें. यहां, आपको पता होना चाहिए कि आप सोशल नेटवर्क, मैसेजिंग सिस्टम और अन्य प्लेटफार्मों पर अपनी Deezer प्लेलिस्ट साझा कर सकते हैं. चलो फेसबुक के साथ शुरू करते हैं.
चरण 1 साझा करने के लिए Deezer प्लेलिस्ट चुनें और खोलें
शीर्षक, एल्बम, कलाकार, प्लेलिस्ट, पॉडकास्ट या पॉडकास्ट का एपिसोड चुनें जिसे आप साझा करना चाहते हैं.
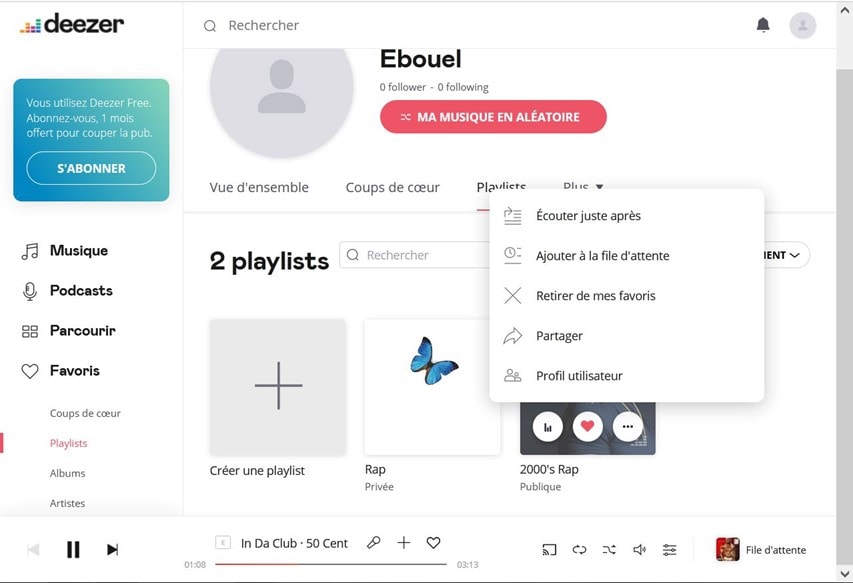
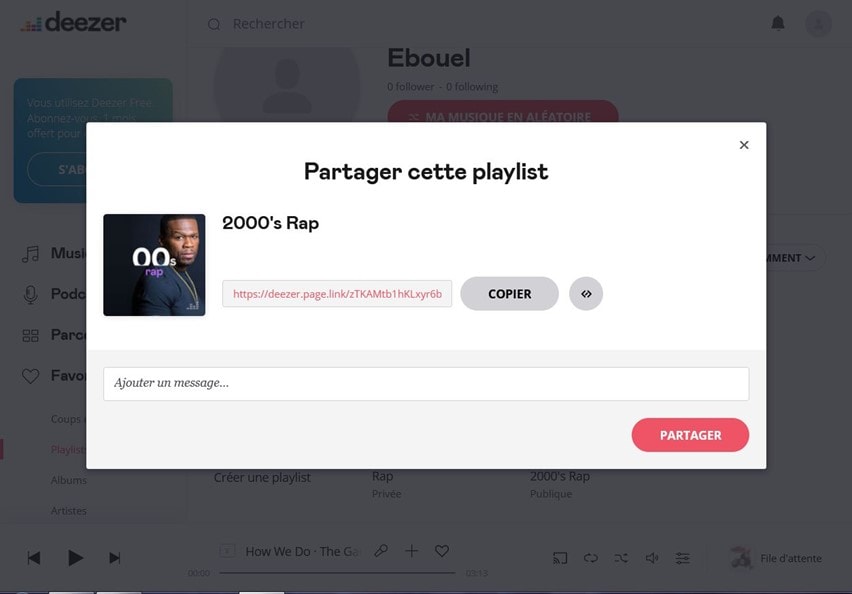
चरण 2 प्लेलिस्ट डीएज़र शेयरिंग सेटिंग्स सेट करें
पाठक में, शेयर आइकन चुनें. साझाकरण विकल्प मेनू में, लिंक को कॉपी करें और इसे उस नेटवर्क पर रखें जिस पर आप अपनी सामग्री साझा करना चाहते हैं: फेसबुक कहानियों के लिए, एक बार जब आप इस विकल्प का चयन कर लेते हैं, तो आप अपने प्रकाशन को निजीकृत करने के लिए प्रकाशक का उपयोग कर सकते हैं. आप फेसबुक न्यूज फीड या फेसबुक मैसेंजर पर भी साझा कर सकते हैं.
यह जान लें कि आप इंस्टाग्राम स्टोरीज में या स्नैपचैट पर भी शब्द साझा कर सकते हैं. आप अपने Deezer अनुयायियों के साथ सामग्री भी साझा कर सकते हैं. यहाँ आप अब जानते हैं कि Deezer से सामग्री कैसे साझा करें.
2. कैसे Deezer पर एक नई सहयोगी प्लेलिस्ट बनाएं ?
एक सहयोगी प्लेलिस्ट आपको, साथ ही साथ अन्य Deezer उपयोगकर्ताओं को एक ही प्लेलिस्ट में शीर्षक जोड़ने की अनुमति देती है. यह अन्य लोगों, दोस्तों या प्रशंसकों के साथ सुंदर संगीत का आनंद लेने का एक शानदार तरीका है. सहयोगी प्लेलिस्ट हमेशा सार्वजनिक होते हैं, और इसे निजी के रूप में कॉन्फ़िगर नहीं किया जा सकता है. एक सहयोगी प्लेलिस्ट और एक सार्वजनिक प्लेलिस्ट के बीच एक अंतर है. सभी Deezer उपयोगकर्ता एक सार्वजनिक प्लेलिस्ट का उपयोग कर सकते हैं, लेकिन केवल प्लेलिस्ट के मालिक केवल शीर्षक जोड़ सकते हैं या हटा सकते हैं. सहयोगी प्लेलिस्ट हमेशा सार्वजनिक होते हैं, और सभी डीज़र उपयोगकर्ता शीर्षक जोड़ सकते हैं. हालांकि, केवल प्लेलिस्ट के मालिक केवल एक सहयोगी प्लेलिस्ट से खिताब हटा सकते हैं. अब एक सहयोगी प्लेलिस्ट कैसे बनाएं ?
Android के लिए अपने Deezer एप्लिकेशन से, आप अपने सहयोगी प्लेलिस्ट की रचना, संशोधित और बना सकते हैं. इसका मतलब है कि सभी डेज़र सदस्यों को टुकड़े जोड़ने की अनुमति है. हालाँकि, वे उन्हें संपादित या हटा नहीं सकते हैं. यहां बताया गया है कि कैसे एक नई सहयोगी प्लेलिस्ट बनाई जाए.
चरण 1 एक Deezer प्लेलिस्ट बनाने के लिए विकल्प चुनें
स्क्रीन के बाईं ओर मेनू से, अपने पसंदीदा को एक्सेस करें. “संगीत” टैब में, “प्लेलिस्ट” चुनें, फिर “एक नई प्लेलिस्ट बनाएं”.

चरण 2 एक सहयोगी प्लेलिस्ट के मापदंडों को परिभाषित करें
अपनी प्लेलिस्ट का नाम जानें और संभवतः एक कवर फोटो जोड़ें. “सहयोगी” विकल्प को सक्रिय करने के लिए, “निजी” बटन को अक्षम किया जाना चाहिए. एक सार्वजनिक प्लेलिस्ट को सभी Deezer उपयोगकर्ताओं द्वारा पढ़ा जा सकता है, लेकिन वे इसे बदल नहीं सकते हैं या इसे हटा सकते हैं. “सहयोगी” फ़ंक्शन को सक्रिय करके, अन्य सदस्य हालांकि वहां गाने रिकॉर्ड कर सकते हैं.
चरण 3 “बनाएँ” पर क्लिक करके मान्य करें.
3. कैसे एक मौजूदा प्लेलिस्ट को डीएज़र पर एक सहयोगी प्लेलिस्ट में बदलने के लिए ?
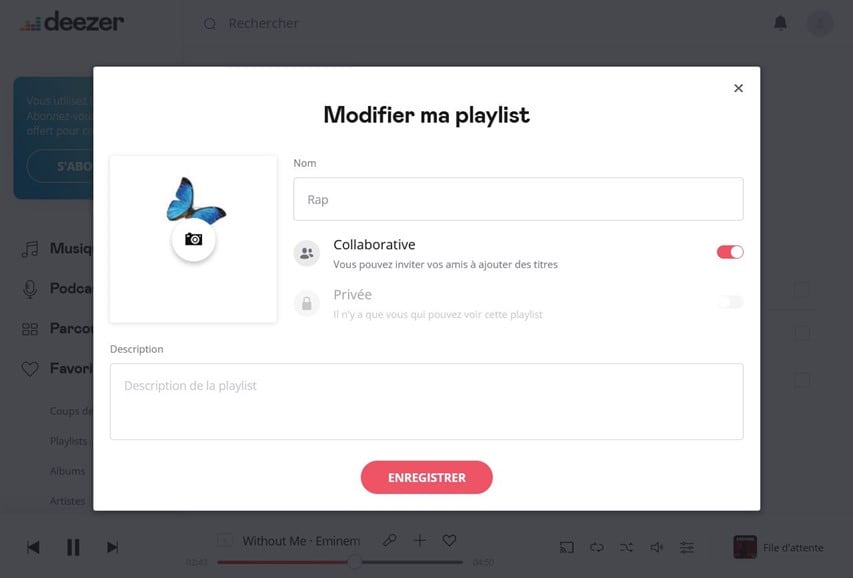
चरण 1 डेज़र प्लेलिस्ट पर संशोधित करने का विकल्प चुनें
पृष्ठ के निचले भाग में “पसंदीदा” मेनू से, अपनी प्लेलिस्ट पर जाएं. अपनी प्लेलिस्ट की सूची में, जिसे आप संशोधित करना चाहते हैं, उसे स्पर्श करें, फिर पेंसिल -शेप्ड पिक्टोग्राम.
चरण 2 प्लेलिस्ट देइज़र सहयोगी बनाएं
प्लेलिस्ट प्रकाशन स्क्रीन से, “फिनिश” बटन के साथ मान्य करने से पहले “सहयोगी” विकल्प को सक्रिय करें. हालांकि, याद रखें कि एक प्लेलिस्ट केवल सहयोगी हो सकती है यदि यह निजी मोड में नहीं है.
ध्यान दें कि आपने इसे सहयोगी बनाने में सक्षम होने के लिए खुद को प्लेलिस्ट बनाया होगा. कैसे एक प्लेलिस्ट के सहयोगी मोड का उपयोग करने के लिए इसे दूसरों के साथ साझा करने में सक्षम होने के लिए ? वास्तव में, अपने प्लेलिस्ट की लिंक अपने दोस्तों, परिवार या अन्य संगीत प्रेमियों को साझा करें. अन्य उपयोगकर्ताओं को हार्ट आइकन का उपयोग करके अपनी पसंदीदा प्लेलिस्ट जोड़ना चाहिए. वे तब वे शीर्षक जोड़ सकते हैं जो वे चाहते हैं !
अंत में, देइज़र का उपयोग दुनिया भर के हजारों लोगों को सुंदर संगीत का आनंद लेने और दूसरों के साथ अनुभव साझा करने की अनुमति देता है. हमने देखा है कि एक डेज़र प्लेलिस्ट कैसे काम करता है और कैसे Spotify और इसके विपरीत एक Deezer प्लेलिस्ट को स्थानांतरित करें. हमने यह भी सीखा है कि डेज़र कैसे काम करता है, विशेष रूप से सहयोगी प्लेलिस्ट और प्लेलिस्ट के संबंध में. हालाँकि, उन सभी गुणों के वीडियो साझा करने में सक्षम एक एप्लिकेशन भी है जो आपको प्रिय हैं: यह Wondershare Uniconverterter है. Wondershare Uniconverter के साथ, कन्वर्ट, कंप्रेस, एडिट, एडिट, डाउनलोड करें और अपने वीडियो आसानी से बनाएं. यह एक वास्तविक क्रांति है ! यह उपयोग करना आसान है और आपको किसी भी अन्य कनवर्टर की तुलना में 30 गुना तेजी से परिवर्तित करने की अनुमति देता है. यह उपयोग करना आसान है और आपको 1000 से अधिक वीडियो प्रारूपों में परिवर्तित करने की अनुमति देता है. इस पर जाने में संकोच न करें Spotify deezer प्लेलिस्ट कनवर्टर, डाउनलोड मुफ्त है !
 Wondershare Uniconverter – Windows/Mac के लिए सर्वश्रेष्ठ Deezer प्लेलिस्ट कनवर्टर

- कम गुणवत्ता वाले नुकसान के साथ वीडियो को 1,000 से अधिक लॉट से अधिक में परिवर्तित करें.
- आसानी से अनुकूलन योग्य सेटिंग्स के साथ वीडियो संपीड़ित करें.
- डाउनलोड करें और वीडियो/ऑडियो YouTube, Deezer, Twitch, Pinterest और 10,000 अन्य साइटों को सहेजें.
- कई एकीकृत मेनू मॉडल के साथ डीवीडी या ब्लू-रे डिस्क पर किसी भी प्रारूप में वीडियो उत्कीर्ण करना.
- कट और फसल वीडियो, साथ ही प्रभाव, उपशीर्षक, वॉटरमार्क, आदि के साथ वीडियो संपादन भी।
- एक डीवीडी/सीडी उत्कीर्णन, एक वीडियो मेटाडेटा सुधारक, एक जीआईएफ निर्माता, एक स्क्रीन रिकॉर्डर, एक छवि कनवर्टर और अधिक संयोजन के लिए बहुमुखी टूल बॉक्स.
- बहुमुखी टूलबॉक्स फिक्स्ड वीडियो मेटाडेटा, एक GIF निर्माता, एक वीडियो कंप्रेसर और एक स्क्रीन रिकॉर्डर को जोड़ती है.
- समर्थित OS: Windows NT4/2000/2003/XP/VISTA/7/8 और विंडोज 10 (32 बिट और 64 बिट), मैक ओएस 10.15 (कैटालिना), 10.14, 10.13, 10.12, 10.11, 10.10, 10.9, 10.8, 10.7, 10.6.
![]()
सत्यापित सुरक्षा, 5,942,222 लोगों ने इसे डाउनलोड किया.


 Ilyass बैरी – 26 जून, 2023
  मैं आपके साथ अपने बुरे अनुभव b नया एस्ट्रा साझा करता हूं . महीनों में खरीदी गई कार 10/22 में मुझे कैमरे की समस्याओं को समायोजित करने के लिए 360 और एयर कंडीशनिंग को समायोजित करने के लिए -Sales सेवा से लगभग 9 बार स्थानांतरित करने के लिए मजबूर किया गया था और अब मैं एक एनवी समस्या के सामने हूं: कॉकपिट और स्क्रीन जो अपने आप बंद हो जाती है . हैची कामेल और याला वास्लाह डब्ल्यू 5900 किमी वास्तव में मैं निराश हूं .
 WAFA HH – 22 फरवरी, 2022
  लेई राम – 23 फरवरी, 2022