SAMSUNG, Android की सुरक्षित फ़ाइल को पुनर्प्राप्त करने के लिए हल: एक लॉक किए गए फ़ोल्डर में अपने दस्तावेज़ों को कैसे सुरक्षित करें
Android: एक लॉक किए गए फ़ोल्डर में अपने दस्तावेज़ों को कैसे सुरक्षित करें
Contents
- 1 Android: एक लॉक किए गए फ़ोल्डर में अपने दस्तावेज़ों को कैसे सुरक्षित करें
- 1.1 सुरक्षित सैमसंग फ़ाइलों को कैसे पुनर्प्राप्त करने के लिए
- 1.2 भाग 1: सैमसंग पर सुरक्षित फ़ाइल क्या है
- 1.3 भाग 2: यह कहाँ है
- 1.4 भाग 3: क्या सैमसंग सुरक्षित फ़ाइल को पुनर्प्राप्त करना संभव है
- 1.5 भाग 4: सैमसंग सुरक्षित फ़ाइल को पुनर्स्थापित करें
- 1.6 भाग 5: सैमसंग सुरक्षित फ़ाइल की हटाए गए फ़ोटो खोजें
- 1.7 निष्कर्ष
- 1.8 Android: एक लॉक किए गए फ़ोल्डर में अपने दस्तावेज़ों को कैसे सुरक्षित करें
हालांकि, यह ध्यान दिया जाना चाहिए कि सुरक्षित फ़ाइल सैमसंग की बहाली वर्तमान डेटा के उन्मूलन का कारण बन सकती है, जहां से हटाए गए सैमसंग सुरक्षित फ़ाइल डेटा का पूर्वावलोकन और चुनिंदा पुनर्प्राप्त करने की आवश्यकता है.
सुरक्षित सैमसंग फ़ाइलों को कैसे पुनर्प्राप्त करने के लिए
घुसपैठिए आपको परेशान करते हैं ? सुरक्षित फ़ाइल को सक्रिय करें. यह आपके डेटा को छिपाने के लिए सैमसंग द्वारा दी जाने वाली एक सुविधा है. यह तकनीक क्या है ? और इसे कैसे सक्रिय करें ? यहाँ उत्तर हैं.
AUDREY JEUNET | अंतिम अद्यतन : 01/09/2023 पर
निर्माताओं की सबसे बड़ी चुनौतियों में से एक अपने स्मार्टफोन को सुरक्षित करना है. न केवल साइबर हमलों के खिलाफ, बल्कि डेटा के usurpation भी. आरेख और पसे का शब्द अब पर्याप्त नहीं है. अब हमें ऐसी तकनीकों की आवश्यकता है जो एक अनलॉक स्मार्टफोन के साथ भी दस्तावेजों को छिपाते हैं. सैमसंग की सुरक्षित फ़ाइल एक अच्छा समाधान लगता है. लेकिन कई उपयोगकर्ता उसे नहीं जानते. तो यह पता लगाने का एक अवसर है.
सारांशछिपाना
1-क्या एक सुरक्षित फ़ाइल है
2-कहाँ है
3-क्या सैमसंग सुरक्षित फ़ाइल फ़ोटो को पुनर्प्राप्त करना संभव है ?
4-रेस्तरां सैमसंग सिक्योर फाइल [फ्री]
सैमसंग सिक्योर फाइल से डिलीट की गई 5-रिवट फ़ोटो
भाग 1: सैमसंग पर सुरक्षित फ़ाइल क्या है
यदि आपको बताया जाता है कि सुरक्षित फ़ाइल एक अलग फोन है तो हम अतिशयोक्ति नहीं करते हैं. यह उपयोगकर्ता द्वारा चुने गए डेटा को छिपाने के लिए है. उदाहरण के लिए, आप इसे सुरक्षित फ़ोल्डर में स्थानांतरित करने के लिए अपनी गैलरी की एक ही तस्वीर को चुभ सकते हैं. वह फिर से गैलरी में कभी दिखाई नहीं देगी. यह कंप्यूटर पर छिपी हुई फ़ाइलों का एक ही सिद्धांत है. लेकिन एक सैमसंग पर, इसका उपयोग बहुत गहरा है. वास्तव में, आप सुरक्षित फ़ोल्डर में कोई भी एप्लिकेशन जोड़ सकते हैं: संपर्क, संदेश, एजेंडा, आदि।. इसकी तरलता निश्चित रूप से इसका मजबूत बिंदु है. आपको सभी फ़ोटो या सभी नोटों को छिपाने की ज़रूरत नहीं है. ऑपरेशन केवल एक, दो या पांच तत्वों को प्रभावित करता है. यह आप पर निर्भर करता है. अन्य दस्तावेज वैसा ही रहते हैं जैसे वे हैं.
भाग 2: यह कहाँ है
मेनू जो इसे नियंत्रित करता है वह फोन सेटिंग्स में है. यह वह जगह है जहाँ आप सब कुछ कॉन्फ़िगर कर सकते हैं. कार्यक्षमता सक्रियण, डेटा बैकअप, अनुप्रयोगों और अन्य सेवाओं के अलावा आपके से पहले होगा. जैसे ही सुरक्षित फ़ाइल लागू की जाती है, बाद वाला मुख्य मेनू पर उपलब्ध होगा. आपको इसे एक्सेस करने और फ़ाइल का कुल नियंत्रण लेने की अनुमति देने के लिए एक आइकन प्रदर्शित किया जाता है. प्रवेश के लिए एक पासवर्ड या अनलॉकिंग आरेख का अनुरोध किया जाएगा. फिर, सुरक्षित आवेदन आपके सामने होंगे. आप फ़ाइलें जोड़ सकते हैं या दूसरों को हटा सकते हैं. अब आप अपने सैमसंग डिवाइस के मुख्य मेनू से पूरी तरह से अलग दुनिया में हैं.
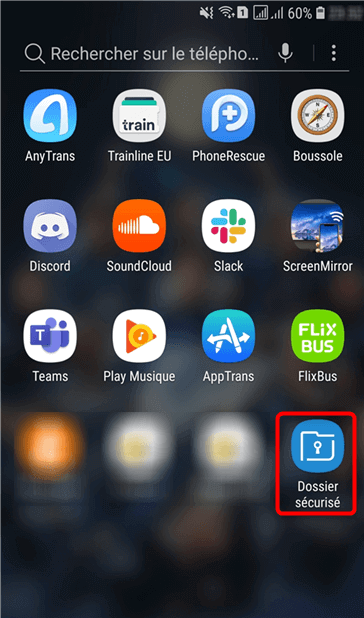
मुख्य मेनू पर सुरक्षित फ़ोल्डर
भाग 3: क्या सैमसंग सुरक्षित फ़ाइल को पुनर्प्राप्त करना संभव है
हां, सैमसंग सुरक्षित फ़ोल्डर के हिस्से में खोई हुई तस्वीरों को पुनर्प्राप्त करना संभव है जिसमें हमने कई महत्वपूर्ण फाइलें सहेजीं हैं.
हालांकि, यह ध्यान दिया जाना चाहिए कि सुरक्षित फ़ाइल सैमसंग की बहाली वर्तमान डेटा के उन्मूलन का कारण बन सकती है, जहां से हटाए गए सैमसंग सुरक्षित फ़ाइल डेटा का पूर्वावलोकन और चुनिंदा पुनर्प्राप्त करने की आवश्यकता है.
भाग 4: सैमसंग सुरक्षित फ़ाइल को पुनर्स्थापित करें
टेलीफोन डेटा की तरह, सुरक्षित फ़ोल्डर को सहेजा जा सकता है. यह ऑपरेशन उन उपयोगकर्ताओं के लिए महत्वपूर्ण है जो मोबाइल बदलेंगे. दरअसल, सुरक्षित फ़ाइल की सामग्री हस्तांतरणीय नहीं है. इसलिए सभी दस्तावेजों का पूरा बैकअप बनाना आवश्यक है. फिर, लक्ष्य डिवाइस पर एक साधारण बहाली आपको सब कुछ कॉपी करने की अनुमति देगी. बेशक, आपको दोनों मोबाइलों पर एक ही Gmail खाते से कनेक्ट करना होगा. अन्यथा, आप कुछ भी ठीक नहीं कर पाएंगे. डेटा बैकअप सुरक्षित फ़ोल्डर के मापदंडों से संभव हो सकता है. यह सैमसंग क्लाउड द्वारा समर्थित है. यह अपने सर्वर पर है कि डेटा सहेजा जाएगा. खानपान के लिए, आप इसे उसी मेनू से कॉन्फ़िगर कर सकते हैं. एक अंतिम टिप्पणी नहीं भूलना है: आपको सैमसंग क्लाउड द्वारा पेश किए गए 15 जीबी से अधिक नहीं होना चाहिए. अन्यथा, आप कई दस्तावेजों को खोने का जोखिम उठाते हैं. अनुसरण करने के चरणों के नीचे.
- अपने सैमसंग फोन सेटिंग्स तक पहुँचें> पर क्लिक करें ताला/सुरक्षा स्क्रीन
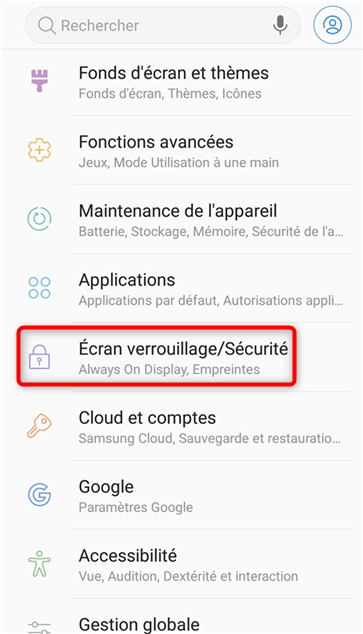
सुरक्षा सेटिंग्स तक पहुंच
- पर क्लिक करें सुरक्षित संचिका
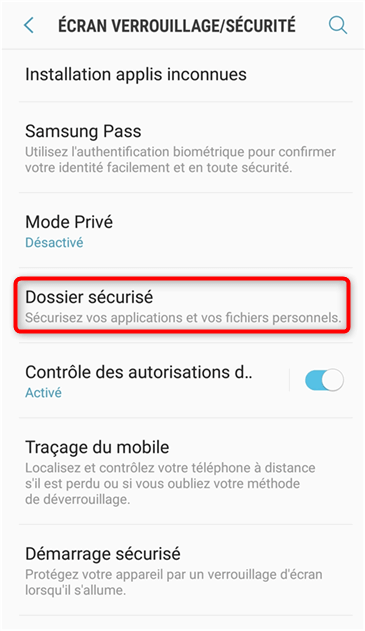
सुरक्षा सेटिंग्स तक पहुंच
- पर क्लिक करें सहेजें और बहाल करें
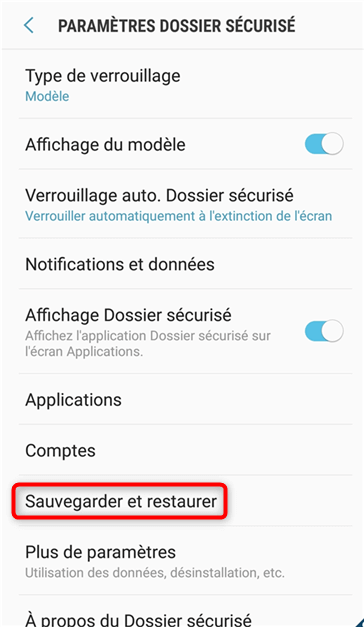
सुरक्षित बैकअप बैकअप टैब
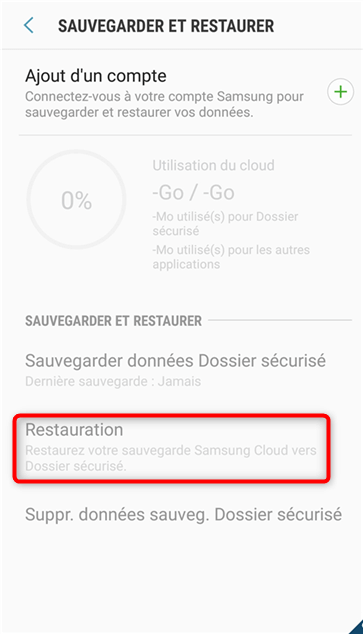
सुरक्षित फ़ाइल डेटा की वसूली
भाग 5: सैमसंग सुरक्षित फ़ाइल की हटाए गए फ़ोटो खोजें
आप शायद droidkit को डेटा एक्सचेंज सॉफ्टवेयर के रूप में जानते हैं. एक कंप्यूटर पर स्थापित, यह आपको एक USB केबल के माध्यम से एक लिंक के लिए एक फोन की सामग्री का प्रबंधन करने की अनुमति देता है. अपने नए अपडेट के साथ, इस कार्यक्रम में और भी अधिक विशेषताएं होंगी. नई विशेषताओं में, हम सुरक्षित फ़ाइल से डेटा खोजने की क्षमता का हवाला दे सकते हैं. Droidkit अपने सैमसंग को स्कैन करता है और अपने पीसी पर फ़ोल्डर की सामग्री डालने का प्रस्ताव करता है.
सबसे महत्वपूर्ण बात, DroidKit आपको डिवाइस से मौलिक रूप से हटाए गए डेटा या फ़ोटो को पुनर्प्राप्त करने की अनुमति देता है. यह कहना है कि Droidkit के साथ, आप हमेशा अपनी खोई हुई तस्वीरों को पुनर्प्राप्त कर सकते हैं, सैमसंग सुरक्षित फ़ाइल को नुकसान के बावजूद.
सुरक्षित या बैकअप फ़ाइल के सैमसंग पर हटाए गए फ़ोटो को पुनर्प्राप्त करने के लिए किए जाने वाले चरणों के नीचे:
- अपने विंडोज/मैक कंप्यूटर पर सही लॉन्च करें> विकल्प पर क्लिक करें गहरी वसूली
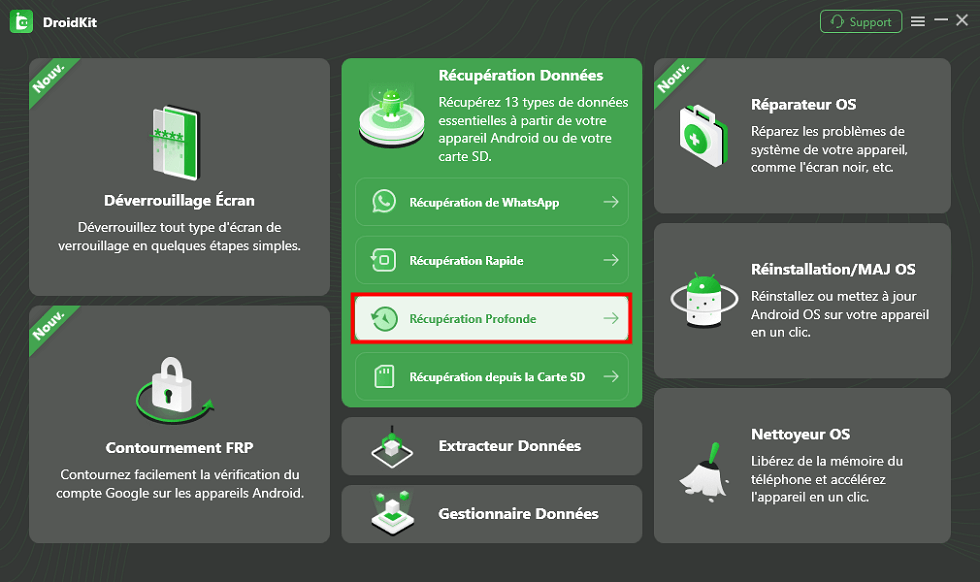
गहरी वसूली मॉड्यूल की पसंद
- सुरक्षित फ़ाइलों को पुनर्प्राप्त करने के लिए डेटा प्रकार (ओं) चुनें>आरंभ करना

पुनर्प्राप्त करने के लिए डेटा प्रकार चुनें
- अपने सैमसंग फोन को एक USB केबल के साथ कंप्यूटर से कनेक्ट करें> बटन पर क्लिक करें आरंभ करना
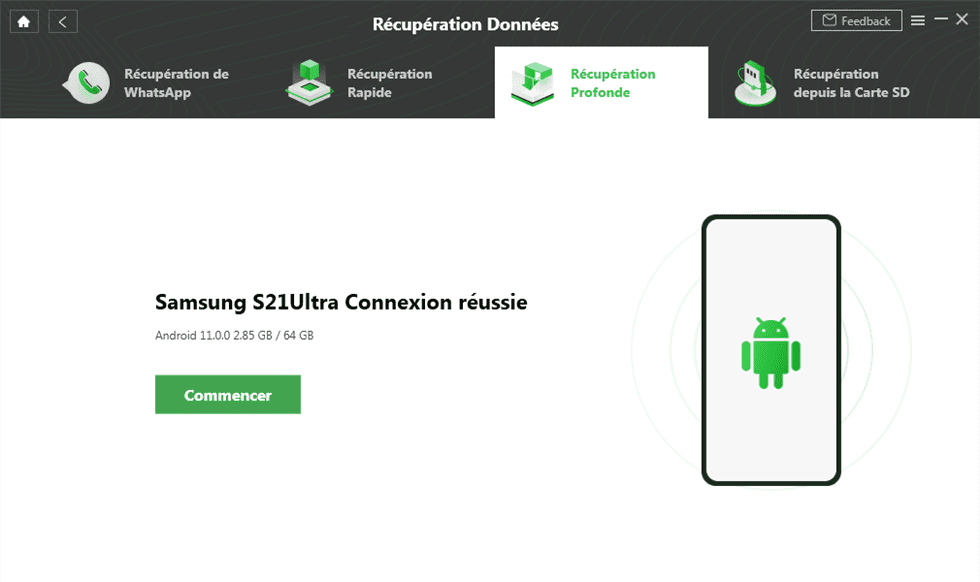
फोन और सॉफ्टवेयर के बीच कनेक्शन
- Droidkit स्वचालित रूप से आपके सैमसंग की मूल स्थिति की जांच करना शुरू कर देगा. यदि आपका फ़ोन रूट किया गया था, तो हम अगले चरण पर जाते हैं: डिवाइस से डेटा का विश्लेषण करें. अन्यथा, कृपया डिवाइस को रूट करने के लिए प्रदर्शित निर्देशों का पालन करें.
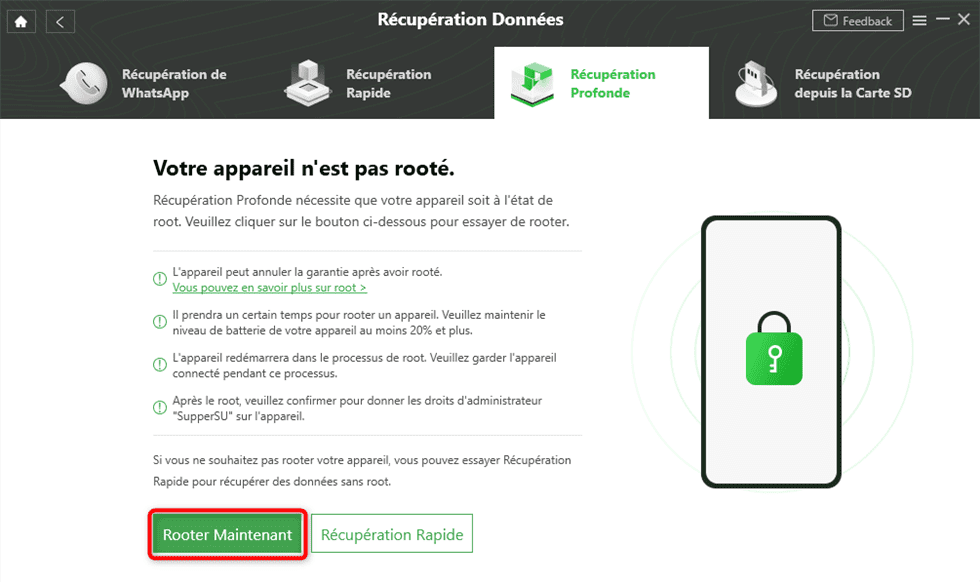
अब रूटर पर क्लिक करें
- विश्लेषण पूरा हो जाने के बाद, आप फिर फ़ोटो का पूर्वावलोकन कर सकते हैं और पुनर्प्राप्त करने के लिए लोगों का चयन कर सकते हैं> के बाद, बटन पर क्लिक करें उपकरण या पीसी से पीसी.
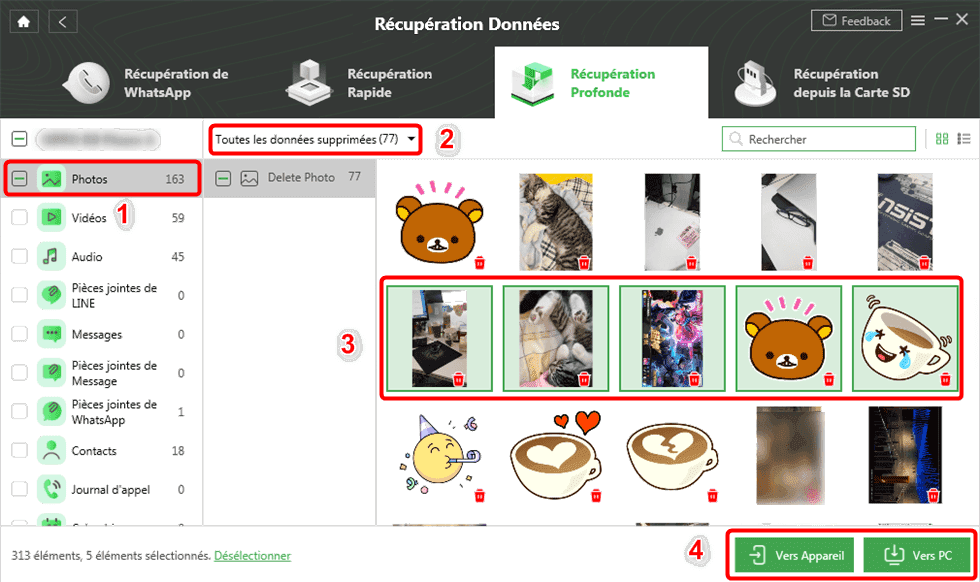
पुनर्प्राप्त करने के लिए फ़ोटो का चयन करें
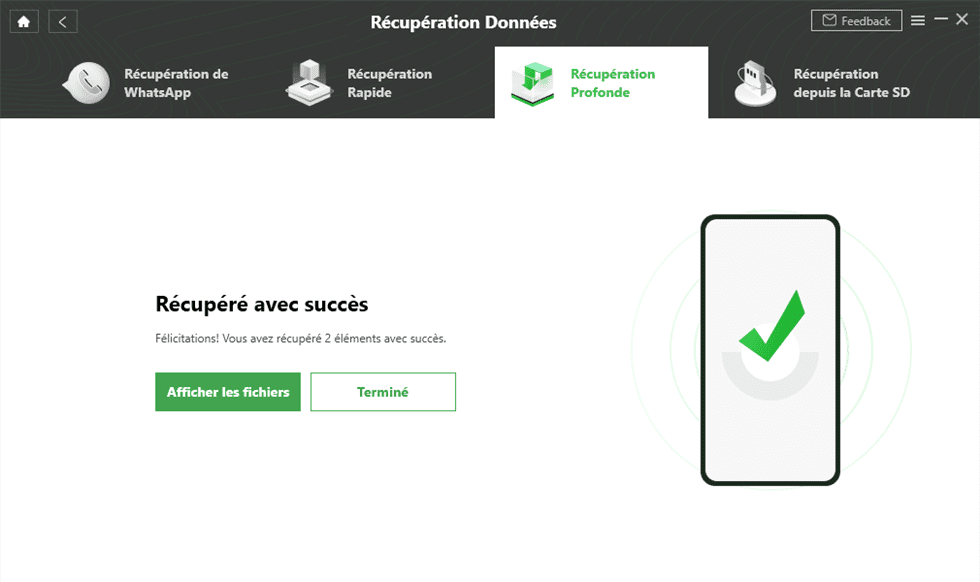
- आपने सुरक्षित फ़ाइल और सैमसंग स्टोरेज से अपनी हटाए गए फ़ोटो को सफलतापूर्वक पुनर्प्राप्त कर लिया है.
निष्कर्ष
अब आप सैमसंग की सुरक्षित फ़ाइल के बारे में सब कुछ जानते हैं. यह आपके गोपनीय दस्तावेजों को छिपाने का एक बहुत प्रभावी तरीका है. यदि आवश्यक हो, तो आप इसकी सामग्री को droidkit के माध्यम से प्रबंधित कर सकते हैं. यह डेटा रिकवरी के क्षेत्र में सबसे अच्छा विकल्प है.
Droidkit – सुरक्षित सैमसंग फ़ाइलों को पुनर्प्राप्त करें
- उच्चतम सफलता दर के साथ जल्दी से हटाए गए फाइलों को पुनर्प्राप्त करें.
- 13 प्रकार के डेटा समर्थित हैं, दैनिक कवर पर सभी आवश्यक हैं.
- पूर्वावलोकन और पुनर्प्राप्त करें जो आपको चाहिए.
- सभी ब्रांडों से 20,000 से अधिक एंड्रॉइड डिवाइस मॉडल के साथ संगत.
इमोबिया टीम के सदस्य, इंटेलिजेंट डिवाइस के कट्टरपंथी, Apple और Android से संबंधित पेशेवर समाधान खोजने और प्रदान करने के लिए भावुक हैं.
Android: एक लॉक किए गए फ़ोल्डर में अपने दस्तावेज़ों को कैसे सुरक्षित करें

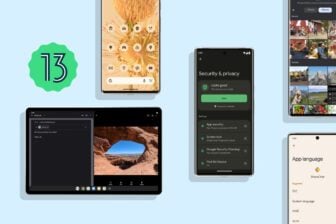
अपने स्मार्टफोन पर संग्रहीत महत्वपूर्ण दस्तावेजों को एक कोड का उपयोग करके एक एन्क्रिप्टेड डायरेक्टरी में संग्रहीत करके संग्रहीत करें.
अपने स्मार्टफोन पर महत्वपूर्ण फ़ाइलों को संग्रहीत करना जोखिम भरा जितना उपयोगी हो सकता है. यदि एक तरफ ये दस्तावेज किसी भी समय सुलभ रहते हैं जैसे ही आप अपना स्मार्टफोन अपने साथ रखते हैं, दूसरी तरफ, उनकी सुरक्षा सुनिश्चित करना हमेशा आसान नहीं होता है.
इस कारण से, एंड्रॉइड स्मार्टफोन निर्माताओं के अधिक से अधिक मूल रूप से अपने सबसे संवेदनशील दस्तावेजों को संग्रहीत करने के लिए एक सुरक्षित संग्रहण निर्देशिका बनाने के लिए एक विकल्प को एकीकृत करते हैं. यह मामला है, उदाहरण के लिए, सैमसंग टर्मिनलों पर.
कोरियाई निर्माता आपको एक कोड का उपयोग करके बंद एक एन्क्रिप्टेड निर्देशिका बनाने की अनुमति देता है सेटिंग्स> बायोमेट्रिक डेटा और सुरक्षा, जहां आपको विकल्प मिलेगा सुरक्षित संचिका.
दुर्भाग्य से, सभी स्मार्टफोन ऐसी कार्यक्षमता प्रदान नहीं करते हैं. हालांकि, आप एक तीसरे -पकाने वाले समाधान की ओर मुड़ सकते हैं जो इस कमी को भर देगा. यह क्या है Google फ़ाइलों द्वारा, Google का फ़ाइल प्रबंधक, जो एक सुरक्षित फ़ोल्डर विकल्प प्रदान करता है. यहां बताया गया है कि इसे अपने कीमती दस्तावेजों को शरण देने के लिए कैसे रखा जाए.
वीडियो पर भी खोजने के लिए:
1. Google द्वारा फ़ाइलें डाउनलोड करें
यदि पहले से नहीं किया गया है, तो एप्लिकेशन डाउनलोड करें Google फ़ाइलों द्वारा अपने Android स्मार्टफोन पर. यह फ़ाइल प्रबंधक जिसकी प्रतिष्ठा अब नहीं की जानी है, विशेष रूप से आपके डिवाइस के भंडारण में सफाई करने के लिए, एक सुरक्षित फ़ोल्डर बनाने के लिए एक विकल्प को एकीकृत करने के अलावा, सुविधाओं की एक भीड़ प्रदान करता है.
2. एप्लिकेशन कॉन्फ़िगर करें
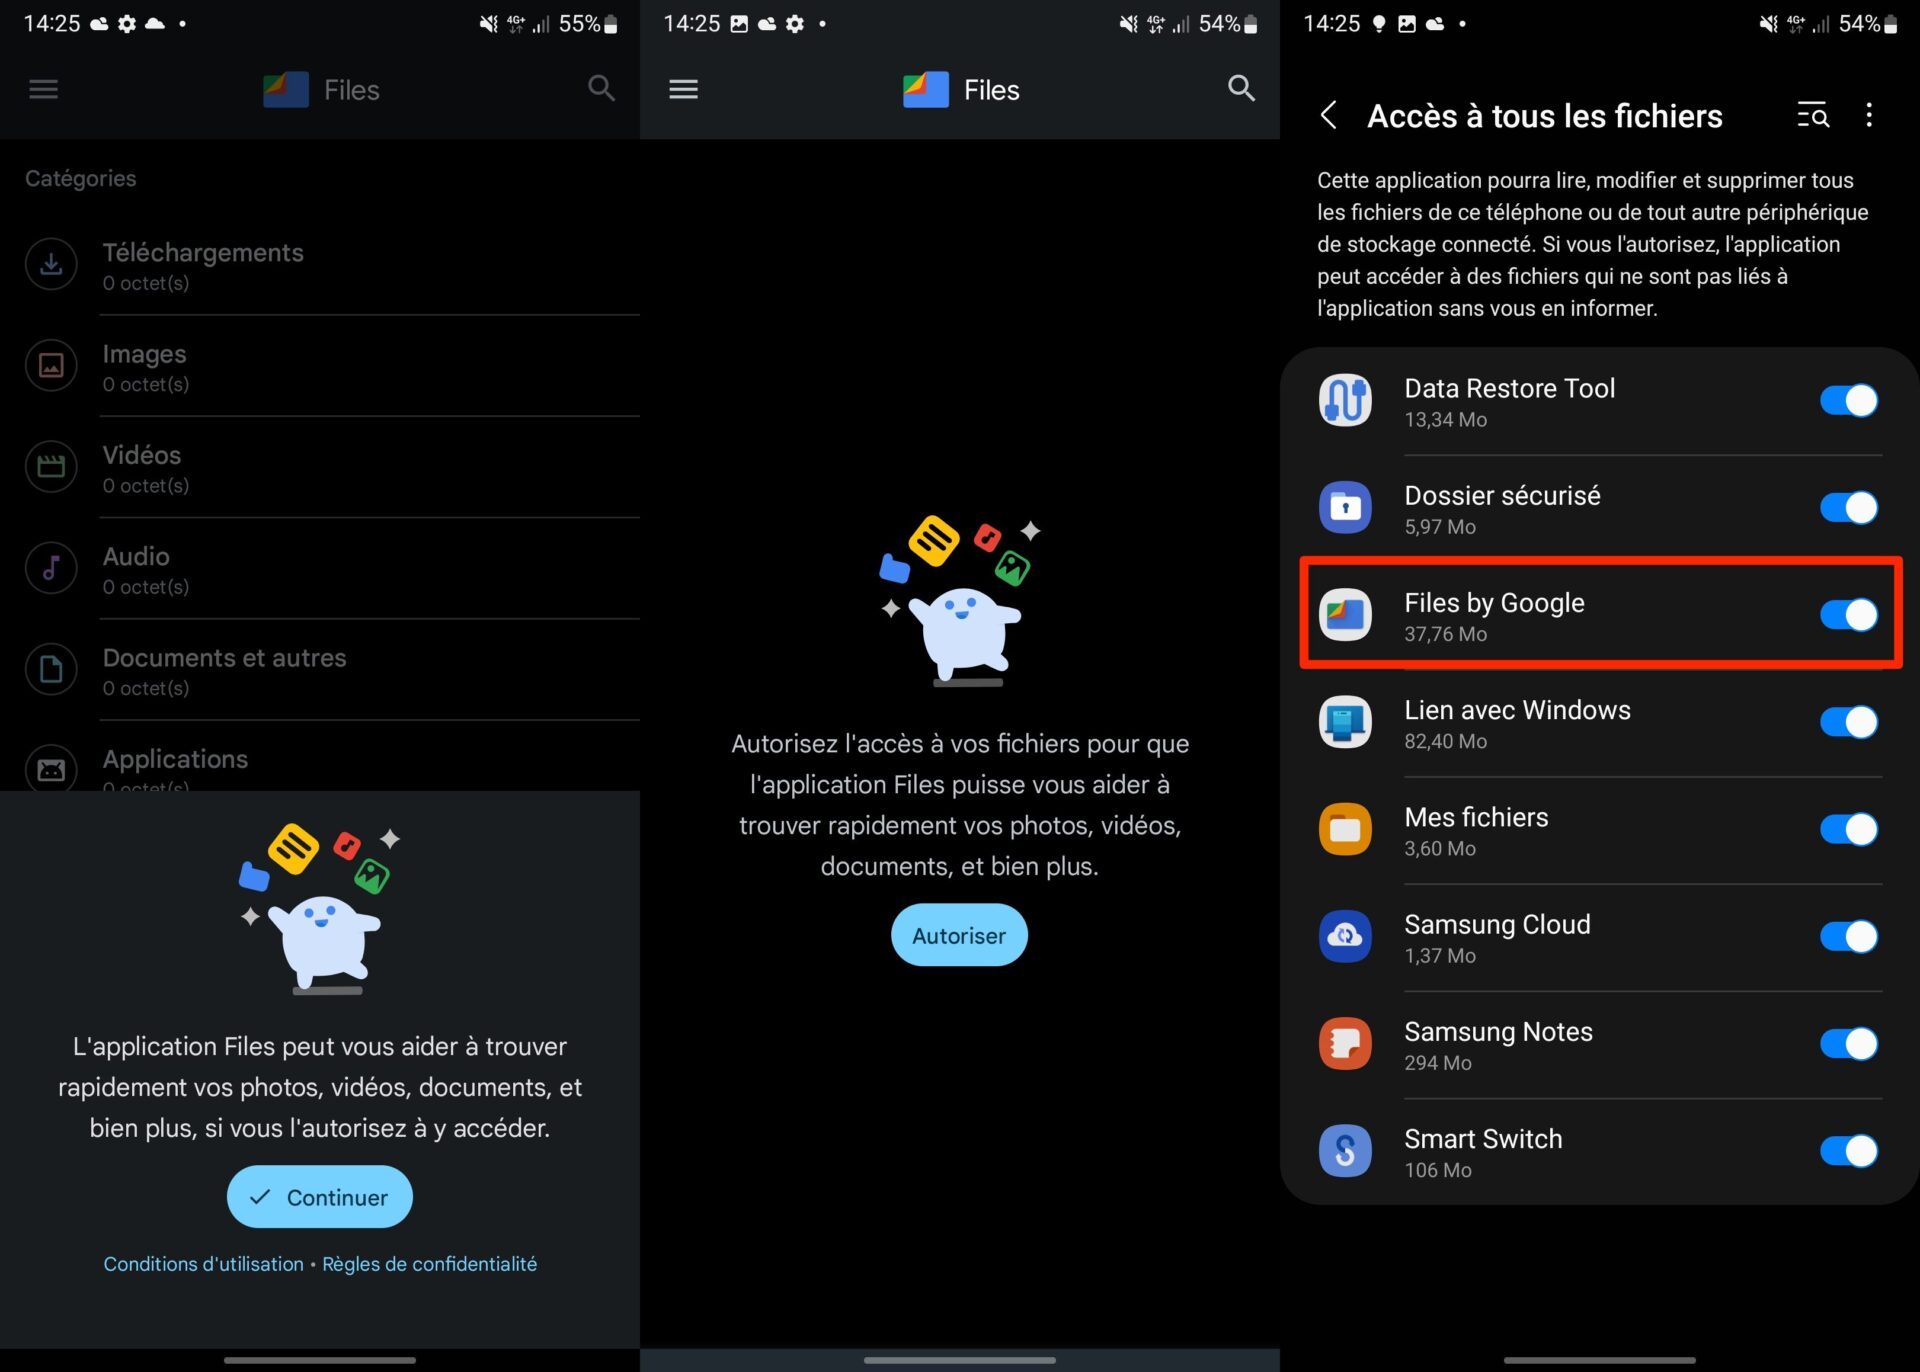
यदि तुम प्रयोग करते हो Google फ़ाइलों द्वारा पहली बार, आपको पहले अपने स्मार्टफोन से डेटा तक पहुंचने के लिए एप्लिकेशन को अधिकृत करना होगा. ऐसा करने के लिए, खोलें Google फ़ाइलों द्वारा और बटन दबाएं जारी रखना उद्घाटन पॉप-अप में प्रदर्शित.
उसके बाद चुनोअनुमति देने के लिए अपनी फ़ाइलों तक पहुंच, फिर सभी फ़ाइलों तक प्राधिकरणों तक पहुंचने के लिए समर्पित पृष्ठ में, संलग्न बटन को सक्रिय करें Google फ़ाइलों द्वारा एप्लिकेशन को अपने स्मार्टफोन पर संग्रहीत फ़ाइलों तक पहुंचने के लिए प्राधिकरण देने के लिए, फिर एप्लिकेशन के एप्लिकेशन पेज पर लौटें
3. अपनी सुरक्षित फ़ाइल बनाएँ
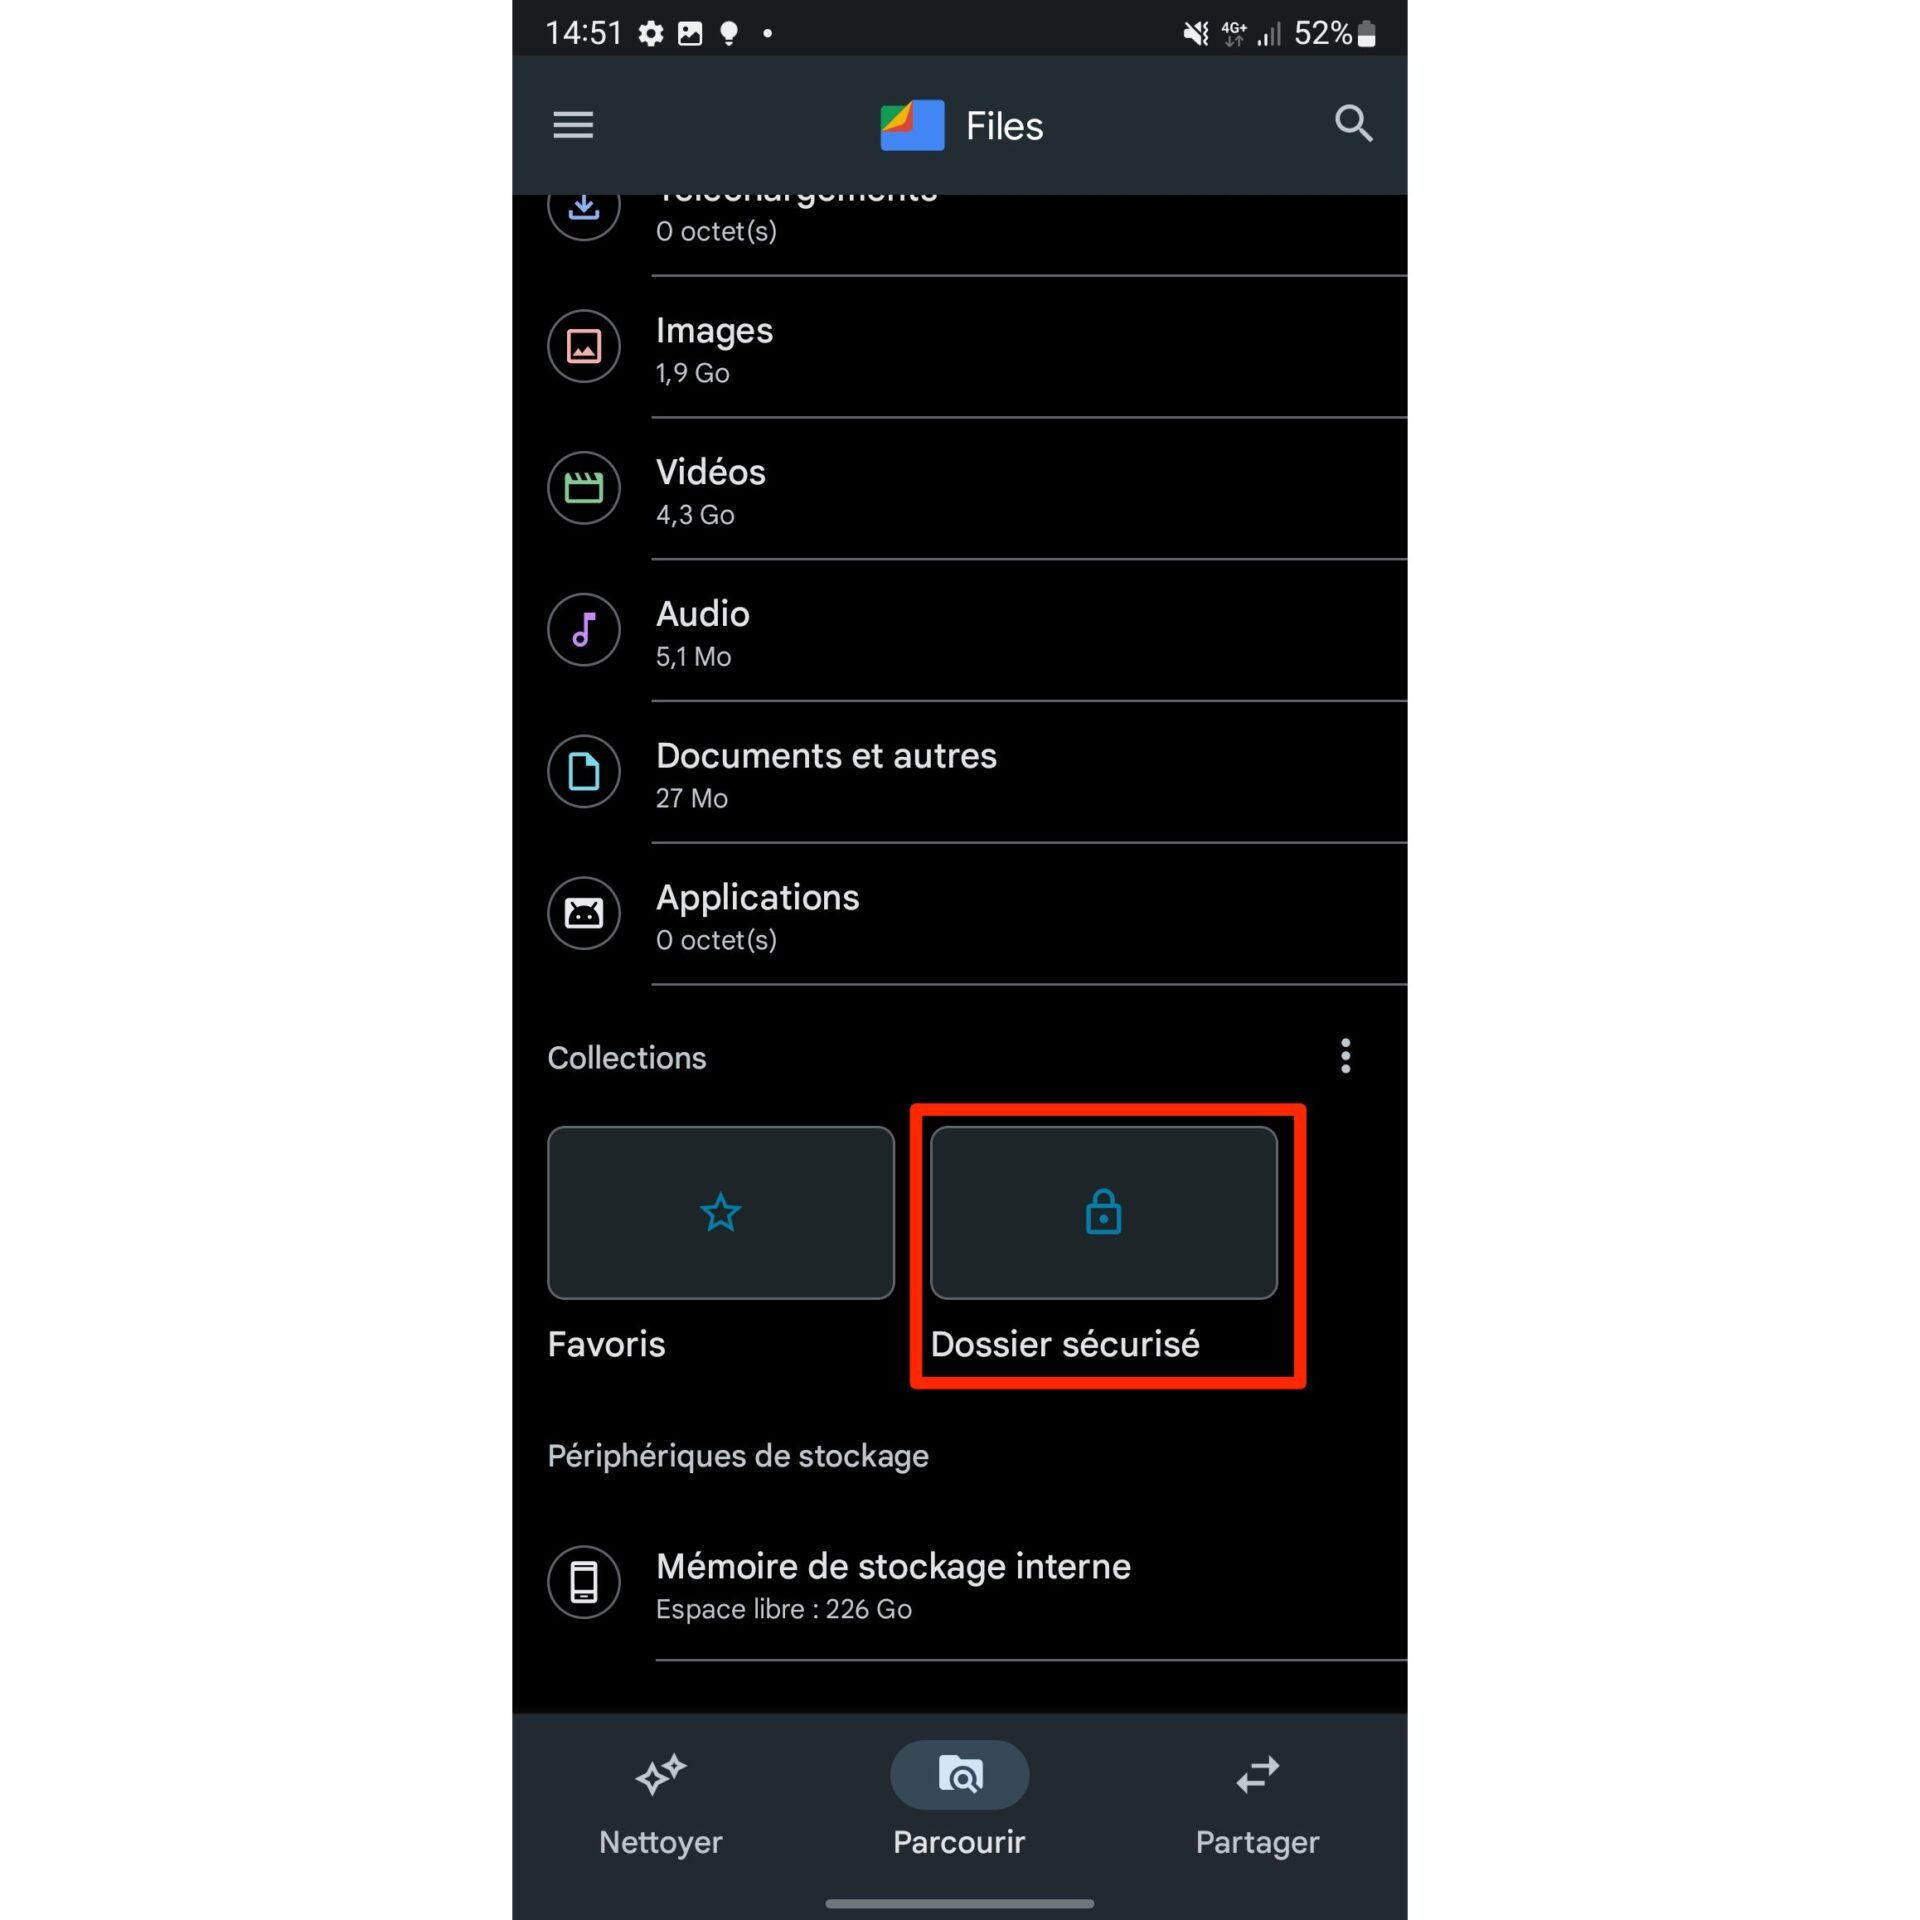
के मुख्य पृष्ठ पर वापस Google फ़ाइलों द्वारा, प्रदर्शित श्रेणियों को नीचे स्क्रॉल करें, फिर शीर्षक संकलन के तहत, दबाएं सुरक्षित संचिका.
पेज पर एक लॉकिंग चुनें कौन प्रदर्शित किया गया है, जिस लॉकिंग मोड का उपयोग आप अपनी सुरक्षित फ़ाइल के लिए करना चाहते हैं: कोडित या योजना. आपने जो कुछ भी चुना है, उसके आधार पर, अपने कोड या लॉकिंग आरेख को परिभाषित करें, इसे दूसरी बार फिर से करें और इसे मान्य करें.
चयनित लॉकिंग मोड जो भी हो, दोनों मामलों में आपकी फाइलें खो जाएंगी यदि आप अपना कोड या लॉकिंग आरेख भूल जाते हैं.
4. अपने महत्वपूर्ण दस्तावेजों को स्थानांतरित करें
के होम पेज पर वापस जाएं Google फ़ाइलों द्वारा और उन विभिन्न निर्देशिकाओं का पता लगाएं जिनमें आपके दस्तावेज़ संग्रहीत हैं. अपने सुरक्षित फ़ोल्डर में एक दस्तावेज़ को स्थानांतरित करने के लिए, अपनी फ़ाइल की लाइन पर प्रदर्शित विकल्प बटन (तीन छोटे बिंदुओं द्वारा दर्शाया गया) दबाएं, फिर इसे सुरक्षित फ़ोल्डर में स्थानांतरित करने के लिए चुनें. फिर अपने दस्तावेज़ के आंदोलन की पुष्टि करने के लिए अपना कोड या लॉकिंग प्लान दर्ज करें.
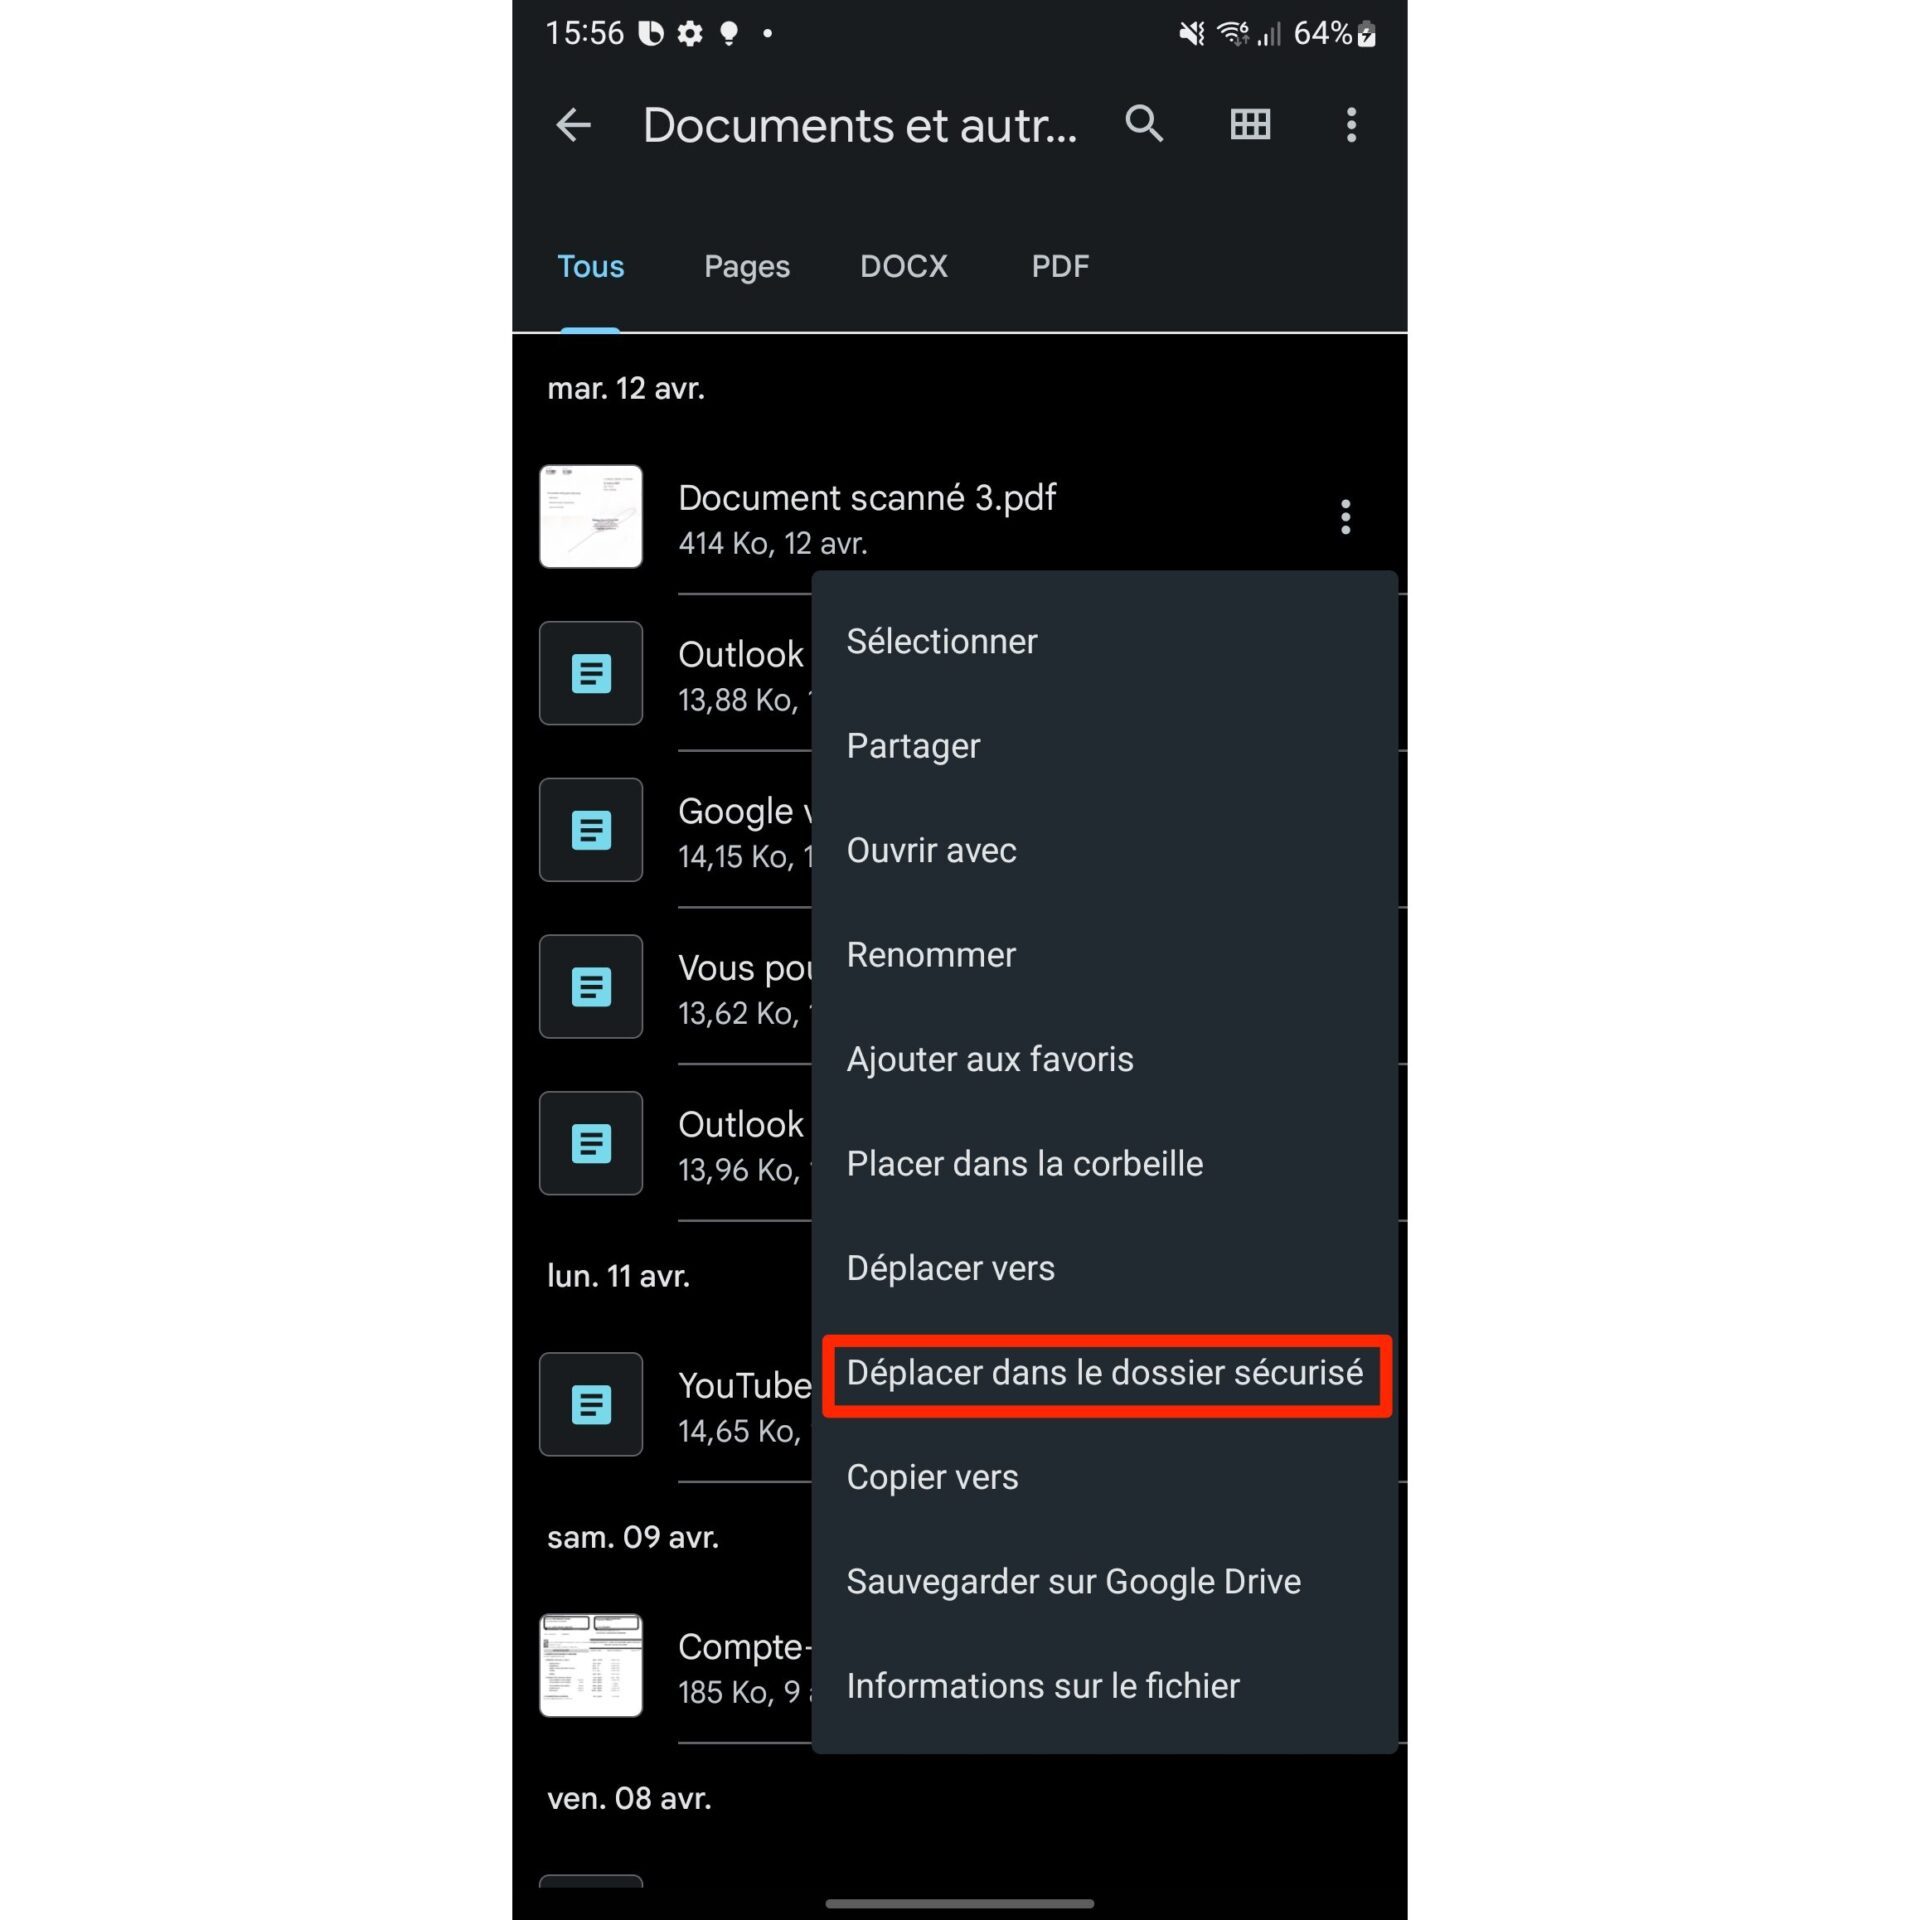
उन सभी दस्तावेजों के लिए ऑपरेशन को कई बार दोहराएं जिन्हें आप सुरक्षित फ़ाइल में संग्रहीत करके सुरक्षा करना चाहते हैं.
ध्यान, ध्यान रखें कि आवेदन का विलोपन Google फ़ाइलों द्वारा आपका स्मार्टफोन सुरक्षित फ़ोल्डर में संग्रहीत दस्तावेजों को हटा देगा, उन्हें पुनर्प्राप्त करने की संभावना के बिना.


 Ilyass बैरी – 26 जून, 2023
  मैं आपके साथ अपने बुरे अनुभव b नया एस्ट्रा साझा करता हूं . महीनों में खरीदी गई कार 10/22 में मुझे कैमरे की समस्याओं को समायोजित करने के लिए 360 और एयर कंडीशनिंग को समायोजित करने के लिए -Sales सेवा से लगभग 9 बार स्थानांतरित करने के लिए मजबूर किया गया था और अब मैं एक एनवी समस्या के सामने हूं: कॉकपिट और स्क्रीन जो अपने आप बंद हो जाती है . हैची कामेल और याला वास्लाह डब्ल्यू 5900 किमी वास्तव में मैं निराश हूं .
 WAFA HH – 22 फरवरी, 2022
  लेई राम – 23 फरवरी, 2022